Nomadix EG 6000 Quick Start Manual Download Page 5

EG


6000


Q

UICK 

S

TART 

G

UIDE


February 2020B  

Information subject to change without notice. 

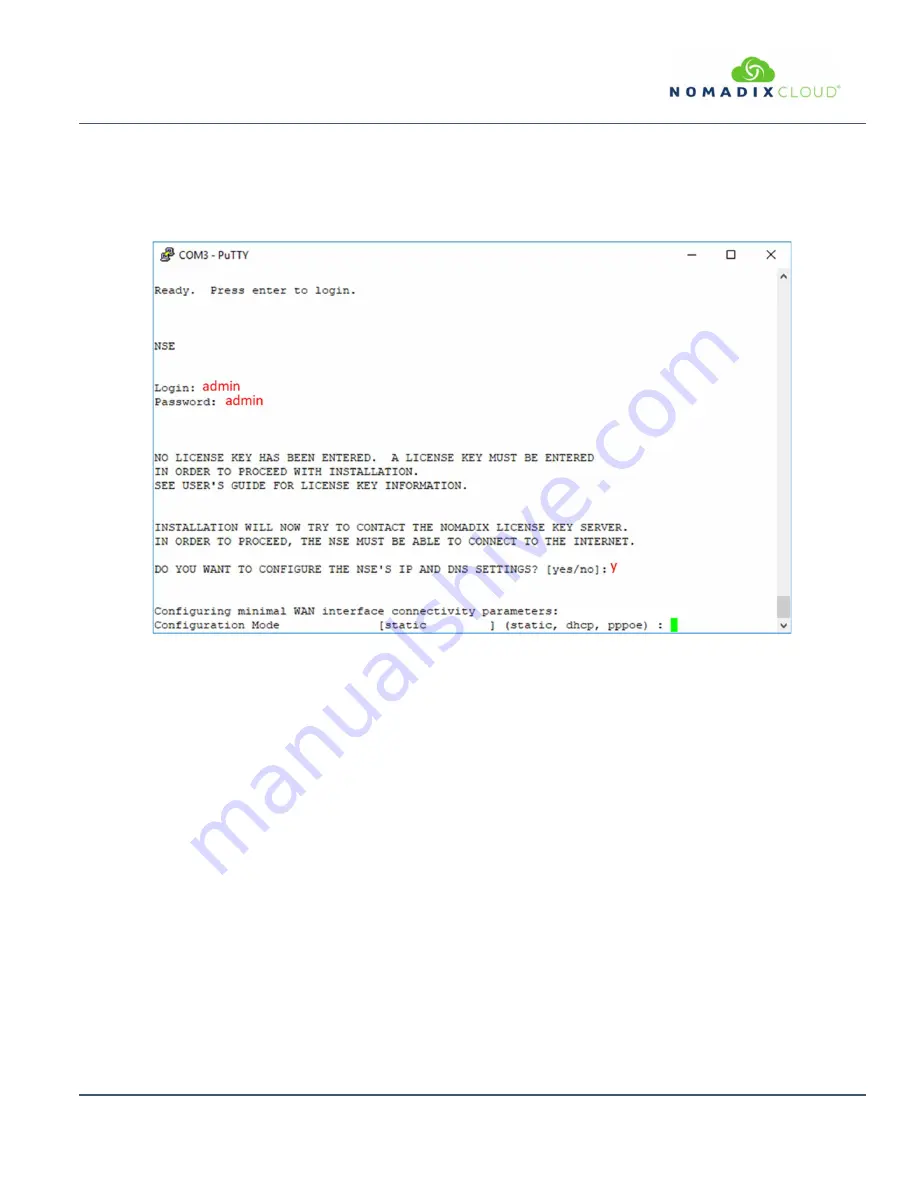
Initial (startup) Configuration 

Log in to the Gateway, by opening an SSH to 172.30.30.172 or the asynchronous comm port, using the default 

Login= 

admin

 and 

password= 

admin

.

 Type 

y

[es] when prompted to configure settings. 


The initial minimal WAN port configuration mode will be displayed as shown in 

Figure 1

.


Figure 1: 

Initial minimal WAN port configuration. 

Select the desired configuration mode and use the following steps to configure the WAN port for either Static IP, DHCP client or 
PPPoE. 


Summary of Contents for EG 6000

Page 1: ...g on what was ordered Included with the EG 6000 Qty Description Comments 1 1 8m U S NEMA 5 15p Power Cord Type B United States Canada Mexico and Japan Other countries are sold separately 1 19 Rack Mount Brackets Kit and screws 1 Bumper Kit for desktop installations optional Items available separately Part Number Description Console Cable 715 4001 001 1 8m USB to DB9 Console Cable1 Country Specific...

Page 2: ...ews position the EG 6000 in the rack and secure to the vertical rails EG 6000 4 Connect the AC mains power cord 5 The Gateway is now ready for initialization Initializing the Gateway There are 2 methods to initialize start up the Gateway most common is via the WAN Ethernet port or alternatively by using the asynchronous USB the console port both configurations are depicted below Ethernet Port Conn...

Page 3: ...artup Configuration Asynchronous Console Port Connection On the PC laptop start the asynchronous terminal emulation application using PuTTY Hyperterm Procomm or equivalent application using the following configuration parameters for the comm port Table 2 Bits Per Second Data Bits Parity Stop Bits Flow Control 9600 8 NONE 1 NONE Table 2 Comm port settings On the EG 6000 the console port is on the U...

Page 4: ...dy to configure the configure the Gateway s WAN for a static IP address DHCP Client or PPPoE client using appropriate configuration guidelines that follow in order to obtain the license key Go to Initial startup Configuration Once the key has been obtained the web management interface WMI can be used to continue and finish the configuration ...

Page 5: ...synchronous comm port using the default Login admin and password admin Type y es when prompted to configure settings The initial minimal WAN port configuration mode will be displayed as shown in Figure 1 Figure 1 Initial minimal WAN port configuration Select the desired configuration mode and use the following steps to configure the WAN port for either Static IP DHCP client or PPPoE ...

Page 6: ...ation Accept static as the default configuration mode and enter the following mandatory settings shown in Figure 2 Figure 2 Initial WAN port settings A WAN port summary page will then be displayed as shown in Figure 3 Figure 3 WAN port static IP configuration summary page ...

Page 7: ...ion Step 1b DHCP Client Configuration Type d hcp for the configuration mode as shown in Figure 4 Figure 4 Selecting DHCP Client for WAN configuration A WAN port summary page will then be displayed as shown in the example Figure 5 Figure 5 WAN port DHCP client configuration summary page If everything is correct in the summary type b ack to return to the previous menu and proceed to Step 2 to enter ...

Page 8: ... prompted Enter the following mandatory settings for a PPPoE connection with dynamic PPP IP configuration shown in Figure 6 Figure 6 Selecting PPPoE with dynamic IP configuration A WAN port summary page will then be displayed as shown in Figure 7 Figure 7 WAN port PPPoE client configuration summary page ...

Page 9: ...menu to display or make changes to the WAN port settings When finished with the settings type b ack to return to the previous menu and proceed to Step 2 to enter the location information Step 2 Entering Your Location Information You will be required to enter location information to obtain the license key Enter the following mandatory location information details shown in Figure 8 Figure 8 Site loc...

Page 10: ...ple To establish various billing and authentication methods see Defining the AAA Services To establish hotel billing see Assigning a PMS Service Step 5 Configuring EG DHCP Server Settings DHCP Server is enabled by default To configure the DHCP Server go to DHCP under the Configuration menu You can either modify the default DHCP pool or delete add another DHCP pool The total lease pool size recomme...

Page 11: ...End IP Address 10 0 0 72 DHCP Lease Minutes 1440 Table 3 DHCP server configuration Sample Network Setup An example of a basic network including the Edge Gateway is shown in Figure 10 Figure 10 Example of a network setup Additional Documentation Additional Product documentation can be found at http www nomadix com technical support documentation Nomadix Product Documentation ...

Reviews: