background image

Nokia HA-140W-B admin manual 


LAN clients (admin account) 


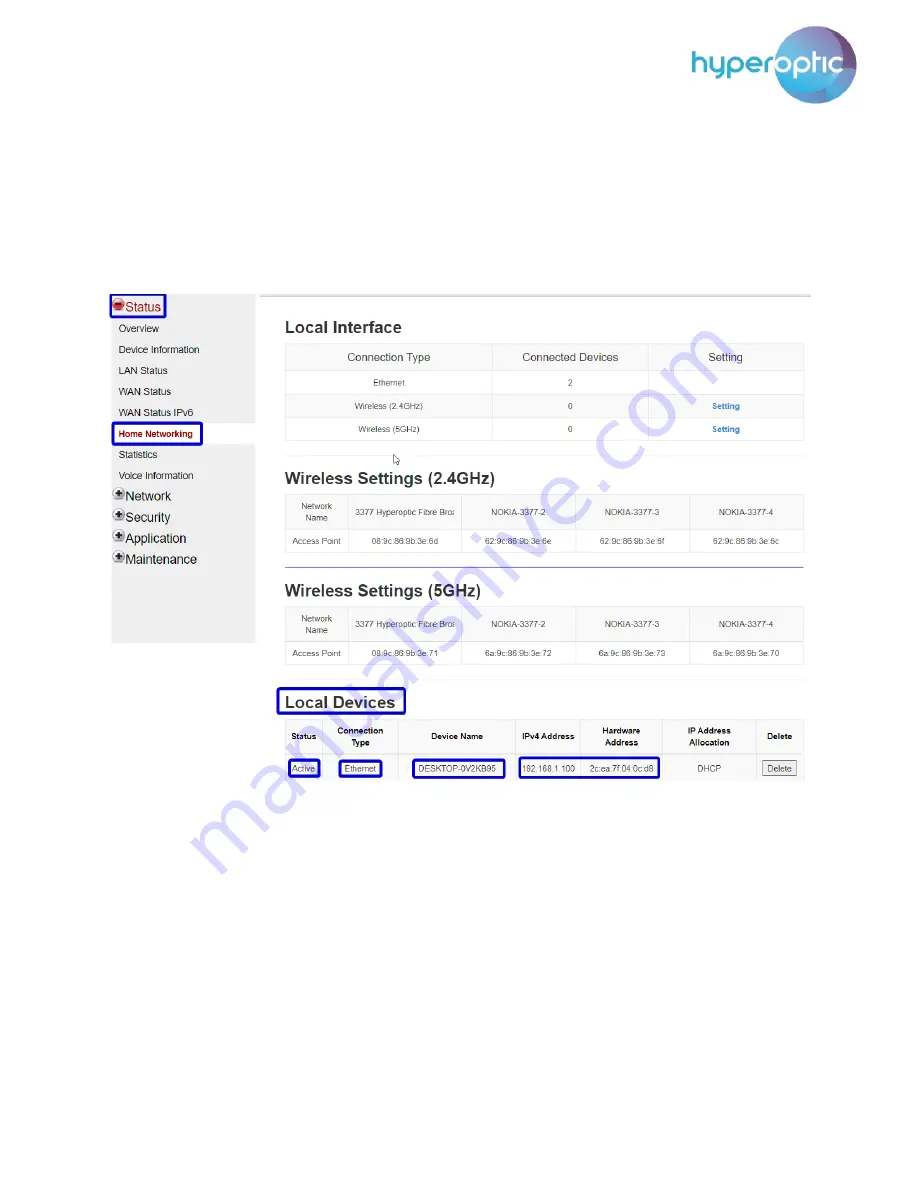
To  check  the  number  of  LAN  clients  connected,  log  into  your  router  (page  2).  To  check  leased  IPv4 
addresses and to check which clients are connected via ethernet or via Wi-Fi, navigate to section 

Status > 

Home Networking

 (see image 4). The 

Local Devices

 section will show all connected devices (i.e. all devices 

using the 

router’s 

Wi-Fi and/or Ethernet network). The list of connected devices is  refreshed every 60 

seconds. 


Image 4. List of WLAN and Ethernet LAN clients 


Summary of Contents for HA-140W-B

Page 1: ...e admin account 6 Creating disabling and changing settings for SSIDs admin account 8 Wi Fi channel change admin account 10 Wi Fi security admin account 12 WPS connection admin account 13 Change of admin credentials admin account 14 Reboot and Factory Reset admin account 16 USB storage admin account 18 Port forwarding admin account 20 DMZ admin account 22 DHCP Binding Admin account 23 ...

Page 2: ...pen a web browser such as Google Chrome Microsoft Edge Mozilla Firefox Opera or any similar application Type 192 168 1 1 in the address bar of the browser Image 1 illustrates the window that will appear on screen In the Username field type admin In the Password field type the password as it appears on the back of your router Once all fields are populated click Login button Image 1 Router HA 140W B...

Page 3: ...roptic DNS servers These servers communicate directly with the WAN ethernet router port and provide means for swift browsing To define specific DNS use fields Primary DNS and Secondary DNS In these fields enter the IPv4 address of your desired server e g 8 8 8 8 or 8 8 4 4 and click Save Click OK in the pop up window to confirm router reboot and settings change Image 2 Specifying DNS servers for L...

Page 4: ...see image 3 UPnP can be used for easier and more convenient router configuration from an LAN client app PortMapper Windows application is one example of such an app If no UPnP application is used UPnP should be unticked The default UPnP setting is unticked Please bear in mind that after a router reboot or factory reset any changes made via UPnP will be removed from router configuration Image 3 Ena...

Page 5: ...esses and to check which clients are connected via ethernet or via Wi Fi navigate to section Status Home Networking see image 4 The Local Devices section will show all connected devices i e all devices using the router s Wi Fi and or Ethernet network The list of connected devices is refreshed every 60 seconds Image 4 List of WLAN and Ethernet LAN clients ...

Page 6: ...ID i e the name of your Wi Fi network and or Wi Fi password log into your router page 2 and go to Network Wireless 2 4GHz see image 5 or Network Wireless 5GHz see image 6 SSID name and WPA Key can be changed as desired Don t forget to click Save Image 5 Configuration of 2 4GHz Wi Fi parameters ...

Page 7: ...Nokia HA 140W B admin manual 7 Image 6 Configuration of 5GHz Wi Fi parameters ...

Page 8: ...nu of field SSID Select Once new SSID is selected you can change the name in the SSID Name field You can set the password for that specific SSID in the WPA Key field The SSID needs to be enabled by selecting the Enable option from the Enable SSID dropdown menu If the SSID needs to be disabled select Disable from the Enable SSID dropdown menu Don t forget to click Save See image 7 Image 7 Creation ...

Page 9: ...SSID is selected you can change the name in the SSID Name field You can set the password for that specific SSID in the WPA Key field The SSID needs to be enabled by selecting the Enable option from the Enable SSID dropdown menu If the SSID needs to be disabled select Disable from the Enable SSID dropdown menu Don t forget to click Save See image 8 Image 8 Creation and modification of new 5GHz SSID...

Page 10: ...rongly recommend keeping the automatic channel selection as is but should you wish to change it manually you can To change the operating channel of the 2 4GHz Wi Fi network log into your router page 2 and go to Network Wireless 2 4GHz In the Channel field select your chosen channel from the dropdown menu e g 11 Don t forget to click save See image 9 Image 9 Channel change in 2 4GHz Wi Fi band ...

Page 11: ...nce on the 5GHz Wi Fi network select 80MHz in the Bandwidth field After Bandwidth parameter is chosen from the dropdown menu select channel from the section Channel e g 36 See image 10 Click Save to apply changes Image 10 Channel change in 5GHz Wi Fi band ...

Page 12: ... Network Wireless 2 4GHz Types of encryption parameters are seen in image 11 After selecting an Encryption Mode from the drop down menu click Save By default an advanced encryption algorithm is used Similar settings exist in Network Wireless 5GHz section of router web UI We strongly recommend using only WPA2 AES for 2 4GHz and 5GHz Image 11 Encryption types per SSID ...

Page 13: ...ur Wi Fi network without a password log into your router page 2 and go to Wireless 2 4GHz or Wireless 5GHz Enable WPS See image 12 For WPS Mode select PBC and click WPS Connect button After few seconds press the WPS button on the LAN device and they ll connect Image 12 Connecting LAN clients via WPS ...

Page 14: ...ccount To change the router admin login password log into your router page 2 and go to Maintenance Password See image 13 You can find the original password on the router itself After entering and re entering the new password click Save Image 13 Changing admin password ...

Page 15: ...Nokia HA 140W B admin manual 15 After the password s been changed you ll see a confirmation screen see image 14 Image 14 Confirmation that password is changed successfully ...

Page 16: ...ory Reset admin account To reboot your router log in page 2 and go to Maintenance Reboot Device Click on Reboot see image 15 Image 15 Reboot and Factory reset buttons Confirm the reboot by clicking OK see image 16 Image 16 Confirmation of rebooting ...

Page 17: ...tory Default see image 17 Please avoid using factory reset often as it can shorten the life of a router Please also bear in mind that factory reset will override any of your personalised or previously saved settings Image 17 Factory Default button Confirm the factory reset by clicking OK see image 18 Image 18 Confirmation of factory reset ...

Page 18: ...rver to allow access from LAN clients Set FTP password and username in appropriate fields To allow access from the internet side tick Enable SFTP Server and Enable SFTP for Remote Access Set appropriate password and username for SFTP service Click Save see image 19 Image 19 Enabling FTP access to USB flash Access to USB flash drive from LAN can be seen in image 20 FTP communicates over TCP port 21...

Page 19: ...Nokia HA 140W B admin manual 19 Access to USB flash drive from WAN can be seen image 21 SFTP communicates over TCP port 2122 Image 21 Access to USB flash drive via FileZilla client app from WAN ...

Page 20: ...settings for Application Name line In the WAN Port field set an arbitrary port on WAN interface of a router e g TCP port 12001 All requests coming to the server from the internet side will have a destination IP address of the router itself and a destination port as listed in WAN Port fields For LAN port fields list the port on which the LAN client server app is running in this case TCP port 8008 S...

Page 21: ...AN ports are the same Please also note that ports TCP 8080 and 443 should never be used on WAN as these ports are reserved for Hyperoptic Ltd remote management If you d like to use these ports on your server in a LAN then you can use different ports on WAN as shown in Image 22 e g you can use ports on WAN 12000 12001 and map them to LAN ports 8080 443 respectively A list of commonly used ports can...

Page 22: ...fected by a router s firewall Placing LAN devices in DMZ can therefore pose an IT security risk and this action should be taken with caution If a LAN device needs to be placed in a demilitarized zone log into your router page 2 and go to Security Firewall as seen in image 26 Select Advanced option for Security Level Click Save to apply settings ...

Page 23: ...ge 26 Setting Firewall level to Advanced Now go to Security DMZ and ALG see image 27 Select LAN client from the DMZ IP Address dropdown menu Tick Enable DMZ and click Save DMZ Image 27 Putting LAN client in DMZ DHCP Binding Admin account ...

Page 24: ...fine which LAN client will have which IPv4 address DHCP binding must be completed To do this log into your router page 2 and go to Network LAN Enter the MAC address of the LAN client and the desired IPv4 address Click Add button to make changes See image 28 Image 28 Configuration of Static DHCP binding ...

Reviews: