


ENGLISH
Attach the grounding wire
To attach the grounding wire to the
mounting bracket, place the
connector of the wire under the nut
(20), and tighten the bolt to lock the
wire firmly in place.
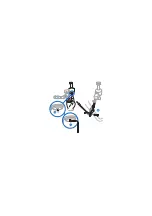
Mount the charger and mobile device
Attach the charger to the
handlebar
To attach the charger and your Nokia
mobile device to the handlebar, use
the supplied Nokia Phone Holder for
Bicycles CR-124.
Place the holder on the top and the
charger on the bottom of the
handlebar (21). Thread the straps of
the holder through the slots at the
charger (22).
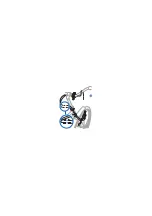
Connect the cables
To connect the charger cables to the
electric wire attached to the dynamo
and the grounding wire attached to
the mounting bracket, press the ends
of the corresponding cables and wires
into each other (23).
Attach the electric and grounding
wires to the head tube with the
supplied removable cable ties.
Make sure the charger is properly
mounted (24).
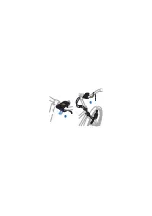
Attach the mobile device to the
handlebar
Place the mobile device over the
holder. Carefully stretch the holder
straps, and thread them around the
top and rear sides of the mobile device
(25). Make sure the mobile device
stays firmly in place and is properly
mounted (26).
Summary of Contents for DC-14
Page 1: ...Nokia Bicycle Charger DC 14 9222639 1 0 11 1 2 3 10 9 6 7 8 4 5 ...
Page 2: ...12 13 ...
Page 3: ...14 15 ...
Page 4: ...16 17 ...
Page 5: ...20 18 19 ...
Page 6: ...22 21 ...
Page 7: ...23 ...
Page 8: ...24 ...
Page 9: ...26 25 ...
Page 10: ...28 27 ...