


INSTALACIÓN_INSTALLATION_INSTALLATION
4
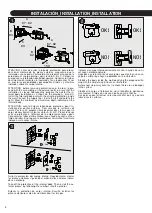
ATENCIÓN: antes de quitar la tapa de protección, para proce-
der con el montaje de las piezas externas, asegurarse que la
instalación sea cerrada. Posteriormente; preparar el hueco de la
pared para el cuerpo interno según la cota A, B y C. Colocar el
cuerpo con su protección dentro del agujero. Conectar los tubos
de alimentación (caliente a la izquierda y fría a la derecha). Tener
en cuenta las profundidades por empotrar mínimas y máximas
indicadas sobre el cuerpo interno.
ATTENTION: before removing protection cap, in order to pro-
ceed with the assembling of the external parts, be sure that the
installation is closed. Subsequently; prepare the wall for the in-
ternal body installation as it shows on the drawing A, B and C.
Install the internal body part with the attached protection inside
the wall. Connect the supply lines (hot to the left and cold to the
right). Meet the minimum and maximum depth indicated on the
internal body.
ATTENTION: avant d’enlever labonde de protection, pour l’in-
stallation des parties externes, S’assurer que le système soit
fermé. Par la suite; préparer l’emplacement dans le mur pour le
corps d’encastrement selon les cotes A, B et C. Placer le corps
avec sa protection à l’intérieur de lá emplacement prévu pour.
Connecter les tubes d’alimentation (eau chaude à gauche et eau
froide à droite). Envisager à la profondeur minimale et maximale
indiquée sur le corps interne.
Quitar la protección del cuerpo interno. Seguidamente, montar
las piezas exteriores siguiendo el orden de los números indica-
Take off the protection of the internal body. Then install the ex-
ternal pieces, by following the numbers into the pictures.
Enlever la protection du corps interne. Ensuite installer les
pièces extérieures selon les nombres dans les images.
Colocar el cuerpo interno correctamente con la ayuda de un ni-
vel segùn el dibujo adjunto.
Llegados a este punto Les aconsejamos que efectùen un ensa-
yo para
verificar
que haya no pérdidas en la instalación.
Stabilize the body inside the wall identifying the proper positio-
ning with the help of a spirit level, as illustrated.
Before next step carry out a test to check there are no leakages
in the system.
Stabiliser le corps à l’intérieur du mur
d’identifier
le positionne-
ment correct à l’aide d’un niveau à bulle, comme l’illustre.
A ce point on peut effectuer un test pour
vérifier
qu’il n’y a pas de
fuites dans le système.
A
67-82
B
84
C
60
A
67-82
B
82
C
150
OK!
OK!
NO!
NO!
dos en al dibujo.
2,5mm
1
2
3
4
5
2,5mm
1
2
3
4
5
6