Noitom Perception Neuron 3 User Manual Download Page 12

Page | 11  


4.  Sensor Setup 

The following step is recommended to perform before each motion capture session. Charge the 
PN3 sensors prior to beginning the following steps.  

Note: Do not perform sensor initialization immediately after a full charge, allow sensors to cool down. This 
is an important step to allow any magnetic field built-up during the charging to dissipate 

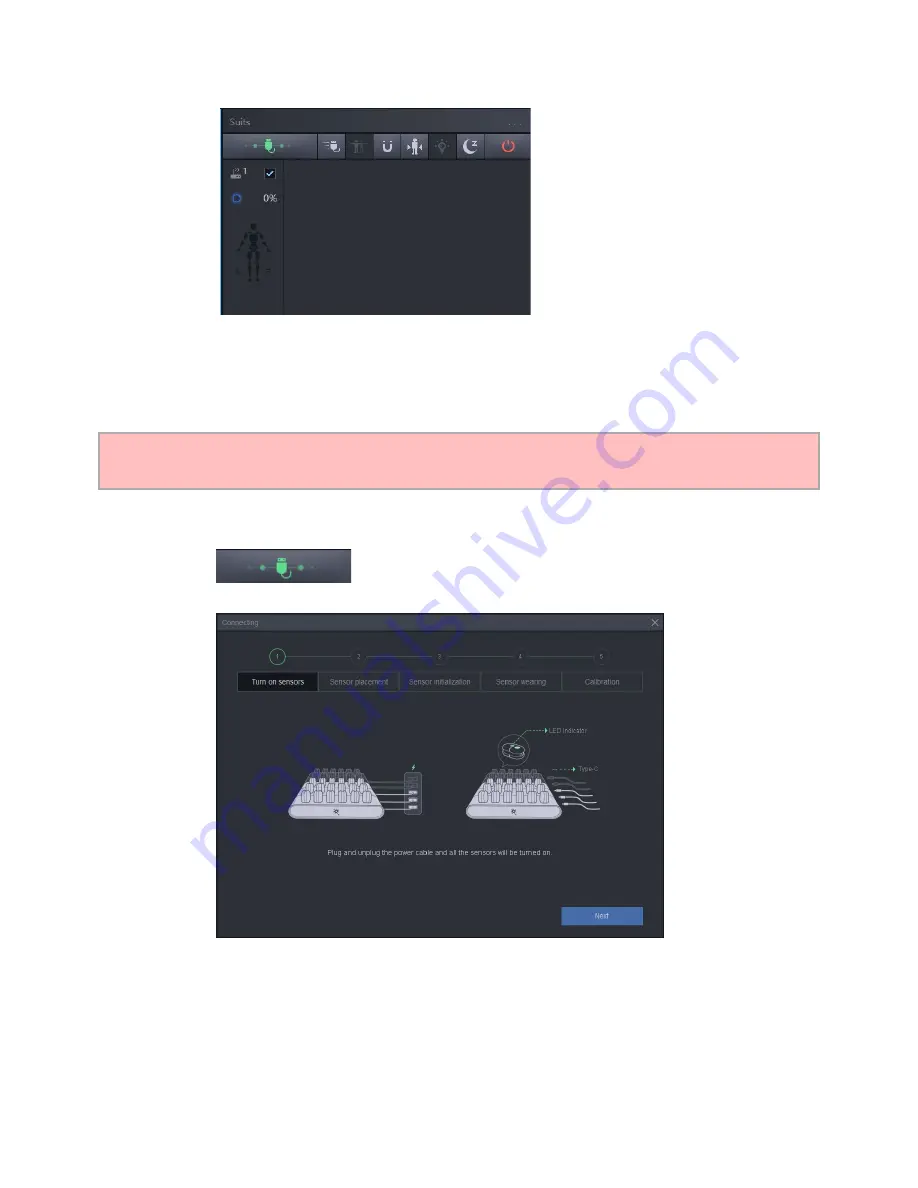
a.  Click on the Wizard Connect button  


b.  Step 1:Turn sensors on


Summary of Contents for Perception Neuron 3

Page 1: ...Perception Neuron 3 User Manual ...

Page 2: ...P INSTALLATION 13 SENSOR INSTALLATION 16 BODY SIZE PRESET 17 POSTURE CALIBRATION 18 CAPTURE 19 HARDWARE INFORMATION 20 SENSOR 20 TRANSCEIVER 21 CHARGING DOCK 22 AXIS INTRODUCTION 23 MENU BAR 23 PROJECT WINDOW 24 CAPTURING WINDOW 25 EDITING WINDOW 26 FIRMWARE UPDATE 27 FREQUENCY SETTING 27 WORKING MODE 29 BODY SIZE MEASUREMENT 32 POSTURE CALIBRATION POSES 33 BROADCASTING 39 ...

Page 3: ...Page 2 SKELETON OUTPUT 40 EDITING DATA 41 DATA PROCESS 41 FRAME EDITING TOOLBAR 45 SAVE AND EXPORT 45 POST BODY DIMENSION ADJUSTMENT 46 ...

Page 4: ...t of all portability This manual covers the features and operation of Perception Neuron 3 and Axis Studio Our hardware offers a flexible motion capture solution in VFX game interaction virtual reality sports analysis medical analysis real time stage performance and many more Be sure to register your hardware as soon as possible When you receive your kit you will see the serial number located in th...

Page 5: ...ardware list Body Kit Item Unit QTY Perception Neuron 3 Sensor PC 18 Perception Neuron 3 Transceiver PC 1 Body Straps Straps 15 Charging Dock PC 3 Type C USB Revert Cable PC 1 Type C Charging Cable PC 3 Software Dongle PC 1 ...

Page 6: ...Page 5 EVA Case PC 1 Glove Kit Item Unit QTY Base Glove Pair 1 Perception Neuron 3 Transceiver PC 1 Charging Dock PC 3 Type C Charging Cable PC 3 ...

Page 7: ...rception Neuron Strap and Socket Placement Perception Neuron requires users to place the sockets around the body using the Velcro straps that are included in your kit The Velcro straps and harnesses are made up of stretchable material to wrap around most if not all body sizes During placement tighten straps securely to ensure sockets do not get displaced during the motion capture performance Socke...

Page 8: ...te Axis Neuron has capabilities to stream data onto your network During the install make sure to give firewall permission to the application 1 Install Run the installer to initiate the installation process Follow the installation prompts and install Axis Studio We recommend installing the software in the default directory 2 Activate a Attach Axis Studio Software dongle b Click Activate ...

Page 9: ...Page 8 c Input the Wibu Activation Code This code is found on your online order under the Wibu Ticket ID ...

Page 10: ...Page 9 d In the drop down menu select your dongle s seiral e Click Activate ...

Page 11: ...nto your project 3 Transceiver Setup After you have set your project a Attach the transceiver to your computer When connecting the transceiver for the first time the following interface will pop up after you open a project click Yes This allows Axis Studio to automatically identify the transceiver and assign a static IP b If the transceiver has been deployed successfully the suits panel Capturing ...

Page 12: ...he PN3 sensors prior to beginning the following steps Note Do not perform sensor initialization immediately after a full charge allow sensors to cool down This is an important step to allow any magnetic field built up during the charging to dissipate a Click on the Wizard Connect button b Step 1 Turn sensors on ...

Page 13: ...3 A critical step that performs four operations to prepare your sensors for motion capture i Sensor Count Assumming sensors are on sensor count will alert you if any sensors are not connecting ii Sensor Initialization Performs Standard and Magnetic Simplified Calibration iii Signal Quality Test signal quality Must be above 90 iv Sensor Posture Magnetic Status check ...

Page 14: ...Page 13 Strap Installation Wear the straps according to the position in the figure below Body Straps ...

Page 15: ...Page 14 ...

Page 16: ...any interference of muscle stretching and shaking as much as possible Having the least amount of strap movement results in better motion capture data The posture calibration process will recalculate the wearing position Each finger sensor should be right on the top of THE 2nd SECTION of each finger ...

Page 17: ...ensor into the base of the strap to ensure that it will not fall off due to movement Each PN3 sensors has designated location they are assigned to for e g Head Left Leg etc Insert sensor with text facing outward to display body location properly ...

Page 18: ...eset that fits the performer body size best A Preset or custom profile must be selected prior to performing the posture calibration A custom body size profile can be created to best fit the performer in an advance situation See Body Size ...

Page 19: ...tion selection which cannot be toggled manually Working Mode Calibration Pose Full Body AT Full body with glove ATBP Arm Only AT Lower Body AS Upper Body AT Glove only ATBP See more information on poses on Posture Calibration Poses Once the above postures have been reviewed click the Start button to begin the the posture calibration process The posture calibration walk through will count down 3 se...

Page 20: ... Capture If you have completed the posture calibration properly the interface should be as shown in the figure It is important to follow the first launch steps correctly to achieve optimal motion capture data ...

Page 21: ...udio software they will automatically turn off after 5min Manually Press the sensor button on the top for about 2s to turn the sensor on Press the button for about 5s to turn off the sensor The LED indicator of the sensor will display the status Refer to the PN3 Sensor Light Indicator below Light Status Description Slow Blink Sensor in Standby mode to save power Fast Blink Calculating transfer dat...

Page 22: ...ed for instruction sending and data receiving When attached to a computer the transceiver will be detected as a network device Details Instruction sending the data transceiver receives the command from axis studio and sends it to each sensor through 2 4GHz wireless bandwidth Data receiving the transceiver receives the data from the sensors in real time through the 2 4GHz wireless network synchroni...

Page 23: ...ameters Item Parameters Size 38 5 x 17 2 x 6 7 Interface type USB Type C Weight 2 8g Transmission distance 8M Charging Dock Insert the PN3 sensor into the charging box for charging Each Dock includes a USB C port for charging Not included users are suggested purchase a multi port usb wall charger to connect multiple charging docks ...

Page 24: ...t Close the project which is opened now Recent Project A shortcut to find the lasted projects that you opened before Magnetic Calibration Calibrate your sensors to resist magnetic interference Steady calibration Calibrate the gyroscope of the sensor Frequency Setting PN3 support 3 different data transfer frequencies If you are using more than one set PN3 at the same time you need to make sure the ...

Page 25: ...ere to input the activation code provided by Noitom company to activate your payment function About Including Axis Studio version Calculation Engine Version and Usage License Project Window In the project window users can manage recorded files and body size dimensions included in the project Motion File Menu Rename and Delete your files directly Batch Export files Body Dimension Import Export prof...

Page 26: ...w 2 Suits Panel Manage single to multiple capture suits Isolate selections and perform certain functions in the menu ribbon 3 Functions Menu a Sensor Map View magnetic status or signal status View working mode and frame rate capture Update avatars name b Skeleton c Device Detail d Solver Parameter 4 Take Information a Name Capture takes b Add comments to individual takes ...

Page 27: ... Scenarios Select from preset algorithm typs b Contact Points Enable edits for Feet Hands and or Hip c Contraint Mode Select preset algorithm values Or use a customized setting 2 Take information a Manage Recorded files b Select different folders c Export data d Save as files 3 Contact Editing a See Editing Data 4 Data Processing a See Editing Data ...

Page 28: ...e latest firmware Firmware updates can be done from our application Axis Studio If the hardware does not have the latest firmware there will be a prompt at the top of the software interface Click Upgrade and the following popup window will follow Then click Check to see firmware status Firmware update may fail several times this is expected as sensors Frequency Setting In a scenario where the sign...

Page 29: ...Page 28 Note Only one connected transceiver is allowed during this operation 1 Go to the Main Menu 2 Click on Frequency Setting 3 Follow the instructions on the software ...

Page 30: ...aps and sensors according to different needs For example if you only need to capture hand movements or upper body movements you do not need to wear a full of sensors By default Axis Studio is set up to detect working modes on all channels automatically Users can manually adjust as needed See Main Menu Settings Working Mode ...

Page 31: ...dd on offer different working modes See the following configurations based on the hardware you have on hand Perception Neuron 3 Body Kit Body Kit Full Body Lower Body Body Kit Glove Kit Full Body with Glove Arm only Upper Body Glove only ...

Page 32: ...Page 31 ...

Page 33: ...rior to performing the posture calibration choose the body size preset that fits the performers body dimension closest before carrying out the posture calibration Inertial motion capture accuracy is affected by the body segment length of the Avatar Please refer to measurement guide for bone measurement Click the button to view Measured in Centimeters ...

Page 34: ...alibration to be done in order to adjust sensor placement on the performer Description A Pose Stand straight arms facing down with palms facing your body Position feet distance approximately the same distance of your hip width and maintain feet parallel to each other ...

Page 35: ...ning feet and legs parallel to each other Extend arms forward with palms facing down T Pose Stand straight spread out arms perpendicular to your body s upward position with palms facing down If you are using gloves extend fingers and position thumb in a resting position ...

Page 36: ...palm to palm The thumb and the other four fingers should form an Angle of about 45 degrees P Pose Gently touch the thumb to the forefinger while keeping the thumb in a straight The middle finger ring finger and little finger should match the bend of the index finger ...

Page 37: ...ified mode Standard Mode 1 Turn on all sensors and link sensor to Axis Studio do not remove sensors from the charging dock 2 Locate an area where all sensors display a magnetic green status in the Device Detail panel Perform magnetic calibration at the found location 3 Place sensors in sleep mode by clicking on the button 4 Click Magnetic Calibration Standard from the Menu options 5 Click Connect ...

Page 38: ...c calibration successful pops up Simpliflied Mode 1 Turn on all sensors in the charging dock and link sensor do not remove sensors from the charging dock 2 Place sensors in sleep mode by clicking on the button 3 Click Magnetic Calibration Simplified 4 Hold the charging dock in the air away from any magnetic interference 5 Click Connect button first then click the Start button after sensors light u...

Page 39: ...n the charging dock and link sensor do not remove sensors from the charging dock 2 Place sensors in sleep mode by clicking on the button 3 Place the charging box still on the table or ground 4 Click Steady Calibration 5 Click Connect button first then click the Start button after sensors light up 6 Wait until Calibration Done pops up ...

Page 40: ...DP protocol for transmission Go to Main Menu Settings Menu to view the following details There is two broadcasting option Adv BVH Broadcasting For Autodesk products BVH Broadcasting Support for UNITY UNREAL HOUDINI ICLONE BLENDER To enable a data stream toggle the switch until you see a blue highlight ...

Page 41: ...better compatibility with 3rd party applications like Unreal Engine Custom Character Skeleton Selecting Customized Character Skeleton option in the broadcast options allows users to make skeleton selections located in the editing window Select the desired avatar and update skeleton ...

Page 42: ...icking Data Process after the first time of opening a new recording data Axis Studio incorporates an automatic post processing algorithm that will optimize the original motion capture file such as make up lost frames during wireless data transfer or correct sensor error data produced by unwanted muscle movement during real time motion capture Several files will take longer than others to open due ...

Page 43: ...ns Contact Enables contact point for selected track lane Non Contact Disables contact point for selected track lane Clear Edit Allows selected edited area to be manipulated by Data Processing Mark Edit Enables Edit Protect to prevent selected edit state to be overwritten by Data Processing Change the length of the timeline to edit frame by frame See the example below a capture with 2363 frames whe...

Page 44: ...need to click the Data Process button for your edits to take effect When you click the data process you may find that unedited segments might also change The algorithm affects the whole data set if you change one part the other parts might be impacted Use the mark edit function to protect the data you don t want to change Hold down the right mouse button and highlight a piece of data you will see ...

Page 45: ...Page 44 Click the Revert to Origin button to restore to your data to its state before enabling Data Processing A warning dialogue will display Click Revert to excute the operation ...

Page 46: ...eeping the original file or to save multiple versions of edits use the save as button Click the save as button then you will be able to input a new name for the file that you want to save choose save then the file you are currently editing will be the new file with the name that you just renamed now the original file will remain the same as it was opened ...

Page 47: ...behind then you can enter the appropriate body size click save to project to save The original bone size will not be overwritten If you do not save to project this modification is temporary Solver Parameter Adjust algorithm behaviour to control motion capture performance This operation can be done in the Editing window prior to capture or during post processing in the Capture window Scenario Choos...

Page 48: ... Contact Sensitivity Axis Studio will use a pattern recognition algorithm to determine the contact between the feet and ground The contact sensitivity value affects the speed of this status change Larger values will plant the feet firmly on the ground and smaller values will allow the feet to slide easily while contacting the ground Joint Constraint Tolerance There are gaps between different body ...

Page 49: ...he Avatar direction directly in third party software Pitch Adjust the pitch direction of the Avatar If you find the Avatar is too leaned forward than it should be you can make the Pitch value a little higher Or if you find the Avatar is too leaned back make the Pitch value lower ...

Reviews: