nMedia HTPC 8000 Quick Installation Manual Download Page 3


3

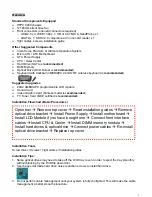
4.  Do not install optional upgrade, i.e. video card, TV tuner card etc. Use everything on board (video 

& sound) to configure system and install operation system. After then, install the upgrades one by 
one and restart the system on every step to ensure component compatibility and save times of 
troubleshooting when issue arises.


5.  To ensure front access ports and card reader work properly, check cable connection accuracy & 

Bios setting if needed.


6.  Case fan is quiet. If you hear abnormal loud noise, take off the fan to hear the noise again to 

ensure not fan defectiveness, then re-install with properly screw installation to achieve minimum 
noise.


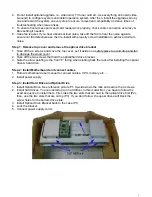
Step 1: Remove top cover and remove the optical drive bracket 

1.  Take off the 4 screws and move the top cover, put it aside on a safety place to avoid drop and fall 

to damage the wood cover. 

2.  Take off the two screws that hold the optical/hard drive bracket.  
3.  Note the arrow pointing is the front “F” facing when slotting back the rack after installing the optical 

drive & hard drive. 

Step 2: Install Motherboard and connect cables 

1.  Follow motherboard user manual to connect cables, CPU, memory etc… 
2.  Install power supply 

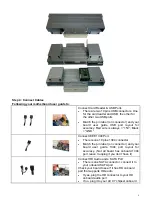
Step 3: Install Hard Drive and Optical Drive 

1.  Install Optical Drive. See reference picture P1. Up-side-down the rack and secure the 4 screws. 
2.  Install hard drives. You can install up to 4 hard drives in this model. But, you have to follow the 

exact sequence to install them. First, take the two slots that are next to the optical drive first (P2), 
then, use the two slots that are on top (P3). If you don’t follow, the upper drives will block the 
screw holes for the bottom drive slots. 

3.  Install Optical Drive Bracket back to the case (P1) 
4.  Lock the bracket 
5.  Connect power supply cords 


Summary of Contents for HTPC 8000

Page 1: ...user guide please contact your place of purchase or local dealer REVISION HISTORY V 1 0 July 2009 Table of Contents Overview ___________________________________________2 Standard Components Equipped _____________________ 2 Other Suggested Components _______________________ 2 Installation Flowchart Basic Procedures ______________ 2 Installation Tools _________________________________ 2 Step 1 Remov...

Page 2: ...Tuner Card MCE certified is recommended Installation Flowchart Basic Procedures Installation Tools Screw driver Screws Tight cables Installation guides Installation Tips 1 Some optical drives may need to take off the DVD tray cover in order to eject the tray smoothly without blocking by the DVD flip down door 2 Use the special made hard drive noise reduction screws to install hard drive 3 Do not p...

Page 3: ...n a safety place to avoid drop and fall to damage the wood cover 2 Take off the two screws that hold the optical hard drive bracket 3 Note the arrow pointing is the front F facing when slotting back the rack after installing the optical drive hard drive Step 2 Install Motherboard and connect cables 1 Follow motherboard user manual to connect cables CPU memory etc 2 Install power supply Step 3 Inst...

Page 4: ...V Black GND Connect IEEE 1394 Port z There is one 10 pins 1394 connector z Match the pin label on connector and your board user guide 1394 port layout for accuracy Not all board has onboard 1394 port leave It unplug if you don t have it Connect HD Audio and e SATA Port z There is one SATA connector connect it to your onboard SATA port Check your board to see if it has HD onboard port that supports...

Page 5: ...er optical drive operating system video card sound card TV tuner card and power supply connection etc follow the user manuals and motherboard manual instruction Specifications Model HTPC 8000 Color Red wood Dimension Case 19 7 W x 14 3 H x 11 D Material Wood and Steel Motherboard Support ATX Micro ATX Power Supply Support ATX PSU not included Drive Bays External 5 25 Bay x 1 Internal 3 5 Bay x 4 E...

Page 6: ...age of the power supply and adjust properly 110 230V z Always unplug the power cord before inserting any add on devices Get the system checked by service personnel if below happens z The power cable is damage z Liquid has penetrated into the system z Dropped and damaged RMA Return Policy z All accessories and cables must be returned as they were shipped z Carefully re packaging is needed to avoid ...

Reviews: