background image

The effective distance is influenced by environment. Changing conditions will greatly affect to distance that the app can be 

used. 

The “Power Saving Mode” in mobile should be set to “Off”. 

“Keep Wi-Fi on during sleep” on your mobile device should be set to “Always”. 

Notes: 

Before you use the Wi-Fi function, please insert Micro SD card into camera, Otherwise Wi-Fi will not work.. 

The effective distance is influenced by environment. Changing conditions will greatly affect to distance that the app can be 

used. 

The “Power Saving Mode” in mobile should be set to “Off”. 

“Keep Wi-Fi on during sleep” on your mobile device should be set to “Always”.


Connecting HDMI:


 Connect the CAMERA to TV via HDMI cable, all functions can be displayed in high definition 

on the TV screen.


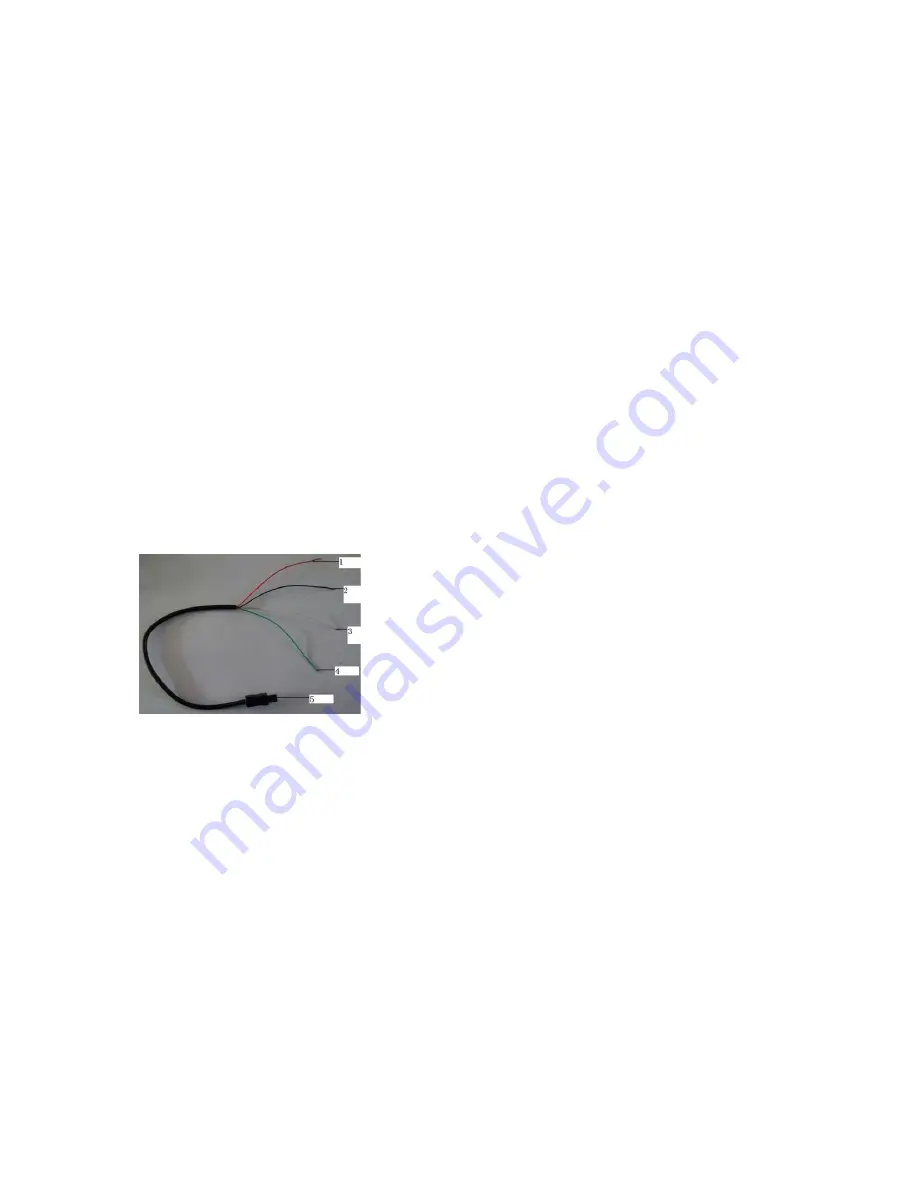
Connect via USB (connecting to Drones for example) 


Connect the CAMERA to Video Source via USB cable as shown, set menu “TV mode” to Yes, 

press Power button to confirm, then all operations can be displayed in TV screen/monitor. 

1-DC positive power 5v 

2-DC negative power (Ground) 

3-Video output 

4-Audio output 

5-USB port 

Note:  Please  refer  to  the  user  guide  of  the  device  you  are  connecting  to  in  order  to 
insure proper   connection


Connecting to your PC 

Connect camera to PC and power on your camera, the screen will display: “MSDC”, “PCCAM”, “Working”. 

Press Up button or Down button to choose the option, press Power/Select button to confirm. 

MSDC: To access the Micro SD card to check and download files. 

PCCAM: To use the Camera as a PCCAM. (software required on your PC) 

Working: Camera can be used Normally while powered and charging by the PC. 

Tips on Mounting Your Camera: 

Included with your camera are the basic mounting attachments. With these accessories you can mount 

Summary of Contents for Ninja 4KX

Page 1: ...MERA Overview Included Accessories Nomenclature Button functions CAMERA Operation Power on off Battery Charging Video Mode Normal recording Loop recording Picture Mode Playback Mode Menu Setting Nijae...

Page 2: ...Micro SD Please use Micro SDHC XC Class10 and above memory card beware of cheap counterfeit cards Freezing up To avoid the camera from freezing up during operation wait until each screen is fully loa...

Page 3: ...take a picture It not only can be used to manually capture but also can be set automatically 2 4G wireless remote control Waterproof wrist remote controller Diving mode When set to Diving Mode The Vid...

Page 4: ...1 Wi Fi indicator 2 Mode Wi Fi button 3 Up Menu Zoom button 4 Down Zoom button 5 HDMI port 6 USB port Nomenclature...

Page 5: ...on In standby mode to zoom in Press and Hold to enter exit the menu In the Menu setting or Playback mode choose the last option or file Increase the digit in the time setting Down button Zoom out in s...

Page 6: ...go off To charge faster turn the Camera off while charging Video mode Video interface 1 Record icon 2 Exposure Compensation 3 White Balance 4 Frame rate 5 Video resolution 6 Microphone 7 Remaining ti...

Page 7: ...Picture interface 10 Picture icon 11 Exposure Compensation 12 White balance 13 Picture size 14 Photos Remaining 15 Battery icon 16 Date Time CAMERA default setting is Video mode While in standby mode...

Page 8: ...on to stop playing To Enter Menu Settings In standby mode Press and hold the Up button to enter the menu mode then press the Mode button again to switch the mode menu and System menu Press the Down bu...

Page 9: ...f 2s 10s 30s 60s Double Periodical Snap continuous Shooting Off 5s 10s 15s 30s 60s Video Menu Options Movie Size 4k 10fps 1440p 30fps 1080p 60fps 1080p 50fps 1080p 30fps 1080p 25fps 720p 120fps 720P 6...

Page 10: ...10s 15s 30s 60s Photo Burst off 3 photos 5 photos 10 photos Playback Mode Menu Please select File type VIDEO JPG Protect Single Protect All Unprotect All Delete Single All System Menu Sounds Beep on o...

Page 11: ...eration is successful continue if not please repeat above steps Please keep the camera and remote control within 1M 3 Feet when matching Installing and Using Wi Fi Scan the QR code to get the APP Inst...

Page 12: ...Connect via USB connecting to Drones for example Connect the CAMERA to Video Source via USB cable as shown set menu TV mode to Yes press Power button to confirm then all operations can be displayed in...

Page 13: ...ts can break under such conditions Finally be sure to test the waterproof housing prior to any underwater activity Check the seal and buttons carefully as debris and small objects can cause leakage Fo...

Reviews: