Nixeus NX-VUE27C User Manual Download Page 31

31 


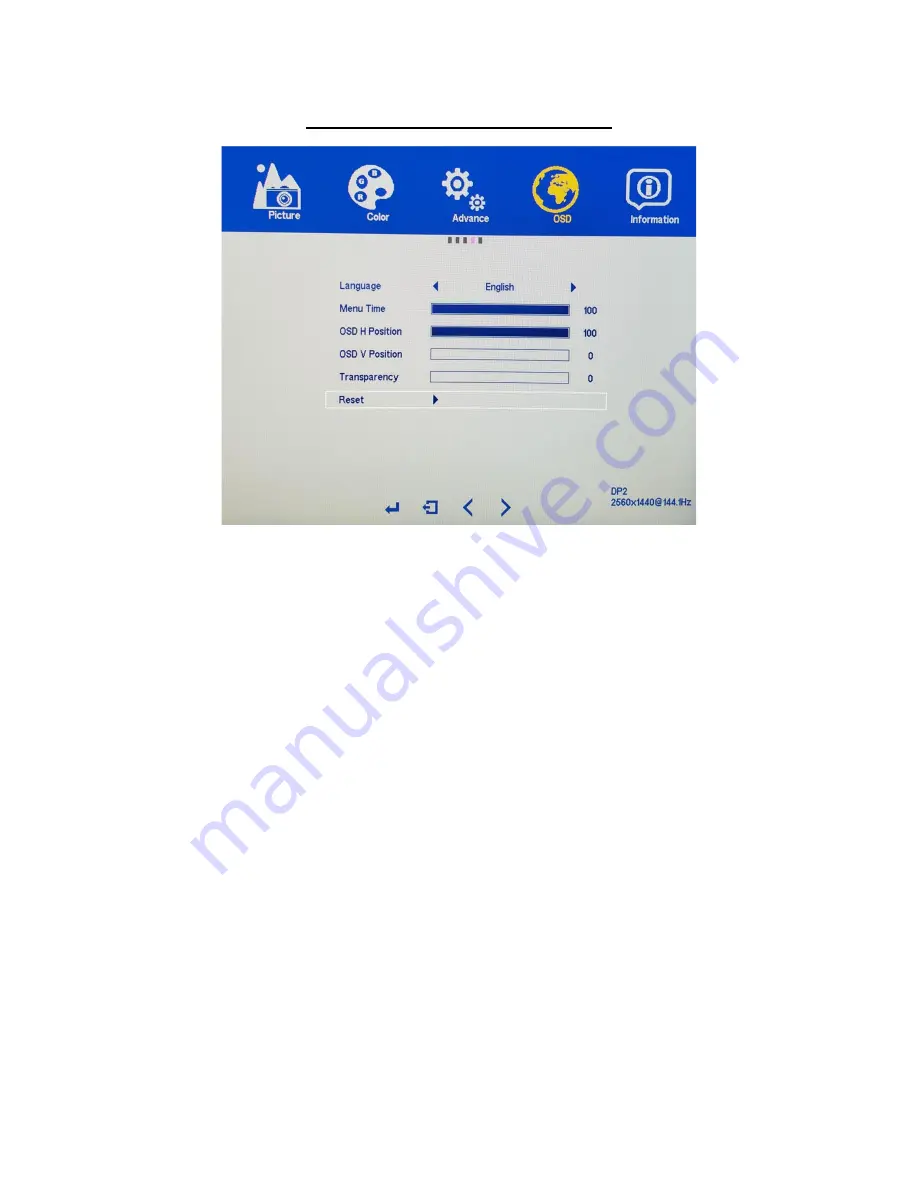
OSD SETTINGS (Sub-Menu) – RESET 


The RESET feature in the OSD SETTINGS sub-menu will allow you to reset all On Screen Display 
(OSD) configurations or changes you have made - back to the monitors default settings. 
 
a) In the OSD sub-menu, use the arrow buttons [

] or [∆]


to navigate to RESET. Make sure RESET is 

highlighted (see picture) and press 

[2] 

to RESET all changes made in the On Screen Display Menu 

(OSD). 


Summary of Contents for NX-VUE27C

Page 1: ...1 NX VUE27C User Manuel Version 6 15 2021 www nixeus com...

Page 2: ...stment 14 Dynamic Contrast Ratio Adjustment DCR 15 On Screen Display OSD Color Sub Menu 16 Color Effects 16 Saturation 17 Gamma 18 Temperature Presets 19 USER Custom Color Temperature Adjustments 20 2...

Page 3: ...ine and power adapters provided by Nixeus If any power connections are missing please contact Nixeus for a replacement Using un authorized power connectors may damage your monitor and void your warran...

Page 4: ...n that you had the static image that caused the image persistence may remove the image persistence Please contact Nixeus if you need assistance in removing image persistence CAUTION Serious brand inci...

Page 5: ...e end of the type c cable into the computer or laptop s type c output and connect the other end to the monitor s type c port Make sure the Type C cable supports video transmission Type C cables that o...

Page 6: ...not guarantee these adapters will work with the NX VUE27C NX VUE27C Power Cable and Power Supply Only use the power cable included with the NX VUE27C Using any other un authorized power adapters may d...

Page 7: ...the On Screen Display Menu OSD Brings up Volume Control and decreases volume Press to navigate back or go to previous left Brings up Volume Control and increases volume Press to navigate forward or go...

Page 8: ...gnal to the monitor b Press or to navigate to select the input for your desired video output source and press 2 to confirm Volume Sub Menu a Press either or to open the volume control sub menu b To ad...

Page 9: ...res for On Screen Display OSD Main Menu 1 1 Press to select confirm 2 Press to move up in the menus or increase setting status bar 3 Press to move down in the menus or decrease setting status bar 4 2...

Page 10: ...to confirm selection Highlight BRIGHTNESS and press 1 to enter into BRIGHTNESS adjustment c Press to decrease brightness or press to increase brightness Default BRIGHTNESS is at 50 d Once you adjust...

Page 11: ...the PICTURE sub menu use the arrow buttons or to highlight CONTRAST and press 1 to confirm selection b Press to decrease the CONTRAST or press to increase the CONTRAST Default CONTRAST is at 50 c Once...

Page 12: ...arrow buttons or to highlight SHARPNESS and press 1 to confirm selection b Press to decrease the SHARPNESS or press to increase the SHARPNESS Default SHARPNESS is at 2 c Once you adjust the SHARPNESS...

Page 13: ...In the PICTURE sub menu use the arrow buttons or to highlight ASPECT RATIO and press 1 to confirm selection b Press or to change the ASPECT RATIO Default ASPECT RATIO is at FULL and is the recommende...

Page 14: ...s we recommend leaving this feature off for PC Gaming a In the PICTURE sub menu use the arrow buttons or to highlight ULTRA VIVID and press 1 to confirm selection b Press or to adjust the ULTRA VIVID...

Page 15: ...picture video quality or add input lag in PC games we recommend leaving this feature off for PC Gaming a In the PICTURE sub menu use the arrow buttons or to highlight DCR and press 1 to confirm selec...

Page 16: ...a In the COLOR sub menu use the arrow buttons or to highlight COLOR EFFECT and press 1 to confirm selection b Press or to change the COLOR EFFECT Default COLOR EFFECTS is at STANDARD c Once you adjust...

Page 17: ...SATURATION and press 1 to confirm selection b Press to decrease the SATURATION or press to increase the SATURATION Default SATURATION is at 50 c Once you adjust the SATURATION settings to your desired...

Page 18: ...and gaming needs OFF 1 8 2 0 2 2 and 2 4 a In the COLOR sub menu use the arrow buttons or to highlight GAMMA and press 1 to confirm selection b Press or to change the GAMMA Default GAMMA setting is OF...

Page 19: ...ttons or to navigate to TEMPERATURE and press 1 to enable TEMPERATURE selection b Use or to cycle through the settings and to highlight USER c Press 1 once to confirm the USER selection and exit to th...

Page 20: ...ired RED temperature settings press 1 to confirm selection and exit to COLOR sub menu to adjust the next color settings a To adjust the GREEN setting Use the arrow buttons or to navigate and highlight...

Page 21: ...ut of the COLOR sub menu To completely exit out of the On Screen Display press 2 again NOTE When using a colorimeter to calibrate the monitor you may need to exit and enter each RGB Red Green Blue col...

Page 22: ...press 2 to confirm selection b Press to decrease the VOLUME or press to increase the VOLUME Default VOLUME is at 50 c Once you adjust the VOLUME settings to your desired level press 2 once to confirm...

Page 23: ...se the arrow buttons or to highlight MUTE and press 2 to confirm selection b Press or to change the MUTE setting to OFF or ON c Once you finish adjusting the MUTE settings to your desired setting pres...

Page 24: ...m selection b Press or to cycle through the OVER DRIVE settings Default OVER DRIVE settings is OFF c Once you finish adjusting the OVER DRIVE settings to your desired level press 2 once to confirm and...

Page 25: ...ect the accuracy of color for professional or gaming use of the display a In the PICTURE sub menu use the arrow buttons or to highlight LOW BLUE RAY and press 1 to confirm selection b Press or to adju...

Page 26: ...uttons or to navigate to LANGUAGE Make sure LANGUAGE is highlighted see picture and press 1 to confirm selection b Use the arrow buttons or to navigate to the preferred LANGUAGE Make sure the selected...

Page 27: ...to navigate to MENU TIME Make sure MENU TIME is highlighted see picture and press 1 to confirm selection c The default OSD MENU TIME is 10 seconds Use the arrow buttons or to adjust between 10 second...

Page 28: ...ns or navigate to OSD H POSITION make sure OSD H POSITION is highlighted see picture and press 1 to confirm selection b Use the arrow buttons or to adjust between 0 to 100 for the OSD H POSITION place...

Page 29: ...navigate to OSD V POSITION make sure OSD V POSITION is highlighted see picture and press 1 to confirm selection b Use the arrow buttons or to adjust between 0 to 100 for the OSD V POSITION placement...

Page 30: ...d press 1 to confirm selection b Use the arrow buttons or to navigate to TRANSPARENCY Make sure TRANSPARENCY is highlighted see picture and press 1 to confirm selection c Use the arrow buttons or to a...

Page 31: ...o reset all On Screen Display OSD configurations or changes you have made back to the monitors default settings a In the OSD sub menu use the arrow buttons or to navigate to RESET Make sure RESET is h...

Page 32: ...he replacement product needs not to be new nor have identical make model or part Nixeus may replace the defective Product or any part thereof with any factory reconditioned product that Nixeus determi...

Page 33: ...r the product or if the model or serial number has been altered tampered with defaced or removed product failures due to power outages and cosmetic damage and does not limit damage that are caused by...

Page 34: ...es reduce greenhouse gas emissions and avoid air water pollution For more information regarding electronics recycling and proper disposal of electronics please visit http www nixeus com recycle Nixeus...

Reviews: