background image

Chapter 3: Web Management 

Internet Settings 

– MAC/IP/Port Filtering 


  NR-10  Router  User  Manual  |  37 

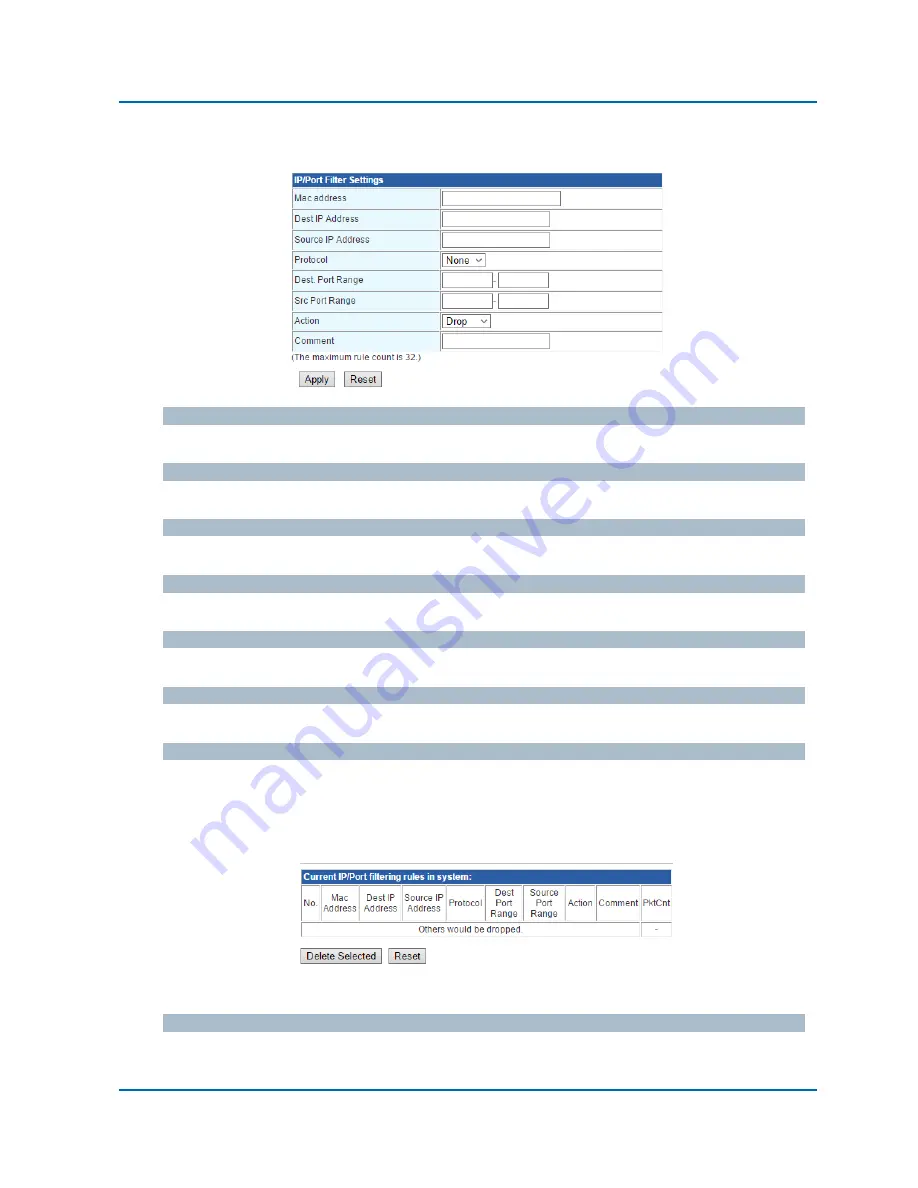
IP/Port Filter Setting 


MAC Address 

Input MAC address of a device here.   

Dest./Source IP Address 

The destination & source IP address.   

Protocol 

You can set the protocol for filtering rule here with this scroll-down menu.   

Dest./Src. Port Range 

Here you can input the range for destination and source port.   

Action 

Set which action the router to take when a packet that match the filtering rules.   

Comment 

Adding note for the filtering rule.   

Buttons 


Apply:


Apply and save all the settings you’ve made on this page.   


Cancel:


Discard all the settings you’ve made. 

IP/Port Filtering Rule Table 


This table lists all the IP/Port filtering rules.   

Buttons 


Delete Selected:


Delete the filtering rule that you’ve selected.   


Reset:


Discard all the settings you’ve made. 

Summary of Contents for NR-10

Page 1: ...Version 1 1 NR 10 4 Gigabit PSE LAN Port 1 Gigabit PD WAN Port NAT Router User Manual ...

Page 2: ... installed and used in accordance with the instructions However there is no guarantee that interference will not occur in a particular installation If this equipment does cause harmful interference to radio or television reception which can be determined by turning the equipment off and on the user is encouraged to try to correct the interference by one or more of the following measures Reorient o...

Page 3: ...ngs Routing Only Available in Gateway Mode 29 3 2 2 5 Internet Settings VPN Pass Through 30 3 2 2 6 Internet Settings QoS Only Available in Gateway Mode 31 3 2 2 7 Internet Settings IPv6 34 3 2 3 Web Management Firewall Only Available in Gateway Mode 36 3 2 3 1 Firewall MAC IP Port Filtering Only Available in Gateway Mode 36 3 2 3 2 Firewall System Security Only Available in Gateway Mode 38 3 2 3 ...

Page 4: ...Table of Contents NR 10 Router User Manual 4 3 2 4 6 Administration PoE 48 Appendix A Product Safety 49 ...

Page 5: ...NR 10 Router User Manual 5 Before Starting In Before Starting This section contains introductory information which includes Intended Readers Icons for Note Caution and Warning ...

Page 6: ...ng management and terminologies Icons for Note Caution and Warning To install configure use and maintain this product properly please pay attention when you see these icons in this manual A Note icon indicates important information which will guide you to use this product properly A Caution icon indicates either a potential for hardware damage or data loss including information that will guide you...

Page 7: ...t Overview In Product Overview This section will give you an overview of this product including its feature functions and hardware software specifications Product Brief Description Product Specification Hardware Description Hardware Installation ...

Page 8: ...3at compliant network accessories By adding this NAT router to existing networking installing networking products such as Access Points and IP cameras can be easily managed and set up Wireless device deployments are easily located with available power outlets and network administrators don t need to use heavy AC power adapters anymore When connected with a PSE to its PD WAN port this NAT router ca...

Page 9: ...c IP PPPoE PPTP L2TP VPN Pass through IPSec L2TP PPTP QoS Features SP Strict Priority WFQ Weighted Fair Queue and SP WFQ latency scheduler Max Min Bandwidth Scheduler Ingress Egress Rate Control Firewall MAC IP Port Filtering Content Filtering Port Forwarding Virtual Server Port Trigger DMZ IPv4 and IPv6 multicast frames hardware forwarding Jumbo Frame 9K PoE IEEE 802 3 af at IEEE 802 3 af at Remo...

Page 10: ...d IEEE 802 3 10BaseT IEEE 802 3u 100BaseTX IEEE 802 3ab 1000BaseT IEEE 802 3af Power over Ethernet PoE IEEE 802 3at Power over Ethernet PoE IEEE 802 3az Energy Efficient Ethernet EEE IEEE 802 3x Flow Control IEEE 802 1p Class of Service ...

Page 11: ...g table provides description of LED status and their meaning LED Status Description Power On Power on Off Power off PoE In On The NAT router is powered by PoE Off The NAT router is off or not powered by PoE WAN On WAN port Linked Flashing Data activating Off No device is attached Link ACT On Linked Flashing Data activating Off No device is attached PoE On Port is linked to Powered Device Off No Po...

Page 12: ...r 1 Product Overview Hardware Description NR 10 Router User Manual 12 Rear Panel The LAN ports WAN port and the DC power jack are located in the rear panel of the NAT router as shown in the figure down below ...

Page 13: ... CAT 5 cable EIA TIA 568 100 ohm Max 100m 1000 Base T 4 pair UTP STP CAT 5 cable EIA TIA 568 100 ohm Max 100m PoE To delivery power properly it is recommended to use CAT 5e and CAT 6 cable Ethernet cables of higher qualities can reduce the power lost during transmission For more information regarding to the product safety and maintenance guide please refer to Appendix A Product Safety Please conne...

Page 14: ...NR 10 Router User Manual 14 Chapter 2 Preparing for Management In Preparing for Management This section will guide your how to manage this product via management web page Preparation for Web Interface ...

Page 15: ...tch and your PC are on the same network Please follow the steps down below to configure your PC properly 1 Verify that the network interface card NIC of your PC is operational and properly installed and that your operating system supports TCP IP protocol 2 Connect your PC with the switch via an RJ45 cable 3 In default setting the router is set to the Gateway mode Under this mode the router will as...

Page 16: ...ormation of your PC and write down the IPv4 Default Gateway IP address The default should be 10 10 10 254 5 Launch the web browser IE Firefox or Chrome on your PC 6 Type the default gateway IP address you ve written down in step 4 in the web browser s URL field and press Enter 7 The web browser will prompt you to log in The default username password for the configuration web page is admin admin ...

Page 17: ...t interface You can make all settings and monitor system status with this management web page Configuration Monitor options included in the management web page can be divided into the following 4 categories which will be discussed in detail in this chapter Web Management Operation Mode Web Management Internet Settings Web Management Firewall Web Management Administration ...

Page 18: ... mode Internet Settings This section of settings allows you to set WAN and LAN as well as other settings regarding to network connection Firewall Firewall section allows you to make settings regarding to the router s firewall function thus securing your network Administration This section contains settings regarding to the router s system including system password updating firmware system reboot a...

Page 19: ...ia the router Gateway One of the ports will work as the WAN port and connect to the Wide Area Network Internet while other ports will work as LAN ports Devices connected to the router running under Gateway mode will acquire IP addresses via the router Function Menu under Bridge Mode Function Menu under Gateway Mode As shown in the figures above the function menu will change according to the router...

Page 20: ... WAN port PPPoE ADSL PPPoE stands for Point to Point Protocol Over Ethernet ISP will provide you a set of account and password for connecting to the Internet L2TP Layer 2 Tunneling Protocol a tunneling protocol used for virtual private networks VPNs and can work as Internet service provided by ISPs PPTP Point to Point Tunneling Protocol another protocol used for virtual private networks and can wo...

Page 21: ...the router Buttons Apply Apply and save all the settings you ve made on this page Cancel Discard all the settings you ve made DHCP Auto Config Host Name Here you can input the network host name This field is optional and not a necessity MAC Address Clone Some ISPs only provide Internet service to a certain set of MAC address You can input the MAC address manually or press the Fill My MAC button to...

Page 22: ...on never disconnect On Demand The router will only make PPPoE connection when Internet connection is required You can set the idle time here as well The router will disconnect if Internet connection is not used after the set amount of time Manual The router will make PPPoE connection upon requested by the user manually MAC Address Clone Some ISPs only provide Internet service to a certain set of M...

Page 23: ... The router will acquire a set of IP address from L2TP server Operation Mode You can set the operation mode via the scroll down menu Keep Alive The router will keep the L2TP connection never disconnect Manual The router will make L2TP connection upon requested by the user manually MAC Address Clone Some ISPs only provide Internet service to a certain set of MAC address You can input the MAC addres...

Page 24: ... The router will acquire a set of IP address from PPTP server Operation Mode You can set the operation mode via the scroll down menu Keep Alive The router will keep the PPTP connection never disconnect Manual The router will make PPTP connection upon requested by the user manually MAC Address Clone Some ISPs only provide Internet service to a certain set of MAC address You can input the MAC addres...

Page 25: ... Host Name The host name of the network IP Address The IP address of the router Subnet Mask The subnet mask IP address of the router LAN 2 Enable the second LAN on this router LAN 2 IP Address LAN 2 IP address LAN 2 Subnet Mask The subnet mask IP address of LAN 2 MAC Address The MAC address of the router ...

Page 26: ...ress for the DHCP server DHCP Lease Time The lease time for the DHCP IP lease period Statically Assigned Here you can bind a device to a certain IP address Input the MAC address of the network device and the IP address that you would like to assign to You can set up to 3 sets here 802 1d Spanning Tree Spanning tree is a protocol that will create a loop free network You can enable Spanning Tree her...

Page 27: ...Proxy When DNS proxy is enabled system will relay DNS requests to the currently configured DNS server and reply as a DNS resolver to the client devices on the network Buttons Apply Apply and save all the settings you ve made on this page Cancel Discard all the settings you ve made ...

Page 28: ...e router will display all DHCP clients on the network Host Name The host name of the network device MAC Address The MAC address of the network device IP Address The IP address of the router Expires in The DHCP lease expire time of the DHCP client OS of Device The operating system of the network device if the network device is a PC ...

Page 29: ...t address of this route Host Net This scroll down menu allows you to select the static route as Host or Net Subnet Mask When set to Net The subnet mask of the static route Gateway The gateway of the static route Interface The interface type of the static route The interface types available here include LAN WAN and Custom Comment Side note for the static route Buttons Apply Apply and save all the s...

Page 30: ...m to pass through the router allowing devices connected to the router to communicate with other devices not in the LAN network via VPN L2TP Pass Through Enable L2TP pass through IPSec Pass Through Enable IPSec pass through PPTP Pass Through Enable PPTP pass through Buttons Apply Apply and save all the settings you ve made on this page Cancel Discard all the settings you ve made ...

Page 31: ... Bidirection Enable QoS function in bidirection mode Enable Upload QoS Only Enable QoS function for uploading data stream Enable Download QoS Only Enable QoS function for downloading data stream The setting web page will change according to the QoS setting you ve enabled the QoS Upload Bandwidth Here you can set the bandwidth for uploading stream You can set the bandwidth by the scroll down menu o...

Page 32: ...oS If you set the QoS type to manual QoS the setting web page will change accordingly QoS Model Here you can set the QoS model with the scroll down menu The settings available here include DRR Deficit Round Robin SPQ Strict Priority Queue DRR SPQ A combination of ERR and SPQ Remark Only The setting web page will change according to the QoS model you ve selected here DRR SPQ ...

Page 33: ...Manual 33 DRR SPQ Highest Set the highest possible download bandwidth High Set the high download bandwidth Default Set the default download bandwidth Low Set the minimal lowest download bandwidth Buttons Submit Apply and save all the settings you ve made on this page ...

Page 34: ...ode you ve chosen Static IP Connection LAN IPv6 Address Subnet Prefix Length Here you can input the LAN IPv6 address and subnet prefix length WAN IPv6 Address Subnet Prefix Length Here you can input the WAN IPv6 address and subnet prefix length Default Gateway Here you can input the default gateway in IPv6 format Tunneling Connection 6RD ISP 6rd Prefix Prefix Length Here you can input the ISP 6rd ...

Page 35: ...ress Here you can input the IPv6 address for WAN port AFTR Server IPv6 Address Here you can input the AFTR server s IPv6 address Gateway IPv6 Address Here you can input the default gateway in IPv6 format Buttons Apply Apply and save all the settings you ve made on this page Cancel Discard all the settings you ve made ...

Page 36: ...irewall MAC IP Port Filtering Only Available in Gateway Mode Basic Settings MAC IP Port Filtering Enable or disable MAC IP Port filtering function Default Policy Set which action the router to take when a packet that doesn t match the filtering rules Buttons Apply Apply and save all the settings you ve made on this page Cancel Discard all the settings you ve made ...

Page 37: ...rc Port Range Here you can input the range for destination and source port Action Set which action the router to take when a packet that match the filtering rules Comment Adding note for the filtering rule Buttons Apply Apply and save all the settings you ve made on this page Cancel Discard all the settings you ve made IP Port Filtering Rule Table This table lists all the IP Port filtering rules B...

Page 38: ...via Internet Ping from WAN Filter Enable this function so the router won t reply ping request via WAN connection Block Port Scan Enable this function to block port scan Block SYN Flood Enable this function to block SYN flood Stateful Packet Inspection SPI Firewall Enable this function to enable stateful packet inspection firewall Buttons Apply Apply and save all the settings you ve made on this pa...

Page 39: ... Here you can set the URLs that will be blocked by the router Input the URL you would like to block and press the Add button to add the new URL filtering rule Web Host Filter Setting Here you can set the filtering keyword Any website with the keyword will be blocked by the router Buttons Add Adding a filtering rule Delete Delete the filtering rule that you ve selected Apply Apply and save all the ...

Page 40: ...t and protocol IP Address The LAN IP address that the Internet packets will be forwarded to Port Range The port range of the protocol Protocol The protocols that will be forwarded include UDP TCP and TCP UDP Comment Note for the port forwarding rule Current Port Forwarding in System This table lists all the port forwarding rules currently set in the router Buttons Apply Apply and save all the sett...

Page 41: ...port Trigger Port Protocol The triggering port protocol Trigger Port The triggering port number Incoming Port Protocol The incoming port protocol Incoming Port The incoming port number Comment Note for the port forwarding rule Current Port trigger in System This table lists all the port trigger rules currently set in the router Buttons Apply Apply and save all the settings you ve made on this page...

Page 42: ...e DMZ Settings You can enable the DMZ function with the scroll down menu When enabled the router will allow all connection from the Internet to access a device on the LAN DMZ Address The LAN IP address for the DMZ Buttons Apply Apply and save all the settings you ve made on this page Reset Discard all the settings you ve made ...

Page 43: ...nd save all the settings you ve made on this page Cancel Discard all the settings you ve made NTP Settings Current Time This field will display the current system time You can press the Sync with host button to synchronize your PC s time to the router Time Zone This scroll down menu allows you to change the time zone of the system NTP Server The URL or IP address for the NTP server Buttons Apply A...

Page 44: ... Settings Dynamic DNS Provider You can select the DNS service provider from the scroll down menu Account The login username for DDNS Password The login password for DDNS Buttons Apply Apply and save all the settings you ve made on this page Cancel Discard all the settings you ve made ...

Page 45: ...ou can upload firmware to the router Please note that during firmware uploading the router must be ON at all times Your PC and the router must be connected during the process as well Choose File Choose the firmware file that is saved in your PC to upload to the router Buttons Apply Upload the selected firmware file to the router ...

Page 46: ...n the scroll down menu Import Settings Reboot After Import Setting Setting the router to reboot immediately or later after uploading the setting you ve saved on your PC Settings File Location You can select the file path of the configuration file on your PC by pressing the Choose File button Buttons Import Start uploading configuration file to the router Cancel Discard all the settings you ve made...

Page 47: ...anagement Administration Status Statistics NR 10 Router User Manual 47 3 2 4 4 Administration Status Here you can view the router s status 3 2 4 5 Administration Statistics Here you can view statistics of the network ...

Page 48: ...tion W This field displays the power consumption of the PoE port PD Monitoring Check the check box to enable the port s PD monitoring The router will ping the PD connected to the port every 30 seconds If the PD does not reply 3 times the PoE port will do a PoE power cycle to reboot the PD PD IP The IP address of the PD Buttons Apply Apply and save all the settings you ve made on this page Cancel D...

Page 49: ...ure changes even within the product s operating temperature range may cause malfunctions DO NOT install this product in a location near any sources of water or liquid DO NOT stack this product with other network devices directly on top of one another Stacking network devices directly without applying a mounting rack will cause this product to overheat DO NOT install this product on an unstable sur...

Reviews: