Ninja DUALBREW CFP200 Series Owner'S Manual Download Page 10

USING THE NINJA® DUALBREW COFFEE MAKER 

CONT.

Volume

2 oz.

4 oz.

6 oz.

8 oz.

10 oz.

12 oz.

14 oz.

16 oz.

18 oz.

20 oz.

22 oz.

24 oz.

28 oz.

32 oz.

40 oz.

50 oz.

60 oz.

DISPENSING HOT WATER

The Ninja DualBrew Coffee Maker 

has a separate water line completely 

independent of the line used for brewing 

coffee. This ensures you get clean 

water every time with no coffee cross-

contamination. 

1

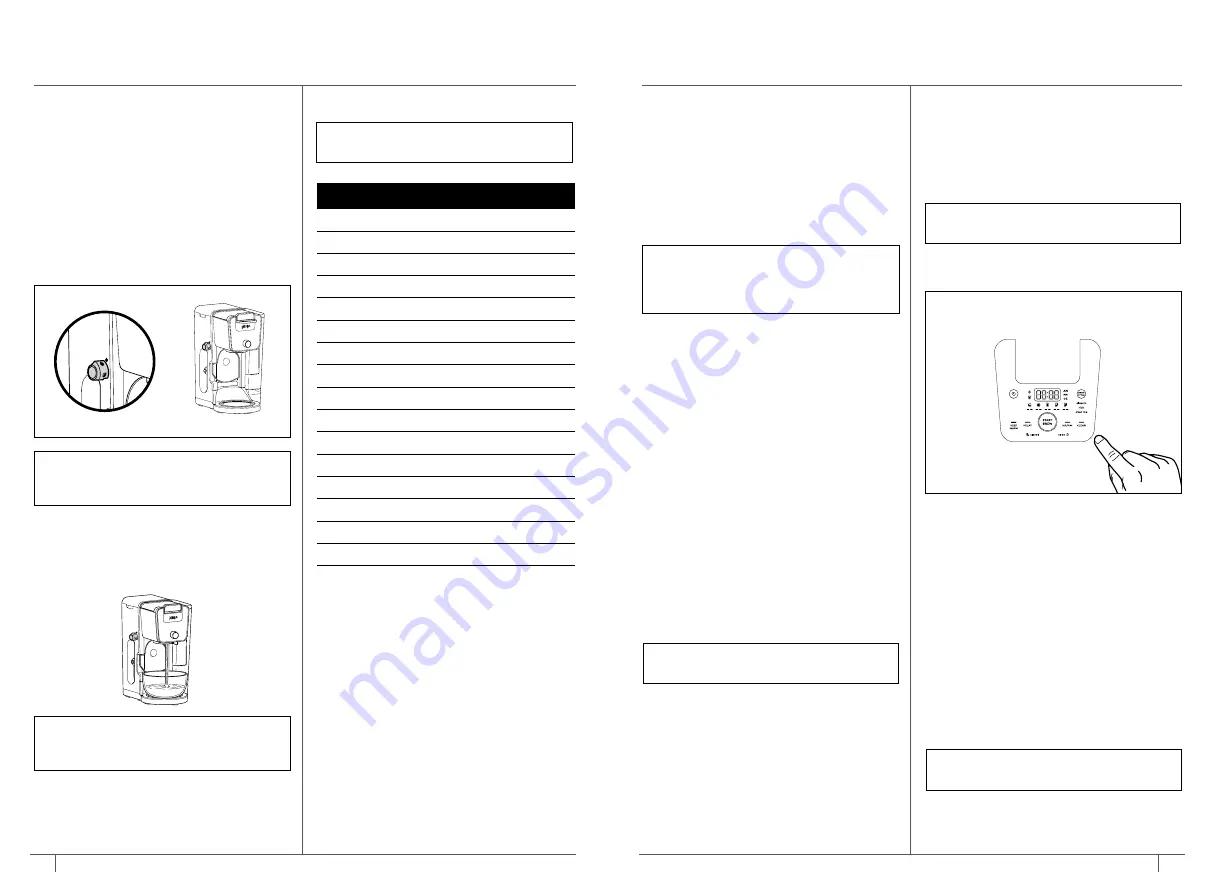
   To switch to Hot Water Mode, turn the  

dial on the left side of the brewer to the 

water droplet icon. You should notice  

a change on the control panel.

2

   Use the Multi-Serve Dial to choose one 

of 17 sizes between 2 oz. and 60 oz.

3

   Press START BREW on the dial to start 

the brew.

Not all functions are available  

on all models.

NOTE: 

The water will cool down once 

dispensed into vessel.

NOTE: 

When dispensing hot water, 

use a vessel that is suitable for high 

temperatures.

NOTE: 

If the display is flashing the water 

droplet icon, make sure the dial is turned 

completely to one side.

CLEANING & MAINTENANCE 

CLEANING THE NINJA POD ADAPTER

Open the handle to reveal the needles and 

pod holder and hand-wash with warm, 

soapy water. Take care when cleaning 

around the needles. Then, close the handle 

and slide it back into the REMOVE position 

before reinstalling. 

CLEANING & DESCALING YOUR 

BREWING SYSTEM

Your Ninja DualBrew coffee maker offers 

multiple modes to choose from, which 

include Grounds, Pods, and Hot Water  

(not available on all models). Each mode 

that you use will eventually need to be 

cleaned with a clean cycle.
The clean cycle is used for descaling 

the brewer when calcium scale buildup 

is affecting the performance of the 

brewer and/or the flavor of your coffee. 

The Intelligent Clean Cycle Indicator will 

automatically illuminate orange when a 

cleaning cycle is recommended for your 

brewer. If the indicator is ignored, your 

brewer may stop mid-brew and display 

“CLn,” indicating it needs immediate 

cleaning on the current mode.

CLEANING AFTER A BREW

1

   After the brewer has cooled, remove 

the brew basket. If using pods, remove 

the Ninja Pod Adapter and brew basket. 

Wash the used parts thoroughly with 

soap and warm water.

2

   Wash the carafe and brew-through lid with 

soap and warm water. Use a bottle brush 

or  cloth to wash the inside of the carafe. 

DO NOT

 use a wire brush.

CLEANING THE WATER RESERVOIR

Empty the reservoir and hand-wash or 

place in dishwasher. For a better clean, we 

recommend placing it in the bottom rack of 

the dishwasher standing upright with the 

opening facing downward. We recommend 

doing this weekly.

CLEANING THE CARAFE

We recommend cleaning your carafe after 

each use with warm, soapy water. 
To clean the carafe more thoroughly, we 

recommend using a soft foam brush.  

DO NOT

 use a wire brush.

CLEANING THE SLIDING LID

Open the hinged hood on top of the 

brewer by pulling up on the left side. Once 

opened, slide the sliding lid out of the back 

of the brewer to remove it. Hand-wash the 

sliding lid with warm, soapy water. Slide 

the sliding lid back into its tracks and close 

the hinged hood.

NOTE: 

For best results, we recommend 

rinsing the reservoir after brewing and 

refilling with fresh water for the next 

brew.

NOTE: 

The clean cycle takes 

approximately 75 minutes.

NOTE: 

DO NOT

 place the Ninja Pod 

Adapter in the dishwasher.

NOTE: 

DO NOT

 place the sliding lid in 

the dishwasher.

17

ninjakitchen.com

16

1-877-646-5288

Summary of Contents for DUALBREW CFP200 Series

Page 1: ...ninjakitchen com OWNER S GUIDE CFP200 Series COFFEE MAKER DualBrew GROUNDS PODS ...

Page 2: ...e CONTENTS Important Safeguards 2 Parts 4 Using the Control Panel 6 Smart Sensing Mode Indicators 6 Preparing For Use 7 Setting the Clock 7 High Altitude Calibration Brew 7 Priming Your Ninja DualBrew Coffee Maker 8 Preparing Using the Ninja DualBrew Coffee Maker 10 Approximate Brew Volumes Chart 10 Coffee Measurement Chart 11 Brewing Ground Coffee 12 Brewing Pods 12 Brew Styles 14 Classic Rich 14...

Page 3: ...carafe or cup beneath the brew basket to receive the brewed coffee 21 DO NOT open brew chambers during brew cycle and cleaning cycle Scalding may occur 22 DO NOT remove the vessel carafe or cup while the appliance is running without the Drip Stop in the closed position Return the vessel carafe or cup quickly and open the Drip Stop to continue the brew 23 DO NOT fill water reservoir with anything o...

Page 4: ...d D Sliding Lid E Hinged Hood F Water Reservoir Base G Single Serve Cup Platform H Control Panel I Brew Basket J Hot Water Dial Not available on all models K Ninja Pod Adapter L Brew Through Lid N Ninja Glass Carafe O Ninja Smart Scoop P Intelligent Warming Plate Q Drip Stop E C D H I O J B L N 1 877 646 5288 A G F K P Q ...

Page 5: ...ITUDE CALIBRATION BREW Required for users in high altitude areas Not running the high altitude calibration brew in a high altitude area will result in excessive steaming during brewing Because water boils at a lower temperature at higher altitudes running a calibration cycle before your first brew allows the brewer to detect the boiling point of water at your location Running a calibration cycle w...

Page 6: ...cator is in the REMOVE position Then using the handles on the left and right lift the adapter out of the brewer 8 1 877 646 5288 NOTE We recommend using cool or room temperature water in the reservoir DO NOT fill with hot or boiling water NOTE DO NOT use ground coffee for the priming brew BREW VOLUMES AND MEASUREMENTS Each size and brew style produces a different amount of coffee to optimize stren...

Page 7: ...Xl Travel 1 4 Carafe 3 5 big scoops 6 10 tablespoons 1 2 Carafe 3 4 Carafe 4 7 big scoops 8 14 tablespoons Full Carafe USING THE BREW BASKET AND SLIDING LID 1 To prepare for brewing open the sliding lid by sliding it back under the hood and ensure the brew basket is installed 2 Place a 4 paper cone filter or permanent filter not included on all models sold separately in the brew basket NOTE Fold t...

Page 8: ...brewer will beep to signal the brew has started The progress bar around the dial will illuminate to indicate the status of the brew When the brew is finished the machine will beep again and End will appear on the display NOTE Rich Brew will use slightly less water and yield slightly less brewed coffee than Classic Brew See Approximate Brew Volume chart for additional information BREW STYLES NOTE I...

Page 9: ...rewer must remain on for the Delay Brew function to work DO NOT power off or unplug after setting Delay Brew If the brewer is turned off or unplugged delay brew will need to be reset 3 Press DELAY DELAY will illuminate and the clock will begin to flash 12 00 or the last time that was set 4 While the clock is flashing turn the Multi Serve dial to adjust the hour The AM or PM indicator will illumina...

Page 10: ...ildup is affecting the performance of the brewer and or the flavor of your coffee The Intelligent Clean Cycle Indicator will automatically illuminate orange when a cleaning cycle is recommended for your brewer If the indicator is ignored your brewer may stop mid brew and display CLn indicating it needs immediate cleaning on the current mode CLEANING AFTER A BREW 1 After the brewer has cooled remov...

Page 11: ...escale the brewer properly IMPORTANT DO NOT remove the carafe at any time during the clean cycle IMPORTANT If you cancel the clean cycle your brewer will not be properly descaled NOTE If the display ever reads CLn it indicates heavy scale buildup on that mode Run a clean cycle on the current mode There s sediment in my coffee If using a permanent filter sold seperately this may be due to using fin...

Page 12: ...TART BREW button to resume If the reservoir is filled with water remove and reseat the reservoir If the issue persists contact Customer Service at 1 877 646 5288 CLn The system has detected that a clean cycle needs be run immediately to remove calcium scale buildup in the heater See Cleaning Descaling Your Brewing System for instructions STOP A brew cycle was cancelled ERROR MESSAGES Er If the clo...

Page 13: ...ories com 2 Any unit that has been tampered with or used for commercial purposes 3 Damage caused by misuse abuse negligent handling failure to perform required maintenance or damage due to mishandling in transit 4 Consequential and incidental damages 5 Defects caused by repair persons not authorized by SharkNinja These defects include damages caused in the process of shipping altering or repairing...

Page 14: ...25 ninjakitchen com NOTES NOTES 24 1 877 646 5288 ...

Page 15: ...ained herein are subject to change without notice NINJA is a registered trademark of SharkNinja Operating LLC NINJA SMART SCOOP is a trademark of SharkNinja Operating LLC All other marks including KEURIG and K CUP are trademarks of their respective owners For SharkNinja U S patent information visit sharkninja com uspatents 2021 SharkNinja Operating LLC CFP200Series_IB_MP_Mv11 PRINTED IN CHINA ninj...

Reviews: