background image

 19


Installation 

of 

the Speaker and Grille in New or Existing Construction

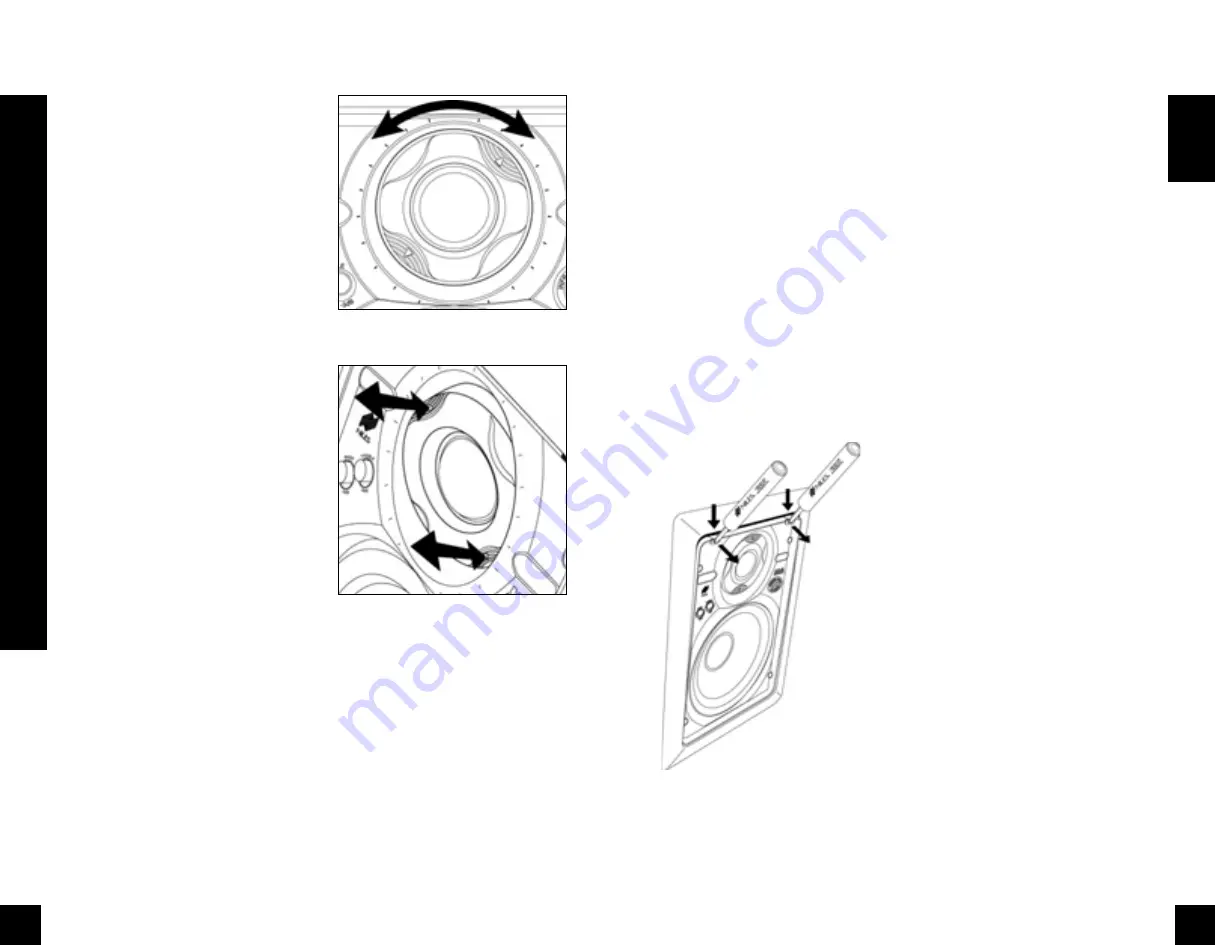
Adjusting the Tweeter

The tweeter is housed in a precision adjust-

ment mechanism which enables precise 

aiming of the directional high frequencies 

to provide optimum performance. To adjust 

the tweeter:


1.  Carefully grasp the tweeter housing by 

placing your thumb and forefinger in the 

indentations provided.

2.  Rotate the tweeter housing either clock-

wise or counter clockwise as required. 

The mechanism is indexed at equal 

intervals so that both speakers in a pair 

can be adjusted equally. Simply count 

the number of “clicks” as the first tweet-

er is adjusted. Repeat the process for the 

second speaker, rotating the tweeter the 

same number of “clicks” in the opposite 

direction 

(See Figure 19)

.

3.  Pivot the tweeter on both speakers 

equally by depressing the housing at 

the arrows until the desired angle is 

achieved 

(See Figure 20)

Installing the Grille

Carefully fit the grille into its recess so that it 

is barely in place. Starting with one corner, 

go around the speaker, pushing the grille in 

a little bit each time. You should be gentle, 

the aluminum grille can be easily bent out 

of shape. The speaker will have an abso-

lutely flush appearance when it is properly 

installed.

Figure 20

Figure 19

 20

Operation

Removal of Speaker 

and Grille

Removing The Speaker

If the grille is already installed, remove it by 

using a bent paper clip or the tip of a cork-

screw and pulling it away from the frame.
Utilizing two small screwdrivers or two 

needle nose pliers, release the snaps that 

hold the speaker to the frame. Insert the 

screwdrivers into the holes in the snaps 

and exert force straight down (towards the 

woofer) until the snaps release. Once the 

snaps release, the speaker can be tilted 

away from the frame to be removed. Do 

not attempt to use the frame for leverage, 

as this may damage the surface of the 

frame 

(See Figure 21)

.

Operation

Listening at Higher Volumes

It requires more power to achieve a reason-

able volume of sound in a large room  than 

it does in a small room. It is possible (even 

if you are not a teenager) to turn the volume 

so high that the amplifier 

runs out of power

This creates “clipping” distortion.

Clipping distortion makes treble sound 

very harsh and unmusical. When you 

hear harsh sounding treble from any good 

speaker, turn the volume down immedi-

ately! Those harsh sounds are masking 

some much more powerful ultra-high-fre-

quency sound spikes which will quickly 

damage any fine loudspeaker. You are 

much less likely to damage a speaker with 

a large amplifier because it will be very 

loud indeed before it produces any clip-

ping distortion. 

Cleaning

You can clean the speaker with a damp-

ened soft cloth or paper towel.  If the 

speaker is mounted high up on a wall or 

ceiling, use a broom to gently brush it off.

Figure 21

Summary of Contents for PERFORMANCE PR5

Page 1: ...B L E N D I N G H I G H F I D E L I T Y A N D A R C H I T E C T U R E I N S T A L L A T I O N O P E R A T I O N G U I D E M O D E L S...

Page 2: ...with the woofer 3 4 Kaladex Tweeter housed in a Precision Adjustment Mechanism The PR Performance series Kaladex Tweeter employs DuPont s latest mate rial technology to produce a dome tweet er with ex...

Page 3: ...the wall You don t have to mask or prep the speaker for painting and worries about theft during the final phases of construction are never an issue Low Diffraction MicroPerf Aluminum Grilles PR speak...

Page 4: ...he effective range is reduced to 9 to 15 feet 3 5 meters Insulating the Wall Cavity For best performance from your speakers fill the wall cavity behind the speaker with fiberglass insulation e g R 19...

Page 5: ...ed at reflective objects and walls The more reflected sound there is in the room the stronger the ambient effect at low vol umes You should use moderation how ever otherwise the compromise becomes too...

Page 6: ...s will save you a lot of time later on Pulling the Cable Pull the cable in sections from the stereo to the volume control from the volume control to the speaker Start with the lon gest sections and us...

Page 7: ...g between two finished floors look for baseboards which could be removed and replaced with the wire behind them Doorjambs can be removed and often have enough space for speaker wire all the way around...

Page 8: ...bracket using the supplied screws Do not over tighten the screws This will distort the frame and the grilles will not fit this is not permanent just loosen the screws and the grille will pop in See F...

Page 9: ...S YOU ARE CUTTING STOP 4 If you are cutting into lath and plaster walls use masking tape to outline your penciled marks drill the four corners with a 1 4 bit and use a razor to score the plaster down...

Page 10: ...peaker wire has two conductors One conductor is attached to the negative terminals and one conductor is attached to the positive terminals of both your speaker and your amplifier Usually the wire is m...

Page 11: ...lle Removing The Speaker If the grille is already installed remove it by using a bent paper clip or the tip of a cork screw and pulling it away from the frame Utilizing two small screwdrivers or two n...

Page 12: ...stranded for up to two hundred feet Connectors accom modate 12 to 18 gauge stranded wire 22 Specifications Specifications Model PR6 Driver Complement 6 1 2 Talc Filled Polypropylene Woofer with Custo...

Page 13: ...Niles Audio Corporation 12331 S W 130 Street Miami Florida 33186 Tel 305 238 4373 Fax 305 238 0185 www nilesaudio com 2008 Niles Audio Corporation DS00279B...

Reviews: