background image

114 Technical Notes/Appendix

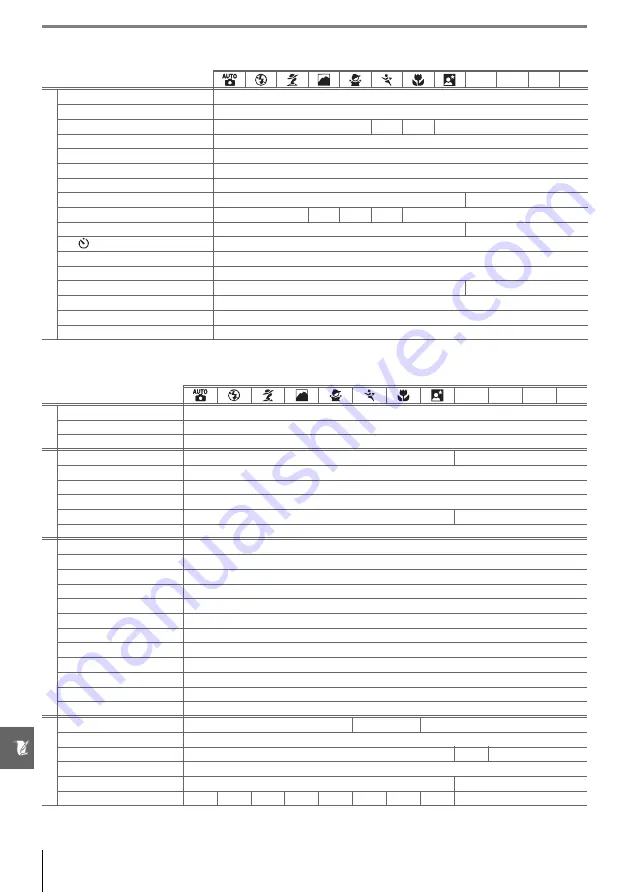
The following defaults are restored with Custom Setting R (

Reset

):

1.

Max. sensitivity

 set to 

800

Min. shutter speed

 set to 

1/30

.

Defaults for other settings are listed below. 

* Auto slow sync.

P

S

A

M

Cust

om
 S

et

ting
s

1: Beep

On

2: Focus mode

AF-A

3: AF-area mode

Closest subject

Dynamic Single

Closest subject

4: Shooting mode

Single frame

5: Metering

Matrix

6: No memory card?

Release locked

7: Image review

On

8: Flash level

0.0

9: AF-assist On

On

On

10: ISO auto

Off

1

11:

/Fn button

Self-timer

12: AE-L/AF-L

AE/AF lock

13: AE lock

Off

14: Built-in flash

TTL

15: Auto off timers

Normal

16: Self-timer

10s

17: Remote on duration

1min.

P

S

A

M

Pla
yback

Playback folder

Current

Slide show: Frame intvl

2s

Rotate tall

On

Shooting menu

Optimize image

Normal

Image quality

JPEG normal

Image size

Large

White balance

Auto

ISO sensitivity

AUTO

200

Noise reduction

Off

Se

tu

p

 m

en

u

CSM/Setup menu

Simple

Display format

Graphic

Auto shooting info

Off

World time

2006.01.01.00:00:00 (format and time zone vary with region of sale)

LCD brightness

0

Video mode

Varies with region of sale

Language

Varies with region of sale

Image comment

USB

Mass storage

Folders

NCD40

File no. sequence

Off

Auto image rotation

On

Ot

h

er

 s

et

tin

gs

Focus area

Center

Focus lock

Off

Flexible program

Off

AE lock hold

Off

Exposure compensation

0.0

Flash mode

Auto

Auto

Auto

Auto Slow

*

Fill flash

Summary of Contents for D-40 - D40 6.1MP The Smallest Digital SLR Camera

Page 1: ... N 4 2 4HE IKON UIDE TO IGITAL 0HOTOGRAPHY WITH THE ...

Page 2: ... 125 Search by key word Error Messages See pages 111 112 If a warning is displayed in the viewfinder or monitor find the solution here Troubleshooting See pages 108 110 Camera behaving unexpectedly Find the solution here Help Use the camera s on board help feature for help on menu items and other topics See page 3 for details Digitutor Digitutor a series of watch and learn manuals in movie form is...

Page 3: ...y All Modes P S A and M Modes More on Playback Connecting to a Computer Printer or TV Menu Guide Playback Options The Playback Menu Shooting Options The Shooting Menu Custom Settings Basic Camera Settings The Setup Menu Creating Retouched Copies The Retouch Menu Technical Notes ...

Page 4: ... neck of an infant or child could result in strangulation Observe proper precautions when handling batteries Batteries may leak or explode if improperly handled Observe the following precautions when handling bat teries for use in this product Use only batteries approved for use in this equipment Do not short or disassemble the battery Be sure the product is off before replacing the battery If you...

Page 5: ...een tested and found to comply with the limits for a Class B digital device pursuant to Part 15 of the FCC rules These limits are designed to provide reason able protection against harmful interference in a residential installation This equipment generates uses and can radi ate radio frequency energy and if not installed and used in accordance with the instructions may cause harmful inter ference ...

Page 6: ...ent licenses issued by public agencies and pri vate groups ID cards and tickets such as passes and meal coupons Comply with copyright notices The copying or reproduction of copyrighted creative works such as books music paintings woodcuts prints maps drawings movies and photographs is governed by national and international copyright laws Do not use this product for the purpose of making illegal co...

Page 7: ...g a Closer Look Playback Zoom 53 Protecting Photographs from Deletion 54 Deleting Individual Photographs 54 Connecting to a Computer Printer or TV 55 Connecting to a Computer 55 Before Connecting the Camera 55 Connecting the USB Cable 55 Printing Photographs 57 Printing Via Direct USB Connection 57 Viewing Photographs on TV 62 Menu Guide 63 Using Camera Menus 63 Playback Options The Playback Menu ...

Page 8: ...e Correction 91 Trim 91 Monochrome 92 Filter Effects 92 Small Picture 92 Image Overlay 94 Technical Notes 96 Optional Accessories 96 Lenses 97 Optional Flash Units Speedlights 99 Other Accessories 102 Accessories for the D40 103 Caring for the Camera 104 Caring for the Camera and Battery Cautions 106 Troubleshooting 108 Camera Error Messages and Displays 111 Appendix 113 Specifications 119 Index 1...

Page 9: ...e D40 103 Who can I ask to repair or inspect my camera Servicing the camera x How do I clean the camera or lens Cleaning the camera 104 Question Key phrase Page How do I focus the viewfinder Viewfinder focus 14 How do I keep the monitor from turning off Stand by mode 78 How do I set the clock World time 11 83 How do I set the clock for daylight savings time How do I change time zones when I travel...

Page 10: ...te control for this camera 33 How do I adjust exposure Exposure P S A and M modes 39 How do I freeze or blur moving objects Mode S shutter priority auto 41 How do I blur background details Mode A aperture priority auto 42 Can I make photos brighter or darker Exposure compensation 47 How do I make a time exposure Long time exposures 44 How do I use the flash Flash photography flash mode 34 Can the ...

Page 11: ...ption Slide show 67 Can I view my photos on TV Television playback 62 How do I copy photos to my computer Connecting to a computer 55 How do I print photographs Printing photographs 57 Can I print photos without a computer Printing via USB 57 Can I print the date on my photographs Time stamp DPOF 59 61 How do I order professional prints Print set 61 How do I bring out details in shadows D lighting...

Page 12: ...Europe and Africa http www europe nikon com support For users in Asia Oceania and the Middle East http www nikon asia com Visit these sites to keep up to date with the latest product information tips answers to frequently asked questions FAQs and general advice on digital imaging and photography Additional informa tion may be available from the Nikon representative in your area See the following U...

Page 13: ...or illustrative purposes 1 Focal length scale 2 Focal length scale index 3 Mounting index 8 4 Rear cover 8 5 CPU contacts 45 6 A M mode switch 8 28 7 Zoom ring 8 Focus ring 28 9 Lens cap This icon marks cautions information that should be read before use to prevent dam age to the camera This icon marks tips additional information that may be helpful when using the camera This icon marks notes info...

Page 14: ... 17 12 flash mode button 34 4 exposure compensation button 47 flash compensation button 48 aperture button 43 13 Eyelet for camera strap 7 Flash compensation 48 14 Connector cover 55 58 62 5 shooting information button 22 15 Video connector 62 z reset button 38 16 Reset switch 108 6 AF assist illuminator 23 17 USB connector 55 58 Self timer lamp 33 18 self timer button 33 Red eye reduction lamp 35...

Page 15: ...r for optional AC adapter connector 103 12 Battery chamber cover latch 10 13 Battery chamber cover 10 103 14 Tripod socket 15 Monitor 6 50 82 16 playback zoom button 53 setting button 22 1 DK 16 viewfinder eyepiece cup 7 z reset button 38 2 Viewfinder eyepiece 5 14 17 thumbnail button 52 3 Diopter adjustment control 14 help button 4 AE L AF L button 46 77 18 menu button 63 protect button 54 19 pla...

Page 16: ...hese modes for full control over camera settings P Programmed auto 40 S Shutter priority auto 41 A Aperture priority auto 42 M Manual 43 Point and Shoot Modes Digital Vari Programs Selecting a Digital Vari Program automatically optimizes settings to suit the selected scene making creative photography as simple as rotating the mode dial Auto 15 Auto flash off 18 Portrait 18 Landscape 18 Child 19 Sp...

Page 17: ...sation indicator 48 12 Battery indicator 15 9 Exposure compensation indicator 47 13 Electronic analog exposure display 43 Exposure compensation 47 14 ISO AUTO indicator 76 15 K appears when memory remains for over 1000 exposures 16 Warning indicator 3 111 The Viewfinder The response time and brightness of the viewfinder may vary with temperature This is normal and does not indicate a malfunction L...

Page 18: ...analog exposure display 43 16 Shooting mode 32 Exposure compensation 47 17 ISO sensitivity 37 4 Aperture f number 39 44 18 White balance mode 49 5 Mode 4 19 Image size 30 6 Shutter speed display 20 Image quality 30 7 Aperture display 21 Battery indicator 15 8 Flash compensation value 48 22 Beep indicator 74 9 Flash sync mode 35 23 Optimize image indicator 68 10 Exposure compensation value 47 24 Au...

Page 19: ...camera strap as shown below The MH 23 Quick Charger 122 The MH 23 is for use with the supplied EN EL9 battery The EN EL9 Rechargeable Li ion Battery 103 121 The EN EL9 is for use with the D40 CHARGE lamp AC adapter plug AC inlet Wall plug shape varies with country of sale The use of third party rechargeable Li ion batteries not bearing the Nikon holographic seal shown above could interfere with no...

Page 20: ... the camera s bayonet mount and rotate the lens in the direction shown until it clicks into place If the lens is equipped with an A M or M A M switch select A autofocus or M A autofocus with manual priority Detaching Lenses Be sure the camera is off when removing or exchanging lenses To remove the lens press and hold the lens release button while turning the lens clockwise After removing the lens ...

Page 21: ...atures below 0 C 32 F or above 40 C 104 F During charging the temperature should be in the vicinity of 5 35 C 41 95 F For best results charge the battery at temperatures above 20 C 68 F Battery capacity may drop if the battery is charged or used at lower temperatures 1 1 Remove the terminal cover from the battery 1 2 Connect the power cord to the charger and plug it in 1 3 Place the battery in the...

Page 22: ...s in the off posi tion open the battery chamber cover 2 2 Insert a fully charged battery as shown at right Close the battery chamber cover Removing the Battery Turn the camera off before removing the battery To avoid shorting the battery replace the terminal cover when the battery is not in use ...

Page 23: ...ation on normal menu operation Turn camera on Select language Display map of world time zones Select local time zone UTC field shows time difference between selected time zone and Coordinated Universal Time UTC in hours Display daylight saving time options Highlight On if daylight saving time is in effect Display date menu Press multi selector left or right to select item up or down to change To r...

Page 24: ...lamp is off 2 Turn the camera off and open the memory card slot cover 3 Press the card in to eject c The card can then be removed by hand d 1 1 Before inserting or removing memory cards turn the cam era off and open the card slot cover 1 2 Slide the memory card in as shown at right until it clicks into place The memory card access lamp will light for about a second Close the memory card slot cover...

Page 25: ...nu Highlight Format memory card Display options Highlight Yes Format card Do not turn camera off or remove card or battery until formatting is complete and setup menu is displayed Formatting Memory Cards Use the camera Format memory card option to format memory cards Performance may drop if cards are formatted in a computer The Write Protect Switch SD cards are equipped with a write protect switch...

Page 26: ...ery Press the shut ter release button halfway to reactivate the display in the viewfinder The length of time before the exposure meters turn off automatically can be adjusted using Custom Setting 15 Auto off timers 78 1 Remove the lens cap and turn the camera on 2 Slide the diopter adjustment control up and down until the focus brackets are in sharp focus When operating the diopter adjustment cont...

Page 27: ...ation Check the battery level as described below Monitor Viewfinder Description Battery fully charged Battery partially discharged Low battery Prepare to charge battery blinks blinks Shutter release disabled Charge battery If shooting information is not displayed when the button is pressed the battery is exhausted Charge the battery 1 3 The number of photographs that can be stored on the memory ca...

Page 28: ... the frame or zoom out to increase the area visible in the final photograph select longer focal lengths to zoom in shorter focal lengths to zoom out Zoom in Zoom out 4 1 Press the shutter release button halfway The camera will automatically select the focus area containing the subject closest to the camera and focus on this subject If the sub ject is dark the AF assist illuminator may light to ass...

Page 29: ... mode Flash range varies with aperture and ISO sensitivity 117 remove lens hoods when using the flash If the flash is raised photographs can only be taken when the flash ready indicator is displayed If the flash ready indicator is not displayed remove your fin ger briefly from the shutter release button and try again To save battery power when the flash is not in use return it to its closed positi...

Page 30: ...n under low light 1 Rotate the mode dial to select a Digital Vari Program mode 2 Frame a photograph in the viewfinder focus and shoot Auto Flash Off The built in flash turns off Use where flash photography is prohib ited to photograph infants without using the flash or to capture natural lighting under low light The camera selects the focus area containing the closest subject the AF assist illumin...

Page 31: ...usly while the shutter release button is pressed halfway tracking the subject in the center focus area If the subject leaves the center focus area the camera will continue to focus based on information from the other focus areas The starting focus area can be selected with the multi selector The built in flash and AF assist illuminator turn off automatically Close Up Use for close up shots of flow...

Page 32: ...utton 50 Additional pictures can be displayed by rotating the command dial or pressing the multi selector left or right To end playback and return to shooting mode press the shutter release button halfway Deleting Unwanted Photographs To delete the photograph currently displayed in the monitor press the button A confirmation dialog will be displayed Press the button again to delete the image and r...

Page 33: ...n bursts or using the self timer or a remote control Shooting Mode 32 Use the built in flash Using the Built in Flash 34 Raise ISO sensitivity when lighting is poor ISO Sensitivity 37 Restore default settings Two Button Reset 38 Let the camera choose shutter speed and aper ture Mode P Programmed Auto 40 Freeze or blur motion Mode S Shutter Priority Auto 41 Choose whether to blur background objects...

Page 34: ... on the option selected for Info display format in the setup menu 81 The button can be used to change the settings shown in the shooting information display Display shooting information Selected setting is highlighted Highlight desired setting Settings not available in current mode are grayed out and can not be selected Display options for highlighted setting Highlight desired option Press to retu...

Page 35: ...for Custom Setting 9 AF assist The illuminator has a range of about 0 5 3 0m 1ft 8in 9ft 10in when using the illuminator use a lens with a focal length of 24 200mm and remove the lens hood 2 Focus Mode 75 Focus mode can also be selected from the Custom Settings menu Focus mode Description AF A Auto servo AF default setting Camera automatically selects single servo autofocus when subject is judged ...

Page 36: ... containing subject closest to camera Default for P S A and M modes selected automatically when mode dial is rotated to or Dynamic area User selects focus area manually but if subject leaves selected focus area even briefly camera will focus based on information from other focus areas Use with erratically mov ing subjects Selected automatically when mode dial is rotated to Single area User selects...

Page 37: ...pose photographs with the main subject positioned at either side of the frame Focus Area Selection Controls used Multi selector 1 At default settings the focus area is selected automatically in P S A and M modes To enable manual focus selection in these modes select Single area or Dynamic area for AF area mode in the shooting information display 24 2 Press the multi selector left or right to selec...

Page 38: ...shutter release button is kept pressed halfway Focus Lock Controls used Shutter release button AE L AF L button 1 Position the subject in the selected focus area and press the shutter release button halfway to initiate focus 2 Check that the in focus indicator z appears in the view finder Focus will lock automatically when the in focus indica tor appears and remain locked while the shutter release...

Page 39: ... g the subject is the same color as the back ground The focus area contains objects at different distances from the camera e g the sub ject is inside a cage The subject is dominated by regular geometric patterns e g a row of windows in a skyscraper The focus area contains areas of sharply contrasting bright ness e g the subject is half in the shade The subject appears smaller than the focus area e...

Page 40: ...n be adjusted manually with the lens set to M or M A See the documentation provided with your lens for details Controls used The Electronic Range Finder If the lens has a maximum aperture of f 5 6 or faster the viewfinder focus indicator can be used to confirm whether the portion of the subject in the selected focus area is in focus After positioning the subject in the active focus area press the ...

Page 41: ... in the number of exposures remaining as shown in the shooting information dis play and viewfinder 5 6 The approximate maximum file size of individual photographs and the total number of pictures that can be recorded at the selected setting are also shown in the shooting information display while image quality or size options are displayed 30 Actual file size and memory card capacity may differ Ty...

Page 42: ...mpressed raw data from the image sensor are saved directly to memory card Choose for images that will be retouched on a computer FINE JPEG Images are compressed less than NORM producing higher quality images Com pression ratio roughly 1 4 NORM default Best choice in most situations Compression ratio roughly 1 8 BASIC Smaller file size suited to e mail or the Web Compression ratio roughly 1 16 RAW ...

Page 43: ...signed automatically in ascending order by the camera and xxx is one of the following three letter extensions NEF for NEF RAW images or JPG for JPEG images The NEF and JPEG files recorded at a setting of RAW B have the same file names but different extensions Small copies created with the small picture option in the retouch menu have file names beginning with SSC_ and ending with the extension JPG...

Page 44: ...mode 18 or turn flash off 35 for burst photography 10s Self timer Use for self portraits or to reduce blurring caused by camera shake 33 2s Delayed remote Optional ML L3 remote control required Use for self portraits 33 Quick response remote Optional ML L3 remote control required Use to reduce blurring caused by camera shake 33 The Memory Buffer The camera is equipped with a memory buffer for temp...

Page 45: ...emote control is used with the camera in autofocus mode you can check focus by pressing the shutter release button halfway 4 Remove the viewfinder eyepiece cup and insert the supplied DK 5 eyepiece cap as shown This prevents light entering via the viewfinder interfering with exposure 5 Take the photograph Self timer Press the camera shutter release button halfway to focus then press it the rest of...

Page 46: ...uilt in Flash and Modes Using the Built in Flash P S A and M Modes Lowering the Built in Flash To save power when the flash is not in use press it gently downward until the latch clicks into place Controls used 1 Rotate the mode dial to or 2 Choose a flash mode 3 Take pictures Unless off is selected the flash will pop up as required when the shutter release button is pressed halfway and fire when ...

Page 47: ...raits REAR rear curtain sync Flash fires just before shutter closes creating the effect of a stream of light behind moving subjects If this icon is not displayed flash will fire immediately after shutter opens The Button Auto Auto slow sync Auto red eye reduction Off Off Auto slow sync red eye reduction P A S M Fill flash Fill flash Red eye reduction Rear curtain slow sync Red eye reduction Rear c...

Page 48: ... only one picture will be taken each time the shutter release button is pressed The shutter release may be briefly disabled to protect the flash after it has been used for several con secutive shots The flash can be used again after a short pause For information on optional flash units Speedlights see Optional Flash Units Speedlights 99 See Flash Compensation for information on controlling flash l...

Page 49: ...A or M to or a Digital Vari Program mode automatically restores the default ISO sensitivity of Auto Controls used Sensitivity ISO sensitivity is the digital equivalent of film speed The higher the ISO sensitivity the less light needed to make an exposure allowing higher shutter speeds or smaller apertures Just as higher speed films tend to be grainy pictures taken at high ISO sensitivities are pro...

Page 50: ... button button Option Default Option Default Image quality 30 JPEG Normal Metering 45 Matrix Image size 30 Large Flash compensation 48 0 White balance 49 Auto Exposure compensation 47 0 ISO sensitivity 37 Digital Vari Program Auto Flash sync mode 34 P S A M 200 Auto Shooting mode 32 Single frame Auto slow sync Focus mode 23 AF A P S A M Fill flash AF area mode 24 Focus area 25 Center P S A M Close...

Page 51: ...ontrols both shutter speed and aperture Set shutter speed to bulb or for long time exposures Lens Aperture Ring When using a CPU lens equipped with an aperture ring lock the aperture ring at the minimum aperture highest f number Type G lenses are not equipped with an aperture ring Non CPU lenses can only be used in exposure mode M when aperture can be adjusted manually using the lens aperture ring...

Page 52: ...ting the command dial flexible program Rotate the command dial to the right for large apertures small f numbers that blur background details or fast shutter speeds that freeze motion Rotate the command dial to the left for small apertures large f numbers that increase depth of field or slow shutter speeds that blur motion All com binations produce the same exposure While flexible program is in eff...

Page 53: ...il the desired shutter speed is displayed in the viewfinder shutter speed can also be dis played in the monitor by pressing the button 3 Frame a photograph focus and shoot Shutter Speed and Camera Shake To prevent blur caused by camera shake the shutter speed should be faster than the inverse of the focal length of the lens in seconds for example when using a lens with a focal length of 300mm choo...

Page 54: ...l produce the optimal exposure Small apertures high f numbers increase depth of field bringing both the main subject and background into focus Large apertures low f num bers soften background details To take photographs in aperture priority auto 1 Rotate the mode dial to A 2 Rotate the command dial until the desired aperture is dis played in the viewfinder aperture can also be displayed in the mon...

Page 55: ...would be under or over exposed at current settings If the limits of the exposure metering system are exceeded the displays will flash 1 Rotate the mode dial to M 2 Rotate the command dial to choose a shutter speed see the illustration at left below To set aperture below right rotate the command dial while pressing the but ton to display shutter speed and aperture in the monitor press the button Ch...

Page 56: ...ttery or an optional AC adapter Note that noise may be present in long exposures before shooting choose On for the Noise reduction option in the shooting menu Shutter speed Description bulb Shutter remains open while the shutter release button is held down Optional remote control required Select mode M choose a shutter speed of bulb and then select delayed remote or quick response remote mode 33 S...

Page 57: ...of CPU contacts type G and D lenses by a letter on the lens barrel Type G lenses are not equipped with a lens aperture ring CPU lens Type G lens Type D lens 5 Metering 75 Metering can also be selected from the Custom Settings menu Method Description Matrix Recommended in most situations Camera meters a wide area of the frame and instantly sets exposure according to distribution of brightness color...

Page 58: ...button 13 AE Lock 77 This option controls whether the shutter release button locks exposure Autoexposure Lock Controls used AE L AF L button 1 Select mode P S or A and choose center weighted or spot metering exposure lock has no effect in mode M 2 Position the subject in the selected focus area when using center weighted metering position the subject in the center focus area Press the shutter rele...

Page 59: ...ground neg ative values when the main subject is brighter than the background The Button Controls used Exposure compensation is shown in the shooting information dis play Normal exposure can be restored by setting exposure com pensation to 0 Exposure compensation is not reset when the camera is turned off 1EV No exposure compensation 2EV Exposure compensation can also be adjusted by pressing the b...

Page 60: ...r reflections Flash compensation is shown in the shooting information display Normal flash output can be restored by setting flash compensa tion to 0 0 Flash exposure compensation is not reset when the camera is turned off The Button 8 Flash Level 76 Flash compensation can also be adjusted from the Custom Settings menu Controls used Flash compensation can also be adjusted by pressing the and butto...

Page 61: ...u can be used to fine tune white balance measure preset white balance or copy a value for preset white balance from an existing photograph 11 Fn Button 77 White balance can also be set using the command dial Option Description Auto Camera sets white balance automatically Recommended for most sit uations Incandescent Use under incandescent lighting Fluorescent Use under fluorescent lighting Direct ...

Page 62: ...monitor remains on before turning off automatically to save power To Use Description View additional photographs or Press multi selector to right or rotate command dial right to view photographs in order recorded Press multi selector left or rotate command dial left to view photographs in reverse order View photo information Press multi selector up or down to view information about current photogr...

Page 63: ...re compensation 47 3 Camera name 9 Focal length 1 4 Metering 45 10 Flash mode 35 5 Shutter speed 39 44 11 Frame number total number of images 6 Aperture 39 44 1 Protect status 54 7 Tone compensation 69 2 Retouch indicator 89 8 Sharpening 69 3 Image optimization 68 9 Color mode hue 69 4 ISO sensitivity1 37 10 Saturation 69 5 White balance white balance fine tuning 49 70 11 Image comment2 84 12 Fram...

Page 64: ...pixels of each brightness in the image Note that camera histograms are intended as a guide only and may differ from those displayed in imaging applications 1 Protect status 54 3 Frame number total number of images 2 Retouch indicator 89 4 Histogram To Use Description Display more images per page Increase number of images displayed from one full frame play back to four or from four to nine Display ...

Page 65: ...in monitor Keep multi selector pressed to scroll rapidly to other areas of frame Navigation window is dis played when zoom ratio is altered area currently visible in monitor is indicated by yellow border View other areas of image View other images Rotate command dial to view same location in other images at current zoom ratio Cancel zoom Return to full frame playback Delete photo Delete current ph...

Page 66: ...ently dis played in full frame or zoom playback or highlighted in the thumbnail list The photograph will be marked with a icon To remove protection from the photograph so that it can be deleted press the button when the photograph is displayed in full frame or zoom playback or highlighted in the thumbnail list Deleting Individual Photographs Press the button to delete the photograph currently disp...

Page 67: ... 5 AC adapter connector 103 Before connecting the camera select the USB item in the camera setup menu and choose a USB option as described below Do NOT select PTP If PTP is selected when the camera is connected the Windows hardware wizard will be displayed Click Cancel to exit the wizard and then disconnect the camera and select Mass Storage Connecting the USB Cable Computer operating system USB W...

Page 68: ...s selected for USB the monitor and viewfinder will display the indicators shown at right when PTP is selected the normal shooting indicators are displayed 5 Transfer photographs to the computer using PictureProject See the PictureProject online help for more information 6 If PTP is selected for USB the camera can be turned off and the USB cable discon nected once transfer is complete If Mass Stora...

Page 69: ...tures Printing Via Direct USB Connection JPEG photographs can be printed directly from a camera connected to a PictBridge printer 117 When taking photographs for printing via direct USB connection in P S A and M modes choose Ia sRGB or IIIa sRGB for the Custom Color mode option in the Opti mize image menu 68 Take photographs Select photographs for printing using Print set DPOF 61 Select PTP in cam...

Page 70: ...orce or attempt to insert the connectors at an angle Connect the camera directly to the printer do not connect the cable via a USB hub or keyboard 5 Turn the camera on A welcome screen will be displayed fol lowed by the PictBridge playback display Proceed to Printing Pictures One at a Time 59 or Printing Multiple Pictures 60 Press the multi selector left or right to view additional photographs or ...

Page 71: ... to select and return to print menu Border Menu shown at right will be displayed Press multi selector up or down to choose print style from Printer default default for current printer Print with border print photo with white border or No border then press OK to select and return to print menu Time stamp Menu shown at right will be displayed Press multi selector up or down to choose Printer default...

Page 72: ...JPEG photos to maximum of 256 Confirmation dialog shown at right will be displayed press OK to display menu of print options Choose page size border and time stamp options as described on pre ceding page warning will be displayed if selected page size is too small To start printing highlight Start print ing and press OK PictBridge menu will be displayed when printing is complete Scroll through pic...

Page 73: ... direct USB connection to print the date of recording on photographs in the current print order use the PictBridge Time stamp option Highlight Select set Display selection dialog 3 Select pictures and specify number of prints as described in Steps 1 3 on previous page Note that RAW NEF photos can not be selected for printing Display options Highlight option and press multi selector right Data impr...

Page 74: ...apter connector is recommended for extended playback 103 1 Choose the appropriate video mode 83 2 Turn the camera off Always turn the camera off before con necting or disconnecting the video cable 3 Connect the video cable as shown Connect to video device Connect to camera 4 Tune the television to the video channel 5 Turn the camera on and press to begin playback During playback images will be dis...

Page 75: ...ayed help for the current item can be viewed by pressing button Current setting for each option is shown by icon Current menu item is highlighted Menu Description Playback Adjust playback settings and manage photos 65 Shooting Adjust shooting settings 68 Custom Settings Personalize camera settings 74 Setup Format memory cards and perform basic camera setup 80 Retouch Create retouched copies of exi...

Page 76: ... the menus and return to shooting mode The monitor will turn off Display menus Highlight icon for current menu Select menu Position cursor in selected menu Highlight menu item Display options Highlight option Menu items that are displayed in gray are not cur rently available Make selection 1 2 3 4 5 6 7 8 ...

Page 77: ... Option Description Delete Delete all or selected photos 65 Playback folder Choose folder for playback 66 Rotate tall Rotate tall portrait orientation photos during playback 66 Slide show Play photos back in automatic slide shows 67 Print set DPOF Select photos for printing 67 Option Description Selected Delete selected photographs see below All Delete all photographs Highlight picture To view hig...

Page 78: ...de land scape orientation Option Description Current default Only photos in the folder currently selected for Folders in the setup menu are displayed during playback This option is selected automatically when a photo is taken If a memory card is inserted and this option selected before photos have been taken a message stating that the folder contains no images will be displayed during playback Sel...

Page 79: ...mpatible device 57 Choose Dese lect all to remove all photos from the current print order Option Description Frame intvl Choose how long each picture will be displayed Start Start slide show To Use Description Skip back skip ahead Press multi selector left to return to previous frame right to skip to next frame View photo info Change photo info displayed Pause slide show Pause slide show Exit to p...

Page 80: ...nes producing natural results suitable for portraits or retouching on a computer Vivid Enhances saturation contrast and sharpness to produce vivid images with vibrant reds greens and blues More vivid Maximizes saturation contrast and sharpness to produce crisp images with sharp outlines Portrait Lowers contrast while lending natural texture and rounded feel to skin of por trait subjects Black and ...

Page 81: ... space and are suited for printing or use as is with no further modification Choose Ia for portrait shots and IIIa for nature or landscape shots Mode II is adapted to the Adobe RGB color space which supports a wider gamut of colors than sRGB Mode II is the preferred choice for photos that will be extensively processed or retouched Default setting IIIa sRBG Saturation Control the vividness of color...

Page 82: ...ish tinge Selecting an option other than preset in the white balance menu displays the menu shown at right Press the multi selector up or down to select a value for fine tuning press OK to select and return to the shooting menu Preset White Balance Preset white balance can be used when the desired results can not be achieved at other settings or to match white balance to the value used in an exist...

Page 83: ... mode highlight No and press OK 4 The message Take photo of white or gray object filling view finder under lighting for shooting will be displayed When the message clears from the display the viewfinder and shooting information white balance displays will flash as shown at right To exit without measuring a preset value press and select another option for white balance 5 Frame the reference object ...

Page 84: ...reset white balance menu Highlight Use photo Display current source photo To use last measured value 71 highlight Measure and press multi selector right Highlight Select image Display folder list To use current source photo highlight This image and press OK Highlight folder Display images in selected folder Highlight photograph To view highlighted picture full frame press and hold button Set prese...

Page 85: ...tion Off default Noise turns off reduction at ISO sensitivities of 1600 or less Minimal noise reduction is still performed when ISO sensitivity is set to HI 1 On Photographs taken at ISO sensitivities over ISO 800 or at shutter speeds of about 1s or slower are processed to reduce noise if shutter speed is 1s or slower time need to process photographs before they are recorded approximately doubles ...

Page 86: ...es in single servo AF AF S or when shooting stationary sub jects in AF A autofocus mode while the release timer is counting down in self timer and delayed remote modes 33 or when a photograph is taken in quick response remote mode 33 The beep will not sound when Off is selected The current setting is shown in the shooting information display is displayed when the beep is on when it is off 6 Option...

Page 87: ...ing is selected the shutter release is disabled when no memory card is inserted Choose Enable release to enable the shutter release button when no memory card is inserted Photographs will be displayed in the monitor but will not be saved 7 Image Review If On the default setting is selected photographs will automati cally be displayed in the monitor after shooting the length of time photographs are...

Page 88: ...he selected value flash level is adjusted appropriately The maximum value for auto ISO sensitivity can be selected using the Max sensitivity option In modes P and A sensitivity will only be adjusted if underexposure would result at the shutter speed selected for Min shutter speed slower shutter speeds may be used if optimal exposure can not be achieved at the value selected for maximum sensitivity...

Page 89: ...the Fn button and rotate the command dial to select shooting mode 32 Image quality size Press the Fn button and rotate the command dial to select image quality and size 29 ISO sensitivity Press the Fn button and rotate the command dial to select ISO sensitivity 37 White balance Press the Fn button and rotate the command dial to select white balance P S A and M modes only 49 Option Description AE A...

Page 90: ...s are performed Choose a shorter auto off delay for longer battery life Note that the shooting information display turns off automatically when the exposure meters turn off Using an AC Adapter Regardless of the setting chosen the monitor and exposure meters do not turn off automatically when the camera is powered by an optional EH 5 AC adapter and EP 5 AC adapter connector 103 Option Description S...

Page 91: ...se delay in self timer mode 33 The default setting is 10s 17 Remote on Duration Choose how long the camera will wait for a signal from the remote before cancelling delayed or quick response remote modes 33 Choose shorter times for longer battery life The default setting is one minute ...

Page 92: ... sequence 86 Format memory card 81 Mirror lock up 86 Info display format 81 82 Firmware version 86 Auto shooting info 83 Dust off ref photo 87 World time 83 Auto image rotation 88 LCD brightness 83 Video mode 83 Language 84 Image comment 84 USB 84 Option Description Simple default Display only basic options in the Custom Settings 74 and setup menus see above Other menus list all options Full Displ...

Page 93: ...itional menus 5 Highlight Done in the list of menu names and press OK to return setup menu Select Yes to format the memory card Note that this permanently deletes all photographs and any other data the card may contain Be sure that any valued files have been copied to a computer before formatting Formatting Memory Cards Do not turn the camera off or remove the memory card while formatting is in pr...

Page 94: ... mode 24 14 Help indicator 3 6 Beep indicator 74 15 Flash compensation value 48 7 Battery indicator 15 16 Metering mode 45 8 Number of exposures remaining 15 116 17 AF area mode 24 Preset white balance recording indicator 71 18 Focus mode 23 PC mode indicator 56 19 Shooting mode 32 9 Manual flash control indicator 78 20 ISO sensitivity 37 Flash compensation indicator for optional Speedlight 99 21 ...

Page 95: ...o an NTSC television or VCR Choose PAL when connecting the camera to a PAL video device The Clock Battery The camera clock is powered by an independent rechargeable power source which is charged as necessary when the main battery is installed or the camera is powered by an optional EH 5 AC adapter and EP 5 AC adapter connector 103 Three days of charging will power the clock for about one month If ...

Page 96: ...e PTP when connecting to a PictBridge printer or using Camera Control Pro available separately See Connecting to a Computer for information on selecting a USB option for use with PictureProject 55 De Deutsch German Pt Português Portuguese En English English Ru Russian Es Español Spanish Sv Svenska Swedish Fi Suomi Finnish Traditional Chinese Fr Français French Simplified Chinese It Italiano Italia...

Page 97: ...tograph numbered 9999 the camera will create a new folder by adding one to the current folder number e g 101NCD40 The camera treats folders with the same name but different folder numbers as the same folder For example if the folder NIKON is selected for Select folder photographs in all folders named NIKON 100NIKON 101NIKON 102NIKON etc will be visible when Current is selected for Playback folder ...

Page 98: ...ll be created and file numbering will begin again from 0001 Reset As for On except that file numbering is reset to 0001 with the next photograph taken if the current folder already contains photographs a new folder will be created File Numbering If the current folder is numbered 999 and contains 999 photographs or a photograph numbered 9999 the shutter release will be disabled If File no sequence ...

Page 99: ...st Off reference data The monitor turns off when the shutter release button is pressed If the reference object is too bright or too dark the camera may be unable to acquire Image Dust Off reference data and the message shown at right will be displayed Choose another reference object and repeat the process from Step 1 Image Dust Off Dust off ref photo is available with CPU lenses only A lens with a...

Page 100: ...e NX available separately 103 or PictureProject The following orientations are recorded In continuous mode 32 orientation recorded for first shot applies to all images in same burst even if camera orientation is changed during shooting Camera orientation is not recorded when Off is selected Choose this option when taking photographs with the lens pointing up or down Landscape wide orientation Came...

Page 101: ...D lighting Brighten dark or back lit subjects or produce effects similar to the flash 90 Red eye correction Correct red eye caused by the flash 91 Trim Create cropped copies of existing photographs 91 Monochrome Copy pictures in black and white sepia or cyanotype 92 Filter effects Create copies with color filter effects 92 Small picture Create small copies of existing photographs 92 93 Image overl...

Page 102: ...de without creating modified copy press button D Lighting Press the multi selector up or down to choose the amount of cor rection performed The effect can be previewed in the edit dis play Press OK to copy the photograph and return to full frame playback Highlight menu item Display selection screen Highlight photo Display retouch options D lighting brightens shadows making it ideal for dark or bac...

Page 103: ...i selector pressed to scroll rapidly to other areas of frame Navigation window is dis played while buttons or multi selector is pressed area currently visible in monitor is indicated by yellow border View other areas of image Create copy If the camera detects red eye in the selected photograph a copy will be created that has been processed to reduce its effects No copy will be created if the camer...

Page 104: ...s from that described at the beginning of this section instead of selecting a single photograph and then choosing a picture size the user selects a picture size first and then selects one or more photographs to copy at the selected size as described on the fol lowing page Option Description Sky light Creates the effect of a sky light filter making the picture less blue The effect can be previewed ...

Page 105: ...ithout creating copies Highlight Choose size Display options Highlight desired picture size Make selection and return to previous menu Highlight Select images Display selection screen Select pictures 65 Selected pictures are marked with icon Confirmation dialog displayed Highlight Yes Copy photos and exit to full frame playback Viewing Small Pictures Small pictures are indicated by a gray border d...

Page 106: ...ighlighted 2 Press OK A picture selection dialog will be displayed 3 Press the multi selector left or right to highlight the first pho tograph in the overlay To view the highlighted photograph full frame press and hold the button 4 Press OK to select the highlighted image and return to the pre view display The selected image will appear as Image 1 5 Optimize exposure for the overlay by pressing th...

Page 107: ...ve Save the overlay without viewing a preview After an overlay is created the camera will enter full frame play back 50 with the new picture displayed in the monitor Image Overlay Only RAW photographs created with the D40 can be selected for image overlay Other images are not displayed on the selection screen The overlay has the same photo info including date of recording metering shutter speed ap...

Page 108: ...NON NIKON ACCESSORIES COULD DAMAGE YOUR CAMERA AND MAY VOID YOUR NIKON WARRANTY Picture Angle and Focal Length The size of the area exposed by a 35 mm camera is 36 24mm The size of the area exposed by the D40 in contrast is 23 7 15 6 meaning that the picture angle of a 35 mm camera is approxi mately 1 5 times that of the D40 The approxi mate focal length of lenses for the D40 in 35 mm format can b...

Page 109: ...P Nikkor 97 9 9 9 1 Spot metering meters selected focus area 2 Camera exposure metering and flash control may not function when lens is shifted and or tilted or aperture is not at maximum 3 Electronic range finder can not beused when shifting or tilting lens 4 Compatible with the following lenses AF S VR Micro ED 105mm f 2 8G IF autofocus not supported AF S VR ED 70 200mm f 2 8G IF 200mm f 2G IF 3...

Page 110: ... 5 serial numbers 280001 300490 Lenses for the F3AF 80mm f 2 8 200mm f 3 5 TC 16 Teleconverter PC 28mm f 4 serial number 180900 or earlier PC 35mm f 2 8 serial numbers 851001 906200 Old model PC 35mm f 3 5 Old model 1000mm f 6 3 Reflex 1000mm f 11 Reflex serial numbers 142361 143000 2000mm f 11 Reflex serial numbers 200111 200310 AF S VR ED 70 200mm f 2 8G AF S VR 300mm f 2 8G AF S ED 80 200mm f 2...

Page 111: ...d 90 right and the SB 800 can be rotated 7 below the horizontal The SB 800 and SB 600 support auto power zoom 24 105mm and 24 85mm respectively ensuring that the illuminating angle is adjusted in accord with lens focal length and have both a built in wide panel that can be used for an angle of 14mm the SB 800 also supports 17mm and an illuminator that can be used when adjusting settings in the dar...

Page 112: ...Speedlight controls to select flash mode Non TTL auto is selected automatically when a non CPU lens is attached 7 Auto aperture is selected automatically if CPU lens is attached Non TTL auto is selected automatically if non CPU lens is attached 8 Use Speedlight controls to select flash mode Use Only Nikon Flash Accessories Use only Nikon Speedlights Negative voltages or voltages over 250V applied ...

Page 113: ...round Choose a flash mode other than slow sync or choose a larger aperture The shutter will synchronize with an external flash at speeds of 1 500s or slower i TTL flash control can be used at ISO sensitivities between 200 and 1600 Higher values may not pro duce the desired results at some ranges or apertures If the flash ready indicator blinks for about three seconds after a photograph is taken th...

Page 114: ...inding The D40 can not be used with linear polarizing filters Use the C PL circular polarizing fil ter instead The NC and L37C filters are recommended for protecting the lens When using an R60 filter set exposure compensation to 1 Moiré may occur if a filter is used when the subject is framed against a bright light or when a bright light source is in the frame Center weighted metering is recommend...

Page 115: ...ace Video cables EG D100 video cable View photos on TV or record them to video tape 62 Remote controls ML L3wirelessremotecontrol Use as a remote shutter release for self portraits or to prevent blur caused by camera shake The ML L3 uses a 3V CR2505 battery Software Capture NX A complete photo editing package with support for RAW images Update to the most recent version Camera Control Pro Control ...

Page 116: ...e elements are made of glass and are easily damaged Remove dust and lint with a blower If using an aerosol blower keep the can vertical to prevent the discharge of liquid To remove fingerprints and other stains apply a small amount of lens cleaner to a soft cloth and clean with care Monitor Remove dust and lint with a blower When removing fingerprints and other stains wipe the surface lightly with...

Page 117: ...ror is raised a beep will sound and the AF assist illuminator will blink to warn that the shutter curtain will close and the mirror will be lowered after about two min utes End cleaning or inspection immediately 1 Remove the lens and turn the camera on 2 Select Mirror lock up from the setup menu note that this option is not available at battery levels of or below 3 Highlight On and press OK The me...

Page 118: ... interruption of power avoid carrying the product from one location to another while the AC adapter is connected Cleaning When cleaning the camera body use a blower to gently remove dust and lint then wipe gently with a soft dry cloth After using the camera at the beach or seaside wipe off any sand or salt using a cloth lightly dampened in pure water and then dry the camera thoroughly The lens and...

Page 119: ...accord with local regulations Foreign Matter on the Low Pass Filter Nikon takes every possible precaution to prevent foreign matter from coming into contact with the low pass filter during production and shipping The D40 however is designed to be used with inter changeable lenses and foreign matter may enter the camera when lenses are removed or exchanged Once inside the camera this foreign matter...

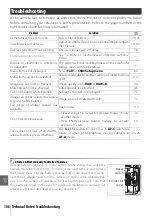
Page 120: ...ality set to RAW or RAW B 30 Metering can not be changed Autoexposure lock in effect 46 Can not measure white balance Subject is too dark or too bright 71 Image can not be selected as source for preset white balance Image was not created with D40 72 Full range of shutter speeds not available Flash in use 117 Can not select focus area Closest subject selected for AF area mode choose another mode Pr...

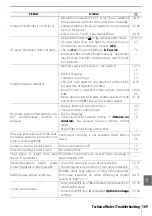
Page 121: ...12 13 15 17 23 8 39 39 43 45 41 43 No photo taken when remote con trol shutter release button is pressed Replace battery in remote control Choose remote control mode Flash is charging Time selected for Custom Setting 17 Remote on duration has passed reselect remote control mode Bright light is interfering with remote 103 33 17 79 Only one shot taken each time shut ter release button is pressed in ...

Page 122: ...ide landscape orientation Select On for Rotate tall Photo was taken with Off selected for Auto image rotation Camera orientation was changed while shutter release button was pressed in continuous shooting mode Camera was pointed up or down when photo was taken 66 88 88 88 Can not delete photo Photo is protected remove protection 54 Can not change print order Memory card is full or locked 13 15 Can...

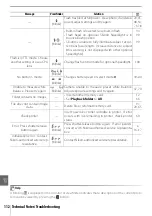
Page 123: ...camera off immediately 105 Shutter release disabled Recharge battery blinks Turn camera off and recharge battery or replace with fully charged spare battery 9 10 15 Clock not set blinks Set camera clock 11 NO MEMORY CARD Insert memory card 12 13 Memory card is locked Slide lock to write position blinks Slide card write protect switch to write position 13 This card can not be used blinks Use Nikon ...

Page 124: ... CPU lens blinks Change flash control mode for optional Speedlight 100 No Bulb in S mode blinks Change shutter speed or select mode M 39 44 blinks Unable to measure white balance Please try again blinks Camera unable to measure preset white balance Adjust exposure settings and try again 47 70 Folder contains no images Insert another memory card Set Playback folder to All 12 66 File does not contai...

Page 125: ...om Settings 2 1 Beep 9 9 9 9 9 9 9 9 9 9 9 9 2 Focus mode1 9 9 9 9 9 9 9 9 9 9 9 9 3 AF area mode1 93 93 93 93 93 93 93 93 9 9 9 9 4 Shooting mode1 9 9 9 9 9 9 9 9 9 9 9 9 5 Metering1 9 9 9 9 6 No memory card 9 9 9 9 9 9 9 9 9 9 9 9 7 Image review 9 9 9 9 9 9 9 9 9 9 9 9 8 Flash level 9 9 9 9 9 AF assist 9 9 9 9 9 9 9 9 9 9 10 ISO auto 9 9 9 9 11 Fn button 9 9 9 9 9 9 9 9 9 9 9 9 12 AE L AF L 9 9 ...

Page 126: ...imers Normal 16 Self timer 10s 17 Remote on duration 1min P S A M Playback Playback folder Current Slide show Frame intvl 2s Rotate tall On Shooting menu Optimize image Normal Image quality JPEG normal Image size Large White balance Auto ISO sensitivity AUTO 200 Noise reduction Off Setup menu CSM Setup menu Simple Display format Graphic Auto shooting info Off World time 2006 01 01 00 00 00 format ...

Page 127: ...Choose a combination of aperture and shutter speed flexible program mode P 40 Choose a shutter speed modes S and M 41 43 Set aperture mode A 42 Set aperture mode M 43 Set exposure compensation modes P S and A 47 Flash settings Choose a flash mode P S A and M modes 34 36 Set flash compensation P S A and M modes 48 Fn button available when the following options are selected for Custom Setting 11 77 ...

Page 128: ...Additional photographs can be taken as soon as enough memory is available in buffer 3 Total file size of NEF RAW and JPEG images Exposure Program Mode P The exposure program for mode P is shown in the following graph The maximum and minimum values for EV vary with ISO sensitivity the above graph assumes an ISO sensitivity of ISO 200 equivalent When matrix metering is used values over 171 3EV are r...

Page 129: ...ivity ISO equivalency and aperture Supported Standards DCF Version 2 0 The Design Rule for Camera File Systems DCF is a standard widely used in the digital camera industry to ensure compatibility among different makes of camera DPOF Digital Print Order Format DPOF is an industry wide standard that allows pictures to be printed from print orders stored on the memory card Exif version 2 21 The D40 s...

Page 130: ...ing to high temperature mercury vapor lamps White balance Fine tuning None 3 2 1 1 2 3 Auto 3 500K 8 000K Fine tuning added to value selected by camera Incandescent 3 000K 3 300K 3 200K 3 100K 2 900K 2 800K 2 700K Fluorescent 4 200K 7 200K 6 500K 5 000K 3 700K 3 000K 2 700K Dir sunlight 5 200K 5 600K 5 400K 5 300K 5 000K 4 900K 4 800K Flash 5 400K 6 000K 5 800K 5 600K 5 200K 5 000K 4 800K Cloudy 6...

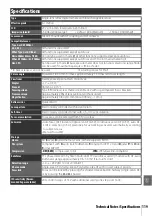
Page 131: ...ckets Frame coverage Approximately 95 of lens vertical and horizontal Magnification Approximately 0 8 50 mm lens at infinity 1 0m 1 Reflex mirror Quick return Lens aperture Electronically controlled with instant return Self timer Electronically controlled timer with 2 5 10 or 20s duration Focus area selection Focus area can be selected from 3 focus areas Lens servo Autofocus AF Instant single serv...

Page 132: ...ion at shutter speeds of up to 1 500 s Flash control TTL TTL flash control by 420 segment RGB sensor i TTL balanced fill flash for digital SLR and standard i TTL fill flash for digital SLR available when CPU lens is used with built in flash SB 400 SB 800 and SB 600 Auto aperture Available with SB 800 and CPU lens Non TTL auto Available with such Speedlights as SB 800 80DX 28DX 28 27 and 22s Range ...

Page 133: ... battery contacts clean Soiled contacts can reduce battery performance Use batteries immediately after charging Batteries will lose their charge if left unused The battery level displayed by the camera may vary with changes in temperature Specifications Nikon reserves the right to change the specifications of the hardware and software described in this manual at any time and without prior notice N...

Page 134: ...DX format digital cameras Focal length 18 55mm Max reproduction ratio 1 3 5 5 6 Construction 7 elements in 5 groups including 1 ED glass element and 1 aspherical element Angle 76 28 50 Zoom positions 18 24 35 45 55 Distance information Supplied to camera body Zoom Zoom adjusted by rotating lens ring Focus Autofocus with low noise motor manual focus Min focus distance 0 28m 11in at all zoom positio...

Page 135: ... Capture NX 31 87 103 Center weighted See Meter ing Clock 83 111 battery 83 Close up 4 19 Closest subject priority See Focus AF area mode CLS See Creative Lighting Sys tem Color See Color mode Filter effects Hue Saturation White balance Color mode 69 Color profile See Color mode Color space See Color mode Color temperature 70 118 See also White balance Computer 55 56 Continuous See Shooting mode c...

Page 136: ...oting menu 68 69 Options See Accessories optional P P See Programmed auto PictBridge 57 61 117 PictureProject 31 55 56 57 88 103 Picture Transfer Protocol See USB PTP flexible program indicator 5 40 Playback 20 50 54 full frame 20 50 menu 65 67 thumbnail 52 zoom 53 Playback folder playback menu 66 Portraits See portrait mode night portrait mode Optimize image PRE See White balance preset Printing ...

Page 137: ...83 VIDEO OUT 2 62 Viewfinder 5 14 16 102 111 112 accessories 102 focus 14 indicators 5 111 112 Viewing photographs See Playback W white balance indicator 6 49 70 72 White balance 49 70 72 See also Color temperature preset 49 70 72 White balance shooting menu 49 70 72 World time setup menu 11 83 ...

Page 138: ...126 ...
Page 139: ...0RINTED IN 4HAILAND O REPRODUCTION IN ANY FORM OF THIS MANUAL IN WHOLE OR IN PART EXCEPT FOR BRIEF QUOTATION IN CRITICAL ARTICLES OR REVIEWS MAY BE MADE WITHOUT WRITTEN AUTHORIZATION FROM 20 2 4 ...

Reviews: