background image

- 26 -

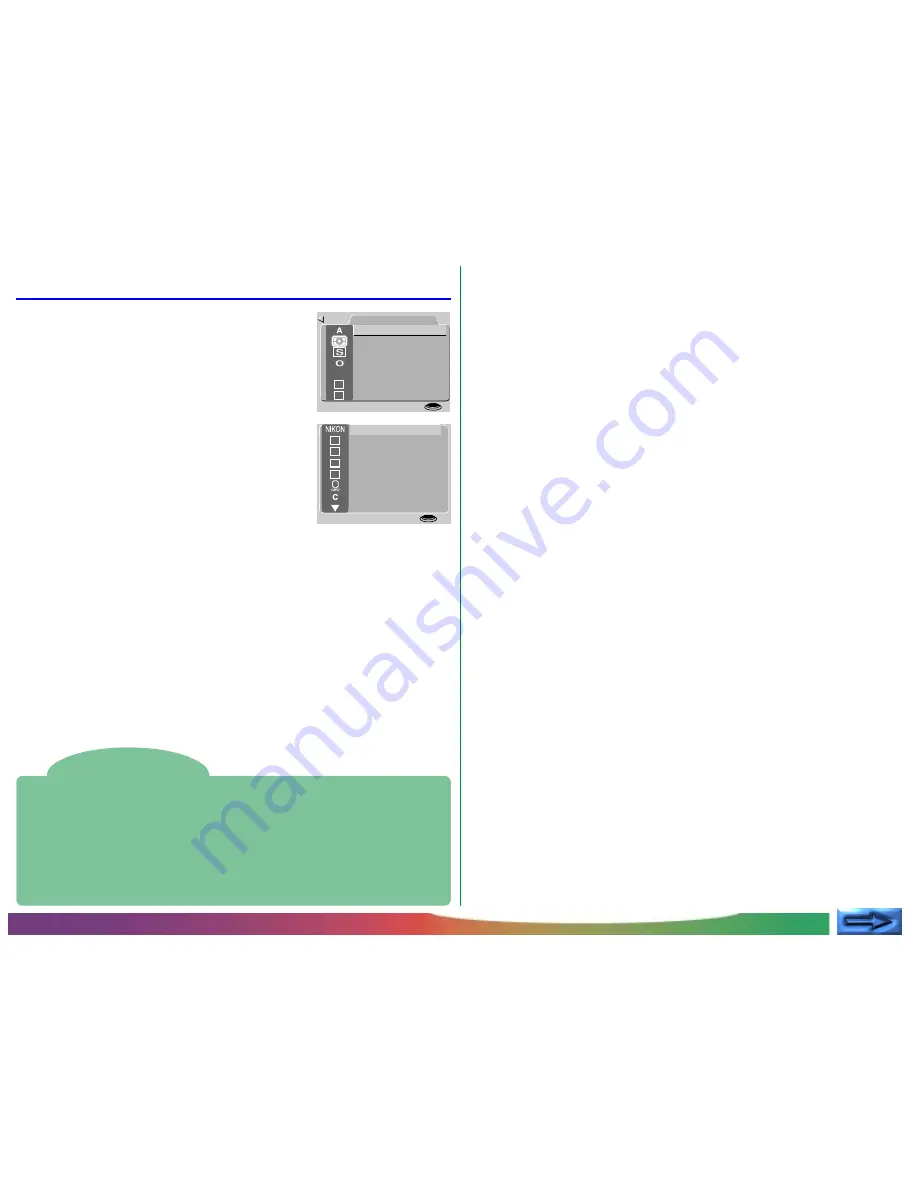
The M-REC Menu

To display the M-REC menu, turn the mode
dial to M-REC and press the MENU button.
The M-REC menu has two pages of options;
you can move from the first to the second
page using the MENU button.  Press the
MENU button when the second page is
displayed to return to shooting mode.

Using the menus

If the menu does not appear when you press the MENU button, press the
MONITOR button until the LCD monitor comes on.  Items can be
highlighted using the zoom buttons (

▼▲

) and selected using the shutter-

release button.  You can page through menus that have multiple pages by
pressing the MENU button.  To clear a menu from the screen, highlight BK
and press the shutter-release button, or press the MENU button until the
menu disappears.

The M-REC menu contains the following options:

WHITE BAL (White Balance)

Depending on lighting conditions, whites in a photograph
may appear slightly yellow or blue.  Use white-balance
settings to eliminate unwanted coloration.  For details, see
“Taking Photographs: Lighting” in the 

Pocket Guide

.

METERING

Determines which part of the image is used to set exposure.
See “Taking Photographs: Lighting” in the 

Pocket Guide

 for

details.

CONTINUOUS

Allows you to choose between single-shot and four multi-
shot modes.  This setting is detailed in the 

Pocket Guide

,

“Taking Photographs: Multi-shot Mode.”

IMG ADJUST (Image Adjustment)

Permits digital adjustment of brightness and contrast to
enhance photos.  See “Taking Photographs: Lighting” in the

Pocket Guide

.

SENS. (Sensitivity)

By default, the COOLPIX 800 has a sensitivity roughly
equivalent to ISO 100.  Using this item, you can choose
values for sensitivity equivalent to ISO 100, 200, or 400, or
let the camera adjust sensitivity according to the amount of
light available (AUTO).  See the 

Pocket Guide

, “Taking

Photographs: Lighting.”

BEST SHOT (Best-Shot Selection)

Takes multiple photographs and saves the sharpest image to
memory.  For details, see “Taking Photographs: Best-Shot
Selection” in the 

Pocket Guide

.

VGA

Allows you to choose an image size of 640 

×

 480 pixels in

place of the default size of 1,600 

×

 1,200 pixels.   See below

for details.

FOLDERS

Create new folders, rename or delete existing folders, or
choose the folder in which to store subsequent photos.  See
“The Camera Menus: The A-REC Menu,” above.

The Camera Menus: The M-REC Menu

S H O O T I N G
W H I T E   B A L

C O N T I N U O U S

M E T E R I N G

B E S T S H O T

I M G   A D J U S T
S E N S .

AUTO

V G A

S E T

SHUTTER

B K

1

U S E R   S E T

R E S E T   A L L

F O L D E R S
L E N S

C A R D F O R M A T

A E   L O C K

B & W

S E T   U P
S E T

SHUTTER

Summary of Contents for CoolPix 800

Page 1: ...s Putting Batteries in Your Camera Inserting and Removing Memory Cards Choosing a Language for the Menus Setting the Time and Date Taking Your First Photograph Using the Buttons A REC M REC Flash Settings Focus Settings Using the Self Timer Image Quality Using the Buttons PLAY ...

Page 2: ...ngs LCD On Off The Controls Menu The Playback Menu Deleting Multiple Photographs Using Folders Playback Slideshow Protecting Photographs from Deletion Hiding Photographs During Playback Preparing Photographs for Printing The Controls Menu PLAY Connections Connecting to a Television or VCR Viewing Photos on a Computer Caring for Your Camera Cleaning Storage Accessories What s in the Box Optional Ac...

Page 3: ...omposed of the following chapters First Steps lists the steps involved in setting up your camera and taking photographs Using the Buttons A REC M REC covers the settings that can be changed using the camera s control buttons and the zoom buttons flash focus exposure compensation and image quality Using the Buttons PLAY outlines basic playback functions viewing photographs and deleting single image...

Page 4: ...em back Before you will be able to use your camera you will need to complete the following steps attach the camera strap see For Your Safety insert batteries or connect the AC adapter sold separately for information on using the AC adapter see the documen tation provided with the adapter insert the compact flash memory card choose the language to be used in the setting and playback menus set the c...

Page 5: ...release button or press the MENU button until the menu disappears First Steps Choosing a Language for the Menus remove the memory card Push the card release button down until the card can be removed by hand 4 Close the card slot cover Choosing a Language for the Menus The cameras menus and messages can be displayed in English German French or Japanese To select a language for the display follow th...

Page 6: ...1 0 1 Y M D S E T U P C O N T R O L S A U T O O F F C A R D F O R M A T L A N G U A G E D A T E B K L C D B R I G H T 0 1 30 F3 8 Setting theTime and Date When you turn on your camera for the first time you will need to set the time and date as follows 1 Turn the mode dial to PLAY 5 Edit the item using the zoom in button to increase its value or the zoom out button to decrease its value After edit...

Page 7: ... AUTO NORMAL Number of exposures remaining TakingYour First Photograph Thissectionoutlinesthebasicstepsinvolvedintakingaphotograph in A REC mode Step 1 Turn the mode dial to A REC Toenterautomaticrecordingmode turnthe selector dial to A REC After a short pause while the camera initializes current settings will be displayed in the LCD monitor and the control panel 1 125 F3 8 Step 2 Check the number...

Page 8: ...h autofocus no exposure compensation an image quality of nor mal and an image size of full 1 600 1 200 pixels 1 125 1 125 F3 8 F3 8 These settings allow the camera to set focus automatically at any distance greater than 30cm one foot The camera measures the available light and adjusts shutter speed and aperture accordingly firing the flash to provide additional light as necessary Step 4 Compose a ...

Page 9: ...rding to the distance to the subject If the focus operation is successful the AF Autofocus Flash indicator next to the viewfinder will glow green The focus setting will remain unchanged as long as the shutter button is half pressed see the section Focus Lock in theFast Track Guide The zoom ratio cannot be changed while focus lock is in effect If the camera is unable to determine the distance to th...

Page 10: ... while the photograph is recorded Before thephotographistransferredtothememory card it will be displayed briefly in the LCD monitor If the photo was taken at an image size setting of full you can press the button to pause the display for ten seconds shooting canberesumedbypressingthe buttonagain Ifyouarenotpleased with the photograph you can delete it before it is transferred to memory by pressing...

Page 11: ...lit backgrounds ideal for night time photography Use of a tripod is advised Anytime Flash forced on Flash fires whenever photo is taken Use to fill in illuminate a back lit subject Auto AUTO Camera fires flash whenever lighting is poor Best for general use Flash Cancel off Flash will not fire even when lighting is poor Use where flash is prohibited or to capture natural lighting under dim light It...

Page 12: ...lurred If possible use a tripod when lighting is poor At shutter speeds of 1 4 sec or slower noise in the form of colored dots may appear in the final photograph At speeds of 1 4 sec this noise is almost imperceptible but the amount of noise increases as shutter speed slows When the shutter speed is set to 1 4 sec or slower shutter speed will be displayed in the LCD monitor in yellow Noise can be ...

Page 13: ...ixed as long is the shutter release button is held down focus lock Using the Buttons A REC M REC Focus Settings Macro Close up When using macro close up it is recommended that you frame photo graphs in the LCD monitor Macro close up can be used at ranges as short as 7cm 2 8in when the camera is zoomed to the middle optical zoom position When the camera is zoomed to a position suited to such close ...

Page 14: ...played in meters 3 Press the zoom buttons while holding down the button to select a focus distance Focus distance is displayed in the LCD monitor while the control panel shows the focus distance together with a flashing icon A short focus distance can be used to focus the camera on objects at the specified distance Choose a setting of Inf for a focus distance of infinity Unlike the autofocus setti...

Page 15: ... Fully depress the shutter release button to activate the timer Press the shutter release button once for a ten second delay For a three second delay press the shutter release button twice The red eye reduction lamp next to the flash will start to blink before the picture is taken The time remaining before the shutter willbereleasedisdisplayednexttothe iconintheLCDmonitor Tips To stop the automati...

Page 16: ...st trade off be tween memory and image quality in most cases a setting of BASIC can be used to save memory A setting of FINE is suitable for photographs that will be enlarged or printed at high resolution To choose an image quality setting press the button The quality setting will change each time the button is pressed note that an image quality of HI is only available when the mode dial is set to...

Page 17: ...store only one such photo graph at a time To take photographs at an image quality of HI turn the mode dial to M REC then press the button until HI is displayed in the control panel Using the Buttons A REC M REC Image Quality Note HI image quality is not available at a multi shot CONTINUOUS setting of 16 shots or when BSS is on see the Pocket Guide Taking Photographs ...

Page 18: ... The MONITOR button The MONITOR button controls the LCD monitor Press the MONITOR button once to hide photo information a second time to turn the monitor off and a third time to turn the monitor on with information showing Using the Buttons PLAY Tips By default only photographs in the current folder are displayed in playback mode To select another folder for viewing or to view photos in all folder...

Page 19: ...center portion of the image will be en larged to fill the LCD monitor Press the button once for a magnification of 2 twice for a magnification of 3 Press the button a third time to view the photograph at full size 5 The image currently displayed can be deleted by pressing the button This button can also be used to delete the thumbnail currently selected in the pre view list Note that once deleted ...

Page 20: ... This option can be used to extend this limit for A REC and M REC mode CARDFORMAT Card Format Format memory cards for use in the COOLPIX 800 Using the menus If the menu does not appear when you press the MENU button press the MONITOR button until the LCD monitor comes on Items can be highlighted using the zoom buttons and selected using the shutter release button To clear a menu from the screen hi...

Page 21: ...will automatically be created with the same name but a different folder number e g 101NIKON and subsequent photos stored in the new folder For most purposes the folder number can be ignored when viewed from the camera all folders with the same name are the same folder In other words the camera will show folders with the same folder name e g 100NIKON and 101NIKON as a single folder with no folder n...

Page 22: ... return to normal viewing mode To exit the window without creating a new folder press the MENU button Until another folder is selected from the FOLDERS menu all subsequent photographs will be stored in the new folder Renaming existing folders To rename an existing folder 1 Using the zoom buttons highlight RENAME in the OPTIONS menu and press the shutter release button The window shown at right wil...

Page 23: ...f photographs taken with the camera the Image Adjustment option allows you to adjust the brightness of photographs see Taking Photo graphs in the Pocket Guide LCD brightness can be adjusted from the setup menu for each mode To display the setup menu for M REC or PLAY select SETUP from the M REC or playback menus see below You can then adjust brightness as described in steps 2 and 3 below To adjust...

Page 24: ...yed while the card is formatted Do not remove the card from the camera while formatting is in progress as this could damage the card To return to the previous menu without formatting the card highlight NO or BK and press the shutter release button Press the MENU button to return to shooting or playback mode without formatting the memory card Auto Off Whenoperatedonbatterypower thecameraenterssleep...

Page 25: ... may be used again If you then copy the new photograph to a computer on which you had saved the earlier photograph the earlier photograph may be overwritten This can be prevented using the SEQ XFER option The following SEQ XFER settings are available The Camera Menus The A REC Menu SEQ XFER is available from the A REC and M REC setup menus The SEQ XFER setting selected in A REC mode remains in eff...

Page 26: ... Allows you to choose between single shot and four multi shot modes This setting is detailed in the Pocket Guide Taking Photographs Multi shot Mode IMG ADJUST Image Adjustment Permits digital adjustment of brightness and contrast to enhance photos See Taking Photographs Lighting in the Pocket Guide SENS Sensitivity By default the COOLPIX 800 has a sensitivity roughly equivalent to ISO 100 Using th...

Page 27: ...ttings LCD BRIGHT LCD Brightness Adjust the brightness of the LCD monitor See The Camera Menus The A REC Menu above LCD ON OFF Determines whether and when the LCD monitor comes on in M REC mode See below for details CONTROLS Offers a choice of settings for controlling basic camera operations See below for details AUTO OFF When operated on battery power the camera automatically enters sleep mode if...

Page 28: ... pixels and VGA 1 Turn the mode dial to M REC 2 Press the MENU button to display the M REC menu 3 Using the zoom buttons highlight VGA 4 Press the shutter release button to dis play the menu at right For an image size of 1 600 1 200 pixels highlight NO and press the shutter release button Choose YES VGA for an image size of 640 480 pixels If an image size of 640 480 pixels is selected a VGA indica...

Page 29: ... option from the menu shown at right then press the shutter release but ton to return to shooting mode At settings other than NORMAL a lens converter icon will appear in the LCD monitor and settings will be optimized for the chosen converter as described at left Choose NORMAL to cancel changes to settings and restore normal camera operation Option How it works Camera zooms all the way out allowing...

Page 30: ... Using the zoom buttons highlight B W 1 U S E R S E T R E S E T A L L F O L D E R S L E N S C A R D F O R M A T A E L O C K B W S E T U P S E T SHUTTER 4 Press the shutter release button and choose YES black and white mode or NO color mode from the B W menu Note In black and white mode the settings in the white balance menu are not available The chosen setting will be in effect whenever the camera...

Page 31: ... and white balance settings are fixed at the values used in the first photograph taken after ON is selected You can turn the lock function off to allow the camera to set autoexposure and white balance separately for each picture by selecting OFF from the AE LOCK menu To restore the original lock settings select ON again Before beginning a new panorama select RESET to clear the previous settings th...

Page 32: ...l is set to M REC To select a different combination of settings 1 Turn the mode dial to M REC 2 Press the MENU button to display the M REC menu then press it again to view the second page 3 Using the zoom buttons highlight USER SET 4 Press the shutter release button to dis play a list of the settings saved under the selected settings number The settings number can then be changed by pressing the z...

Page 33: ...ot be reset To restore default settings 1 Turn the mode dial to M REC 2 Press the MENU button to display the M REC menu then press it again to view the second page 3 Using the zoom buttons highlight RESET ALL 4 Press shutter release button and select RESET from the RESET ALL menu Set tings will be restored to their default values when the shutter release button is pressed Toexitthemenuwithoutchang...

Page 34: ...ly after shoot ing This is useful when you want to shoot several photos in rapid succes sion Other monitor functions and autofocus are not affected FAST REVIEW monitor on review function off TheLCDmonitorremainsonwhenthe mode dial is turned to M REC Focus is only adjusted when the shutter release button is half pressed ON S AF monitor on single autofocus TheLCDmonitorremainsonwhenthe mode dial is ...

Page 35: ...m is checked the focus distance for manual focus is displayed in feet If this item is not checked distance will be shown in meters To change these control settings 1 Turn the mode dial to M REC 2 Press the MENU button to open the M REC menu then press it again to view the second page 3 Use the zoom buttons to highlight SET UP and press the shutter release button to display the SET UP menu 4 Using ...

Page 36: ... menu provides access to the following settings LCD BRIGHT LCD Brightness Adjusts the brightness of the LCD monitor See The Camera Menus The A REC Menu above CONTROLS Bydefault the buttonisusedtomovethe highlight bar down through the menus the button to move it up This option can be used to reverse this relationship as described below AUTO OFF When operated on battery power the camera automaticall...

Page 37: ...e zoom buttons to display further images Photos that have been hidden with the HIDE IMAGE command are not available for deletion and are not shown in the menu of previews Photos marked with a icon are protected and can not be selected for deletion 2 Use the zoom buttons to highlight SELECTED and then press the shutter release button A menu showing thumb nail previews of the images in the current f...

Page 38: ...t YES and press the shut ter release button to delete the folder To return to the previous menu without delet ing the selected folder highlight NO or BK and press the shutter release button The Camera Menus The Playback Menu D E L E T E D E L E T E F O L D E R A P R I L Y E S N O S E T S H U T T E R B K AUTO D E L E T E S E L E C T E D A L L P R N T S E T F O L D E R S E T S H U T T E R B K AUTO D...

Page 39: ... to select a new folder for playback To select a folder for playback 1 Use the zoom buttons to highlight FOLDERSintheplaybackmenuandpress the shutter release button A menu like that shown at right will be displayed 2 Using the zoom buttons select a folder from the list To view all photo graphs in memory select ALL 3 Press the shutter release button to return to playback The most recent photograph ...

Page 40: ...ED or DELETE ALL options protected files will be deleted when the card is formatted Follow these steps to change the protect status of photographs in the current folder 1 Using the zoom buttons highlight PROTECT in the playback menu and press the shutter release button A menu a thumbnail previews showing the images in the current folder will be displayed 2 Using the zoom buttons highlight a photog...

Page 41: ...evice that supports DPOF and is equipped with a card reader The PRINT SET option in the camera menu allows you to select the photographs to be printed set the number of copies and specify whether the date of recording is to be printed on the photo This information is stored in printer files on the memory card You can then remove the memory card from the camera and take it to a photo developer to b...

Page 42: ...formation files when they are no longer needed The Camera Menus The Playback Menu The Controls Menu PLAY By default the zoom out button is used to move the highlight bar down through the menus and the zoom in button to move it up This relationship can be reversed using the CON TROLS option Follow these steps to reverse the direction of scroll 1 Select SET UP from the playback menu using the zoom b...

Page 43: ...nnect the yellow plug to the VIDEO IN jack on the television or VCR 3 Tune the television to the video channel 4 Turn the mode dial to A REC M REC or PLAY The television monitor will mirror the image displayed in the camera s LCD monitor Connections Connecting to a Television or VCR Tips Connect the camera to the AC adapter available separately when you want the television to continue to display i...

Page 44: ...mory card on a computer running Windows 3 1 You can use Nikon View to browse photographs on a memory card in the same fashion as when the camera is connected to your computer directly See the Nikon View reference manual for details Using a PCMCIA Card Slot 1 To read CompactFlash cards using a PCMCIA Type II or Type III card slot insert the card in a PC card adapter as shown at right Note The COOLP...

Page 45: ... and the body of the camera with a soft cloth after removing dust and dirt with a blower If necessary thebodyofthecameramaybecleanedwithadampcloth although you should be sure to dry the camera immediately afterward Do not apply alcohol thinner or any other cleaning fluids to any part of the camera Storage Storeyourcamerainadry well ventilatedenvironment awayfrom electronic equipment such as televi...

Page 46: ...C adapter EH 30 AC adapter Before using the AC adapter attach the ferrite core provided with your camera to the adapter s DC cable just below the power jack COOLPIX 800 digital camera 1 16MB CompactFlash memory card 1 AA LR6 alkaline bat teries 4 SC EW2 RS 232C se rial cable for PC AT computers 1 SC EM2 serial cable adapter for Macintosh computers 1 EG 900videocable 1 Ferrite core 1 SoftwareCD ROM...

Page 47: ...n No indicators are visible in the LCD monitor Press the MONITOR button until indicators are visible if a slide show is in progress first press the MENU key to halt the slide show The LCD monitor is hard to read The LCD monitor is too dark or too bright Adjust the brightness of LCD monitor as described in The Camera Menus The A REC Menu The LCD monitor is dirty Clean the LCD monitor with a soft dr...

Page 48: ...an adjust exposure as described in the Pocket Guide Taking Photographs Lighting If the photo is underexposed you can also try increasing sensitivity see Using the Buttons A REC M REC Sensitivity The flash doesn t work or takes more than thirty sec onds to charge Battery level is low If the battery indicator in the control panel is flashing or shows a low battery level before using the flash you wi...

Page 49: ...amera Your computer can t read photographs recorded on the memory card Checklist Is the card correctly inserted in the PC card adapter or CF card reader See Connections Viewing Photos on a Computer Is the PC card adapter or CF card reader correctly connected to the computer and are the appropriate drivers installed See the documentation provided with your computer or card reader If you are using a...

Page 50: ...ing the Buttons PLAY or The Camera Menus The Playback Menu The camera has encountered an error while saving a photo or has run out of file numbers in the current folder Try saving photos to a different folder If the SEQ XFER option is on choose OFF or RESET from the SEQ XFER menu see The Camera Menus The M REC Menu If the error persists it may indicate that the card is not prop erly formatted Tran...

Page 51: ...ons PLAY or reformat the card see The Camera Menus The A REC Menu after backing up all photo graphs you would like to keep Thecameracannotdeletetheselected folder because it contains protected or hidden photos R A E H I DDEN L A L I MAGE S I MAGE DA T E L O N I F CON T A I N A S N A NOT B E E H C L E E T ED D T FO L DER S S Y T EM ERROR An error has occurred in the camera s internal circuitry Cut ...

Page 52: ... 0 60 Field of view approximately 80 LCD monitor 1 8 low temperature polysilicon TFT LCD display with brightness adjustment Pixel count 112 000 pixels Refresh rate 30 frames per second Field of view approximately 97 approximately 100 in playback mode Shutter combinedmechanicalandcharge coupledelec tronic shutter Speed 8 1 750 sec Aperture electromagnetically controlled Capture modes single shot co...

Page 53: ...ized images per 8MB card one uncompressed TIFF image approxi mately eight images in Fine mode sixteen images in Normal mode thirty two images in Basic mode Playback Modes single frame zoom thumbnail nine frames slide show Deletion all frames or selected frames Attributes hidden and protected attributes can be set for each image Supported platforms Windows 95 or later Mac OS System 7 5 1 or later I...

Reviews: