background image

94

Menu Guide

Show all menus

Metering

Metering
Continuous

Continuous
BSS

BSS
Image adjustment

Image adjustment
Saturation control

Saturation control
User setting

User setting

MY MENU

2

Shooting menu displayed.

1

Select 

P

S

A

, or 

M

.

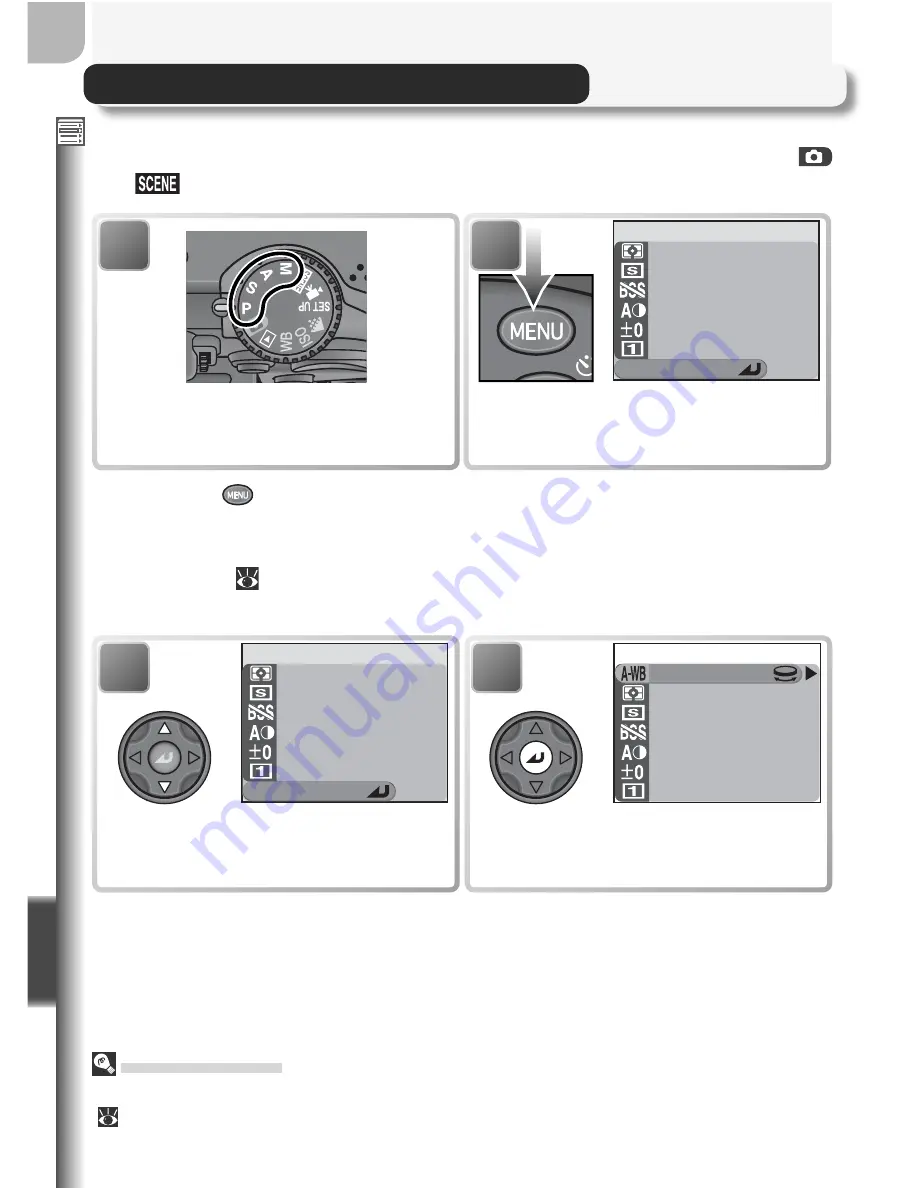
The  Shooting Menu

When the mode dial is set to 

P

S

A

, or 

M

, the settings listed below can be 

adjusted from the shooting menu (the shooting menu is not available in 


and 

 modes).  To display the shooting menu:

2

White balance

Metering

Metering
Continuous

Continuous
BSS

BSS
Image adjustment

Image adjustment
Saturation control

Saturation control
User setting

User setting

ALL MENU

1/3

All options displayed.

1

Show all menus

Metering

Metering
Continuous

Continuous
BSS

BSS
Image adjustment

Image adjustment
Saturation control

Saturation control
User setting

User setting

MY MENU

Highlight  

Show all menus

.

 Using the Menus

For more information on menu operations, see “Before You Begin: Using the Menus” 
(

 10).

Pressing the 

  button displays a one-page custom menu containing six 

items selected from a total of twenty options available in the full shooting 
menu.  You can choose what items appear in the custom menu using the  

My 

menu

 option (

 113).  To display the full shooting menu, which consists of 

three pages of options:

Summary of Contents for 5400 - Coolpix 5.1 MP Digital Camera

Page 1: ...En DIGITAL CAMERA The Guide to Digital Photography with the ...

Page 2: ...gistered trademarks of Microsoft Corporation Internet is a trademark of Digital Equipment Corpora tion CompactFlash is a trademark of SanDisk Corporation Lexar Media is a trademark of Lexar Media Corpora tion Adobe and Acrobat are registered trademarks of Adobe Systems Inc All other trade names mentioned in this manual or the other documentation provided with your Nikon product are trademarks or r...

Page 3: ... More on Playback for information on viewing pictures on the camera on TV on a computer and printing pictures Read Movies to learn more about shooting and viewing movies Refer to the Menu Guide for information on camera menus Technical Notes covers optional accessories camera care troubleshooting and camera specifications Now you are ready to take pictures and view them in the monitor You can then...

Page 4: ...n Do not use in the presence of flam mable gas Do not use electronic equipment in the presence of flammable gas as this could result in explosion or fire Observe caution when using the cam era strap Never place the strap around the neck of an infant or child Do not disassemble Touching the product s internal parts could result in injury In the event of mal function the product should be repaired o...

Page 5: ...t of reach of children Particular care should be taken to prevent infants from putting the batteries or other small parts into their mouths Removing memory cards Memory cards may become hot during use Observe due caution when remov ing memory cards from the camera CD ROMs The CD ROMs on which the software and manuals are distributed should not be played back on audio CD equipment Playing CD ROMs o...

Page 6: ... circuitry To prevent an accidental interruption of power avoid carrying the product from one place to another while the AC adapter available separately is connected Do not drop The product may malfunction if subjected to strong shocks or vibration Keep away from strong magnetic fields Do not use or store this device in the vicinity of equipment that generates strong electromagnetic radiation or m...

Page 7: ...r is connected Consult the dealer or an experienced radio television technician for help CAUTIONS Modifications The FCC requires the user to be notified that any changes or modifications made to this device that are not expressly ap proved by Nikon Corporation may void the user s authority to operate the equip ment Interface Cables Use the interface cables sold or provided by Nikon for your equipm...

Page 8: ... of the government has been obtained the copying or reproduction of unused post age stamps or post cards issued by the government is prohibited The copying or reproduction of stamps issued by the government and of cer tified documents stipulated by law is prohibited Cautions on certain copies and re productions The government has issued cautions on copies or reproductions of securities is sued by ...

Page 9: ...the Battery Level 18 Basic Setup 20 Basic Photography 23 Taking Pictures in Mode 24 Step 1 Select Mode 24 Step 2 Frame the Picture 26 Step 3 Focus and Shoot 28 Step 4 View the Results 31 Flash Photography 32 Focusing Near and Far 34 Self Timer Mode 35 Exposure Compensation 36 Taking Pictures in Scene Mode 37 Taking Pictures for a Panorama 44 More on Photography 47 Controlling Exposure 48 P Program...

Page 10: ...ctures Thumbnail Playback 78 Taking a Closer Look Playback Zoom 79 Adding Audio Commentary Voice Memo 80 Creating Small Copies Small Picture 81 Viewing Pictures on TV 82 Viewing Pictures on a Computer 83 Printing Pictures 86 Movies 87 Recording Movies 88 Recording a Time Lapse Movie 90 Viewing Movies 92 Menu Guide 93 The Shooting Menu 94 White Balance 96 Metering 96 Continuous 96 Best Shot Selecto...

Page 11: ...sfer 129 Move Image 131 CF Card Format 133 Small Pic 133 The Setup Menu 134 Language 135 Date 135 Folders 135 Monitor Options 136 Seq Numbers 138 Shutter Sound 139 Auto Off 140 CF Card Format 140 Controls 141 Shot Confirmation 143 info txt 143 USB 144 Video Mode 144 Reset All 144 Date Imprint 145 Firmware Version 145 Technical Notes 147 Optional Accessories 148 Caring for Your Camera 149 Error Mes...

Page 12: ...x ...

Page 13: ...You Begin Read this chapter to familiarize yourself with the symbols and conventions used in this manual camera controls and displays and menu opera tions Introduction 2 Parts of the Camera 4 Using the Menus 10 ...

Page 14: ...ll read it To make it easier to find the information you need the following symbols and conventions are used This icon marks cautions informa tion that should be read before use to prevent damage to the camera This icon marks tips additional in formation that may be helpful when using the camera This icon marks notes information that should be read before using the camera This icon indicates that ...

Page 15: ...ning As part of Nikon s Life Long Learning commitment to ongoing product support and education continually updated information is available on line at the following sites For users in the U S A http www nikonusa com For users in Europe http www nikon euro com For users in Asia Oceania the Middle East and Africa http www nikon asia com Visit these sites to keep up to date with the latest product in...

Page 16: ... lamp 14 16 Built in microphone 80 89 Mode dial 8 FUNC button 141 Accessory shoe 106 148 Photocell 108 Viewfinder 26 Built in Speedlight 32 Lens 26 Power switch 14 16 Self timer lamp 35 Battery chamber cover 14 Battery chamber cover latch 14 Tripod socket USB digital I O connector under cover 84 Audio video AV out connector under cover 82 Speaker 80 92 Eyelet for camera strap 5 ...

Page 17: ...lens cap use the cord provided to attach it to the camera as shown 2 1 2 N iko n N iko n Diopter adjustment control 27 Viewfinder 26 Red lamp 28 Green AF lamp 9 28 Monitor 6 27 quick review small picture button 74 81 monitor button 9 AE AF L button 30 142 Zoom buttons 26 78 79 DC in connector under cover 15 menu button 10 focus mode MF manual focus self timer delete button 31 34 35 72 Memory card ...

Page 18: ...ra body Failure to observe this precaution could damage the hinge that connects the monitor to the camera When the Monitor Is in the Storage Position The only controls that can be used when the monitor is off are the shutter release and zoom buttons optical zoom only To use digital zoom 26 and other camera controls fold the monitor out Fold out to use Range of rotation 0 90 180 Frame self portrait...

Page 19: ...1 Image adjustment black and white indicator 66 67 32 Focus areas 70 33 Exposure display 53 1 Recording indicator 29 2 Self timer indicator 35 3 Exposure compensation 36 4 Shooting mode 25 38 5 Zoom indicator 26 Folder name 135 6 Date not set icon 21 7 Exposure lock 30 8 Focus mode 34 9 Flash ready indicator 28 10 Flash mode 33 11 Battery level indicator 18 12 Focus indicator 28 13 Image size 56 1...

Page 20: ...shooting conditions and let the camera do the rest Movie 88 Choose from three movie modes SET UP 134 Choose this mode to dis play the setup menu where you can perform such tasks as setting the camera clock and adjusting monitor brightness 56 Display a menu of image quality and size options ISO 59 Display a menu of sensitivity ISO equivalency options WB 60 Display a menu of white bal ance options A...

Page 21: ...n the focus operation is complete Focus and expo sure will remain locked while the shutter release button is pressed halfway To take the picture press the shutter release button the rest of the way down The Monitor Button The button controls the monitor Monitor shows current settings and view through lens Monitor shows view through lens only Monitor off P S A and M only The monitor turns off autom...

Page 22: ... User setting User setting MY MENU 2 Menu for current mode displayed Menu for selected mode displayed Language Date Folders Monitor options Seq numbers Shutter sound Auto off En SET UP 1 3 Exiting the Menus To exit the menus and return to shooting or playback press the button To exit the menu displayed when the mode dial is set to SET UP ISO or WB rotate the mode dial to another setting Taking Pic...

Page 23: ... format Controls Shot confirmation info txt USB Video mode Reset all SET UP 2 3 On Off SHOT CONFIRMATION CF card format Controls Shot confirmation info txt USB Video mode Reset all SET UP 2 3 The selection for some options is made from a sub menu Repeat steps 2 and 3 to make a selection from a sub menu To go back one step press the multi selector to the left If the menu has more than one page of o...

Page 24: ...12 ...

Page 25: ...teries 14 For more on batteries and alternative power sources see Technical Notes Optional Accessories 148 Inserting Memory Cards 16 For more on formatting memory cards see The Shooting Menu CF Card Format 114 Checking the Battery Level 18 Basic Setup 20 To learn more about camera setup options see The Setup Menu 134 ...

Page 26: ... charger Note that EN EL1 batteries must be charged before first use 1 Turn the camera off Check that the power on lamp is off 2 Open the battery chamber cover Slide the battery chamber latch to the open position 1 and flip the battery chamber cover open 2 3 Insert the battery Insert the battery as shown in the label inside the battery chamber 4 Close the battery chamber cover Close the battery ch...

Page 27: ...s described in Step 2 on the preceding page and slide the battery out Alternative Power Sources To power the camera continuously for extended periods use an EH 53 AC adapter or an EH 21 AC adapter battery charger 148 which doubles as a battery charger for EN EL1 batteries Do not under any circumstances use another make or model of AC adapter Failure to observe this precaution could result in overh...

Page 28: ... button is all the way down then insert the memory card in the direction of the arrow as shown in the label on the underside of the memory card slot cover Inserting Memory Cards Insert the memory card terminals first In serting the card upside down or backwards could damage the camera or the card Check to be sure that the card is in the cor rect orientation 4 Close the memory card slot cover Front...

Page 29: ...r Press the eject button to pop it up 1 then press it again to partially eject the card 2 The card can then be re moved by hand Note that memory cards may become hot during use observe due caution when removing memory cards Approved Memory Cards In addition to the card provided with your camera the following memory cards have been tested and approved for use with your Nikon digital camera Nikon EC...

Page 30: ...ion Low battery fewer shots can be taken consecutively in continu ous mode Ready spare battery WARNING BATTERY EXHAUSTED Battery exhausted Replace with fully charged battery The power on lamp will blink when the battery exhausted warning is displayed 3 Check the battery level in the monitor For information on opening the monitor see Parts of the Camera The Monitor 6 ...

Page 31: ...pter the monitor will turn off after thirty minutes The camera can be reactivated by Pressing the shutter release button halfway Pressing the button Pressing the button to display the menu for the current mode Pressing the button to enter quick review Rotating the mode dial to select a new mode The length of time before the camera enters standby mode can be changed using the Auto off option in the...

Page 32: ...English Français Español De En Fr Es Display options 4 LANGUAGE Deutsch English Français Español De En Fr Es Choose language from Deutsch German English Français French Japanese or Español Spanish 5 Language Date Folders Monitor options Seq numbers Shutter sound Auto off En SET UP 1 3 Return to setup menu 6 Language Date Folders Monitor options Seq numbers Shutter sound Auto off En SET UP 1 3 High...

Page 33: ...et the camera clock as described above Still pictures taken before the clock has been set will have a time stamp of 0000 00 00 00 00 movies a time stamp of 2003 01 01 00 00 9 2003 04 01 Y M D DATE 00 00 Select Month Repeat steps 8 9 to edit remaining items 10 Y M D DATE Highlight Y M D 11 Y M D DATE Choose order in which Year Month and Day will be displayed 12 Language Date Folders Monitor options...

Page 34: ...22 ...

Page 35: ...Mode 24 Step 1 Frame the Picture 26 Step 2 For more about focus options see Basic Photography Focusing Near and Far 34 More on Photography More on Focus 69 For information on using the self timer see Basic Photography Focusing Near and Far 34 Focus and Shoot 28 Step 3 For more about playback see More on Playback 73 View the Results 31 Step 4 Taking Pictures in Scene Mode 37 Flash Photography 32 Fo...

Page 36: ...nsitivity ISO equivalency allowing settings to be adjusted for more challenging shots See More on Photography 47 and The Shooting Menu 94 2 Rotate the mode dial to Taking Pictures in Mode This section details the basic steps involved in taking pictures in auto mode In this automatic point and shoot mode the majority of camera settings are controlled by the camera in response to shooting conditions...

Page 37: ...ooting mode The current shooting mode or scene selec tion is displayed here Number of exposures remaining The number of pictures that can be stored on a memory card depends on the capacity of the card and the current image quality and size Shutter speed Aperture Choose from four op tions depending on how picture will be used 54 The default setting is NORMAL Image size Choose from six op tions depe...

Page 38: ...e image up to 4 for a total of 16 Use the zoom buttons to frame your subject in the center of the monitor Press the button to zoom out from the subject increasing the area visible in the frame Press the button to zoom in on the subject so that it fills a larger area of the frame When the camera is zoomed in to maxi mum magnification holding the button down for about two seconds will trigger digita...

Page 39: ...on Monitor or Viewfinder Use the monitor to confirm camera settings at a glance while at the same time viewing an image that shows how the final picture will appear This is particularly useful when the image in the viewfinder does not accurately reflect what will appear in the final picture for example when the subject is close to the camera particularly if the range is 50cm 1 8 or less digital zo...

Page 40: ...ady lamp next to the viewfinder and the flash ready indicator in the monitor Red lamp Green AF lamp Step 3 Focus and Shoot Red lamp fl ash ready indicator On Green AF lamp focus indicator On Flickers Camera unable to focus on subject in focus area Using focus lock 29 focus on another subject at same dis tance then recompose picture and shoot Subject in focus Off Flash off or not required Blinks re...

Page 41: ...hutter release button down smoothly Autofocus and Focus Exposure Lock Autofocus performs best when There is contrast between the subject and the background Autofocus may not per form well if for example the subject is the same color as the background The subject is evenly lit Autofocus does not perform well when The focus area contains objects at different distances from the camera For exam ple au...

Page 42: ...he picture Do not change the distance between camera and subject while focus lock is in effect If the subject moves focus again at the new distance 4 Take the picture Smoothly press the shutter release button all the way down to shoot Locking Focus between Shots To take a series of pictures without stopping to ad just focus keep the shutter release button pressed halfway between shots The AE AF L ...

Page 43: ...al pictures press the multi selector down or right to view pictures in the order recorded up or left to view pictures in reverse order Keep the multi selector pressed to scroll quickly to the desired frame To return to shooting mode rotate the mode dial to Step 4 View the Results 3 Delete picture and return to playback Done Erase 1 image s Erase 1 image s No Yes SELECTED IMAGES 1 Confirmation dial...

Page 44: ...ter closes Creates effect of stream of light behind moving objects Care should be taken at slow shutter speeds to prevent blur Slow sync Auto flash combined with slow shutter speeds Use to capture both subject and back ground at night or under dim light Care should be taken at slow shutter speeds to prevent blur Anytime Flash fill flash Flash fires whenever pic ture is taken Use to fill in illumin...

Page 45: ...built in Speedlight fires while the low battery icon is displayed the monitor will turn off while the flash system charges Keep the Flash Window Clear Keep your fingers and other objects away from the flash window and photocell If a shot seems dark even though the flash has fired you may have accidentally blocked the flash window Check that the flash is unobstructed and try again When Lighting Is ...

Page 46: ... close as 1cm 0 4 to lens Infinity Use when shooting distant scenes through foreground objects such as windows Focus is fixed at infinity Flash is disabled NO ICON Autofocus Use when subject is 50cm 1 8 or more from lens Camera automatically adjusts focus according to distance to subject To choose a focus mode Macro Close Up Minimum focus distance varies with zoom position To focus as close as 1cm...

Page 47: ...d in monitor Ad just settings and frame picture The Self Timer The Continuous option in the shooting menu is automatically set to Single while the self timer is on The self timer is not available in movie mode or when Fireworks show is selected in the scene mode menu Manual Focus Select the self timer before choosing a focus distance Choosing another focus mode will automatically cancel manual foc...

Page 48: ...button and rotate the command dial Compensation displayed in moni tor at values other than 0 Check image in monitor before shoot ing Choosing a Value for Exposure Compensation As a rule of thumb select positive values when large areas of the frame are very bright ly lit for example when photographing an expanse of sunlit water sand or snow or when the background is much brighter than the main subj...

Page 49: ...d sunrises 40 Use to enhance outlines colors and contrast in sky scapes forests and other landscape shots 40 Use for bright subjects such as snowfields beaches and sunlit expanses of water 39 Use for portraits taken against a dimly lit backdrop 39 Use to capture background details or the effects of candlelight and other indoor lighting 39 Use for portraits in which the main subject stands out clea...

Page 50: ...are noted on the pages that follow Camera Shake At slow shutter speeds pictures may be blurred In this section precautions appropri ate for avoiding blur are indicated by stars hold camera in both hands and brace elbows against body use tripod or rest camera on flat level surface Autofocus Mode In mode the camera focuses continuously until the shutter release button is pressed halfway 1 Select 2 P...

Page 51: ...ails of the background or to capture the effects of candlelight and other indoor back ground lighting Auto other modes can be selected other modes can be selected The following scenes are available Portrait Use for portraits Main subject stands out clearly while background details are softened lending composition sense of depth Degree of softening depends on amount of light available Focus area ca...

Page 52: ...finity eliminating the need to check focus before shooting can be selected Focus is fixed at infinity eliminating the need to check focus before shoot ing Noise Reduction Noise in the form of randomly spaced brightly colored pixels tends to appear in pictures taken at slow shutter speeds This effect is particularly noticeable in dark areas of the picture At settings of Night portrait Night landsca...

Page 53: ...an be selected Fireworks show Slow shutter speeds are used to capture the expanding burst of light from a firework Close up Use to capture vivid colors in close up shots of flowers insects and other small objects with the background ar tistically blurred Minimum focus distance varies with zoom position To focus on objects as close as 1cm 0 4 to the lens adjust zoom until the macro close up icon in...

Page 54: ...ut the background is brightly lit The flash will fire automatically to fill in illuminate shadows Auto can be selected Panorama assist Use to take a series of pictures that will later be joined to form a single scene e g a panorama or 360 virtual reality image See Taking Pictures for a Panorama 44 Auto white balance and exposure are determined by the first picture in each series Flash and focus mo...

Page 55: ...xed at infinity eliminating the need to check focus before shooting can be selected Scene Mode Depending on your subject scene mode may not always produce the desired results If results are not satisfactory choose auto P S A or M mode and try again Monitor turns off during shooting Frame pictures in viewfinder Camera records pictures at about three frames per second while shutter release button is...

Page 56: ...ghlight Panorama assist 2 Default pan direction displayed in monitor 4 Take first picture About one third of picture is shown superimposed on view through lens If pan direction is left to right picture will appear on left side of monitor AE L icon turns white to show that white balance and exposure settings for this picture apply to all pictures in series Panorama Assist The pan direction flash mo...

Page 57: ...revious picture 6 Take next picture Repeat steps 5 6 un til all shots in series have been taken Viewing Pictures Taken Using Panorama Assist To view pictures taken at a setting of Panorama assist select All folders in the play back Folders menu or select the appropriate folder from the folder list 118 ...

Page 58: ...46 ...

Page 59: ...s This chapter explains some of the more frequently used camera functions in greater de tail and describes how to take pictures in P S A and M modes Controlling Exposure 48 Image Quality and Size 54 Sensitivity 58 White Balance 60 Continuous 63 Sharpening Contrast and Color 65 Metering 68 More on Focus 69 ...

Page 60: ...round details and let more light into camera increasing range of flash Small apertures large f numbers in crease depth of field bringing main subject and background into focus Use when you want complete control over exposure User controls both shutter speed and aperture M Manual User chooses aperture camera sets shutter speed for best re sults A Aperture priority auto User chooses shutter speed ca...

Page 61: ... of shutter speed and aperture can be selected by rotating the command dial flexible program Each com bination of shutter speed and aperture will produce the same exposure Restoring Default Values for Shutter Speed and Aperture Default values for shutter speed and aperture can be restored by rotating the com mand dial until the asterisk is no longer displayed Default values can also be restored by...

Page 62: ...l photograph We recommend that you either choose a faster shutter speed or use noise reduction 111 Ultra HS When Ultra HS is selected in the Continuous menu 63 the frame advance rate is fixed at thirty frames per second with the result that shutter speed can not be set to a value slower than 1 30 s Faster Shutter Speeds When a shutter speed of 1 4000 s is selected in shutter priority auto aperture...

Page 63: ...aperture of f 8 may not be available at some zoom positions For smaller apertures try zooming the camera out Aperture and Zoom The maximum and minimum values for aperture are the maximum and minimum values for the camera lens adjusted for the current zoom setting Higher f num bers smaller apertures can be achieved by zooming the camera in lower f num bers larger apertures by zooming the camera out...

Page 64: ...increments equivalent to 1 3 EV 1 3 step 4 Select remaining item aperture or shutter speed Set selected item Repeat steps 2 3 until desired exposure is achieved 5 2 Set selected item Exposure display shows amount picture will be under or over exposed at selected setting 3 Select shutter speed or aperture Se lected item shown in green changes each time button is pressed 1 Select mode M If the Shutt...

Page 65: ...e length of time the shutter will remain open depends on the option selected for Exposure options Bulb Time in the shooting menu 104 Bulb release The shutter will remain open as long as the shutter release button is held down to a maxi mum of ten minutes Shutter speed display shows BULB10M Timed release Select this option for time exposures of thirty seconds one minute three minutes five minutes o...

Page 66: ...n to become visible and there may also be noticeable loss of detail The actual effects depend on the type of subject and the size of the image when printed or displayed Option Format Description Compression HI TIFF RGB Image stored in TIFF Tagged Image File Format with no compression Use when fidelity is of par amount importance Only available at image sizes of 2592 1944 and 2592 1728 None FINE JP...

Page 67: ...n a letter or report or to display on monitors 17 or larger 1280 960 Will print at a size of about 10 8 8 1cm 4 3 1600 1200 Will print at a size of about 13 5 10 2cm 51 3 4 2592 1944 Will print at a size of about 21 9 16 5cm 8 6 2592 1728 The top and bottom of the frame are cropped out to produce a picture of the same proportions as photographs taken with a 35 mm film camera The green AF lamp blin...

Page 68: ...The Shooting Menu Image quality and size can also be set using the Image quality size option in the shooting menu 94 5 Make selection Repeat steps 2 5 to change remaining item Image quality Image size IMAGE QUALITY SIZE Highlight option 2592X1944 1600X1200 1280X960 1024X768 640X480 2592X1728 IMAGE SIZE 4 1 IMAGE QUALITY SIZE menu displayed Image quality Image size IMAGE QUALITY SIZE 6 Rotate mode ...

Page 69: ...6MB cards at different combinations of image quality and size is shown below Card Image size 16 MB 64 MB Image quality 2592 1944 1600 1200 1280 960 1024 768 640 480 2592 1728 27 14 7 1 163 84 42 7 4 28 56 109 229 144 86 1377 867 520 347 578 918 121 69 37 731 418 227 151 278 488 86 47 24 520 285 150 100 190 347 59 31 16 354 188 97 65 125 236 24 12 6 1 146 75 38 6 4 25 50 97 HI FINE NORMAL BASIC HI ...

Page 70: ...a automatically raises sensi tivity when lighting is poor In P S A and M modes the following options are available Option 50 Description Approximately equivalent to an ISO rating of 50 Recommended except when lighting is poor or when faster shutter speeds are required e g when photographing moving objects Noise may appear in pictures taken at ISO settings above this value 100 Approximately equival...

Page 71: ...ns Using the Flash A setting of 400 is intended for use with natural lighting Choose Auto 50 100 or 200 when using the flash The Shooting Menu Sensitivity can also be set using the Sensitivity option in the shooting menu 94 Make selection 50 100 200 400 Auto SENSITIVITY 2 3 Rotate mode dial to P S A or M At settings other than Auto ISO value is displayed in monitor 1 SENSITIVITY menu displayed 50 ...

Page 72: ...y skies when your subject is in the shade Speedlight White balance adjusted for light produced by built in flash White balance adjusted for incandescent lighting Daylight White balance adjusted for direct sunlight White bal preset White object used as a reference to set white balance under unusual lighting conditions Auto White balance adjusted automatically to suit lighting condi tions Best choic...

Page 73: ...slightly yellow or red or to compensate for light sources with a blue cast When white balance is set to Fluorescent you can choose from three different bulb types see table at right To fine tune white balance display the white bal ance menu and highlight an option as described above then follow the steps below Option Bulb type FL1 White W FL3 Daylight D FL2 Daylight White Neutral N 2 Make selectio...

Page 74: ...AL PRESET Cancel Measure Option Cancel Measure Description Recalls the most recent value for preset white balance from the memory and sets white balance to this value To measure a new value for white balance place a white object such as a piece of paper under the lighting that will be used in the final pic ture Frame this object so that it fills the square in the center of the menu shown above Hig...

Page 75: ... creates new folder in which all photos in sequence are stored Folder name consists of N_ followed by three digit number assigned automatically by cam era Exposure count is shown in monitor Multi shot 16 Each time shutter release button is pressed camera takes sixteen consecutive pictures 648 486 pixels in size at rate of about 2fps and arranges them in four rows to form a single picture mea surin...

Page 76: ...09 If the monitor is swivelled to point in the same direction as the lens during shooting the display in the monitor will be inverted During shooting the zoom indicator in the monitor will move from S start to E end To interrupt shooting before one hundred pictures have been recorded lift your finger from the shutter release button The Memory Buffer During shooting pictures are stored in a tempora...

Page 77: ...king edges seem sharper As this processing takes place after shooting its effects can not be previewed in the monitor but they will be visible in the final picture In P S A and M modes the image sharpening menu gives you control over the amount of sharpening performed Description Option Auto Camera sharpens edges for optimal results amount of sharpening varies from shot to shot High Pictures proce...

Page 78: ...ast Recommended when light is very bright creating strong shadows on subject More contrast Picture processed to emphasize difference between light and dark areas enhancing contrast Useful when shooting un der overcast skies or shooting low contrast subjects such as landscapes Normal Camera performs same standard contrast adjustment on all pictures Suitable for a wide variety of scenes from dark to...

Page 79: ... or M mode Description Option Black white Pictures recorded in black and white Black and white images require same amount of memory as color images but show a higher level of detail Black white can not be used in combi nation with digital zoom white balance white balance brack eting or a Lens setting of Slide copy adptr 0 Normal Best choice in most situations 2 Maximum Use for vivid photoprint eff...

Page 80: ...rectly exposed even when background is much brighter or darker Can be used with autoexposure lock 30 to meter off center subjects Center weighted Camera meters entire frame but assigns weight of 80 to area in cen ter of frame occupying roughly of total Classic meter for portraits preserves background details while letting lighting conditions at center of frame determine exposure Can be used with a...

Page 81: ...cus on off center subjects User selects focus area manually using multi selector Can be used in stead of focus lock 29 to focus on relatively motionless subjects that are not centered in frame Restrictions on Focus Area Selection Focus area selection is not available when the monitor is off or digital zoom 26 is in effect In these cases the center focus area is used AF Area Mode In auto mode and a...

Page 82: ...the Auto focus mode option determines how the camera focuses when the monitor is on single autofocus is used when the monitor is off regardless of the setting cho sen for Auto focus mode AUTO FOCUS MODE Single AF Continuous AF Option Single AF Continuous AF Camera adjusts focus continuously until shutter release button is pressed halfway minimizing time needed to focus before picture is taken Note...

Page 83: ...ew through the lens shown in the monitor no indicators of focus appear in the final picture Option Description Manual focus Areas of the image that are in focus will be sharply outlined in monitor in manual focus mode 72 Off No indication of focus appears in monitor On Areas of the image that are in focus will be sharply outlined in monitor in all focus modes 34 FOCUS CONFIRMATION Manual focus On ...

Page 84: ...he current zoom position the manual focus display will turn red Focus Lock Focus can not be locked using the AE AF L button in manual focus mode Using a Converter Lens Use autofocus 34 when using an optional converter lens 148 1 Pressing MF button rotate com mand dial until subject is in focus Manual focus display shows approxi mate focus distance from lens from 1cm 0 4 to infinity Confirm focus i...

Page 85: ...Playback This chapter describes how to view pictures on the camera on television and on a computer Viewing Pictures on the Camera 74 Viewing Pictures on TV 82 Viewing Pictures on a Computer 83 Printing Pictures 86 ...

Page 86: ...ack pictures while still in shooting mode mak ing it possible to view the results of earlier attempts while setting up the next shot Quick review is available in P S A M and modes Press the button once to view pictures in the top left corner of the moni tor with the view through the lens visible in the background Press the button again to view pictures full screen To return to shooting mode press ...

Page 87: ...s in P S A or M mode pictures will be displayed briefly in the monitor immediately after each shot To delete the pic ture before it is recorded to the memory card press the AF button A confirmation dialog will be displayed Press the multi selector up or down to highlight an op tion then press the center of the multi selector to select Select No to exit without deleting the picture Select Yes to de...

Page 88: ...f recording 2 Time of recording 3 Image size 4 Folder 5 File number and type 6 Battery level indicator 7 Voice memo icon 8 Transfer icon 9 Print order icon 10 Protect icon 11 Current frame number total number of frames visible in current folder 12 Image quality 1 2 3 4 5 6 7 8 9 10 11 12 Page 2 Shooting Information 1 Camera type 2 Firmware version 3 Metering method 4 Exposure mode 5 Shutter speed ...

Page 89: ...n areas of picture that are in fo cus are sharply outlined active focus area is shown in red 1 2 3 Page 5 Exposure Information 1 Thumbnail preview flashing border marks image highlights i e brightest areas of image 2 Histogram shows distribution of tones in image horizontal axis corresponds to pixel brightness with dark tones to left and bright tones to right while vertical axis shows number of pi...

Page 90: ...bnails to four thumbnail view or when four thumbnails are displayed to view highlighted picture full screen Delete highlighted picture Confirmation dialog will be displayed Press multi selector up or down to highlight option press center to select Select No to exit without deleting picture Select Yes to delete picture Erase 1 image s Erase 1 image s No Yes SELECTED IMAGES To Highlight pictures Use...

Page 91: ...n icon and zoom ratio are displayed in top left corner of monitor View other areas of picture Use multi selector to scroll to areas of picture not visible in monitor To use multi selector to view other pictures can cel zoom Playback Zoom Playback zoom is not available with movies still pictures created with the Ultra HS option in the Continuous menu or with small copies created using the small pic...

Page 92: ...ghlight option press center to select Select No to exit without delet ing picture or voice memo Select to delete voice memo without deleting picture Select Yes to delete picture and voice memo Erase 1 image s Erase 1 image s SELECTED IMAGES No Yes Press Description Play memo If icon appears in file information display during play back memo can be played back by pressing button Playback ends when e...

Page 93: ...of BASIC making them ideal for distribution by e mail or for use in web pages 1 Create small picture file No Yes SMALL PIC Confirmation dialog displayed 2 No Yes SMALL PIC Create small picture file Highlight Yes to exit without creat ing small copy highlight No and press center of multi selector 3 Create copy and return to full screen playback To view the copy use the multi selector to scroll to t...

Page 94: ...monitor will turn on when you shoot movies or take pictures at Ultra HS 1 Turn the camera off 3 Tune the television to the video channel If in doubt consult the documentation for your television or VCR 4 Select mode 5 Turn the camera on The camera monitor will remain off and the television will display the image normally shown in the monitor If the camera is con nected to a VCR images can be recor...

Page 95: ... CD ROM and the reverse side of the Quick Start Guide Before Connecting the Camera Before transferring pictures to a computer set the USB option in the camera setup menu to match the computer s operating system 134 The camera supports two options Mass storage the default option and PTP Picture Transfer Protocol PTP Mass storage USB Operating system USB option Windows XP Home Edition Windows XP Pro...

Page 96: ...camera Windows 2000 Professional The computer will display the welcome dialog for the Found New Hardware Wizard Click Cancel to close the dialog and then disconnect the camera Windows Millennium Edition Me After displaying a message stating that the hardware information database is being updated the computer will start the Add New Hardware Wizard Click Cancel to exit the wizard and then disconnect...

Page 97: ...bed below Windows XP Home Edition Windows XP Professional Click the Safely Remove Hardware icon in the taskbar and select Safely remove USB Mass Storage Device from the menu that appears Windows 2000 Professional Click the Unplug or Eject Hardware icon in the taskbar and select Stop USB Mass Storage Device from the menu that appears Windows Millennium Edition Me Click the Unplug or Eject Hardware ...

Page 98: ...int Order Format DPOF The Print set option in the playback menu is used to create a digital print order list ing the pictures to be printed the number of prints and the information to be included on each print This print order is stored on the camera memory card in Digital Print Order Format DPOF Once a print order has been created the memory card can be inserted in a DPOF compatible device and th...

Page 99: ...87 Movies Your Nikon digital camera can record three dif ferent types of movie This chapter describes how to record and view movies Recording Movies 88 Viewing Movies 92 ...

Page 100: ... will be inverted Focus Mode If Single AF the default option is selected for Focus options Auto focus mode 70 focus will lock when the shutter release button is pressed to start recording Using the Flash The flash turns off automatically when TV movie 640 or Small movie 320 is selected Zoom When TV movie 640 or Small movie 320 is selected optical zoom can only be adjusted before recording begins B...

Page 101: ...mes together to create silent movie with frame rate of 30 frames per second Resulting movie may be up to 60s long Use to cre ate time lapse movies of slow processes that can be filmed without moving the camera a flower opening a butterfly emerging from its cocoon clouds moving across the sky etc Movie Files Movies are recorded as Quick Time movie files with the extension MOV and can be played back...

Page 102: ...VIE Set interval time AE lock Choose interval between frames from 30s thirty seconds 1m one minute 5m five minutes 10m ten minutes 30m thirty minutes and 60m sixty minutes 30s 1m 5m 10m 30m 60m SET INTERVAL TIME 5 4 Display options 30s 1m 5m 10m 30m 60m SET INTERVAL TIME Highlight Set interval time TIME LAPSE MOVIE Set interval time AE lock 3 Restrictions on Time Lapse Movie Time lapse movie is no...

Page 103: ...e results in the monitor before re cording movies at a setting of Time lapse movie During Recording To save power the monitor turns off between frames the green AF lamp blinks to show that recording is in progress The monitor turns on automatically about ten seconds before the camera takes the next shot Time lapse photography will end automatically if the camera is unable to finish recording a fra...

Page 104: ...playback While play back is in progress pressing center of multi selector pauses playback Press again to resume When movie ends first frame of movie will be displayed Raise volume Volume indicator displayed in monitor when zoom buttons are pressed Three levels are available high low and mute Default setting is high Lower volume Viewing Time Lapse Movies When a movie is recorded using the Time laps...

Page 105: ...u 115 Delete selected pictures or folders organize pictures into folders select pictures for transfer to a computer or for printing on a DPOF compatible device protect pictures from accidental deletion and hide pictures during playback The Setup Menu 134 Adjust basic camera settings and perform such tasks as formatting memory cards and choosing a folder to store your pictures ...

Page 106: ...Image adjustment Saturation control Saturation control User setting User setting ALL MENU 1 3 All options displayed 1 Show all menus Metering Metering Continuous Continuous BSS BSS Image adjustment Image adjustment Saturation control Saturation control User setting User setting MY MENU Highlight Show all menus Using the Menus For more information on menu operations see Before You Begin Using the M...

Page 107: ...cketing 109 110 Noise reduction 111 Reset 112 My menu 113 114 CF card format 114 White balance Metering Metering Continuous Continuous BSS BSS Image adjustment Image adjustment Saturation control Saturation control User setting User setting ALL MENU 1 3 Image quality size Sensitivity Sensitivity Image sharpening Image sharpening Lens Lens Exposure options Exposure options Focus options Focus optio...

Page 108: ...t Fluorescent Cloudy Cloudy Speedlight Speedlight WHITE BALANCE 1 2 Metering Four metering methods can be selected see More on Photography Metering for details 68 METERING Matrix Spot Center weighted Spot AF area CONTINUOUS Single Continuous H Continuous L Multi shot 16 Ultra HS 5 shot buffer Restrictions on BSS 97 BSS can not be used with the self timer 35 Continuous options other than Single 63 ...

Page 109: ...hting is poor and the flash can not be used This setting may not produce desired results with moving subjects or if composition is changed during shooting Exposure BSS Selecting this option displays sub menu shown at right Choose from Highlight BSS picture with smallest area of overexposure is selected Shadow BSS picture with smallest area of underexposure is selected Histogram BSS of pictures wit...

Page 110: ...ck and white See More on Photography Sharpening Contrast and Color 67 SATURATION CONTROL Maximum Enhanced Normal Moderate Minimum Black white User Setting Camera settings can be stored in two sepa rate banks Bank 1 and Bank 2 By default changes to camera settings are stored in Bank 1 To store another combination of frequently used settings select Bank 2 and set the camera ap propriately To switch ...

Page 111: ...l tele BSS Saturation control Image sharpening Sensitivity ISO AE lock Lens Image quality Bulb time Any changes to fine tuning and preset white balance apply to both banks regardless of the bank currently selected If Slide copy adptr is selected Lens will be set to Slide copy adptr Positive when the settings bank is recalled 2 White balance White balance Metering Metering Continuous Continuous BSS...

Page 112: ...Quality and Size 54 Image quality Image size IMAGE QUALITY SIZE Sensitivity Choose this option to set sensitivity ISO equiva lency For more information see More on Photography Sensitivity 58 50 100 200 400 Auto SENSITIVITY Image Sharpening This option controls the amount of sharpening performed when pictures are saved to the mem ory card See More on Photography Sharpen ing Contrast and Color 65 Au...

Page 113: ... blurring at edges of frame in modes S A and M adjust settings to pro duce apertures no wider than f 4 Telephoto for TC E15ED Optical zoom fixed at maximum optical zoom position Digital zoom can be used 26 Fisheye for FC E9 Zoom fixed at widest angle 26 Focus fixed at infinity 34 Metering fixed at center weighted 68 Corners of frame blacked out to create circular frame Slide copy adptr for ES E28 ...

Page 114: ...e too bright Should you notice excessive noise in the form of randomly spaced bright pixels set image sharpening to Off or Low 65 Inverse Color is intended for use only when examining film negatives in the monitor and the quality of the image produced will vary widely with the type and make of film used We recommend using a film scanner such as the Nikon COOLSCAN to obtain high quality digital ima...

Page 115: ... picture taken after On is selected sets exposure shutter speed aper ture and sensitivity and auto white balance for all subsequent pictures Flash turns off while AE lock is in effect Off Restores normal exposure and white balance Reset Clears existing exposure settings First picture taken after this option is selected sets exposure shutter speed aperture and sensitivity and auto white balance for...

Page 116: ... onds 1m one minute 3m three minutes 5m five minutes or 10m ten minutes Shutter will open when shutter release but ton is pressed and will remain open until specified exposure time has elapsed or the shutter release button is pressed again 30s 1m 3m 5m 10m Shutter opens for TIMED RELEASE Shutter will remain open as long as shutter release button is held down to a maximum of ten minutes Description...

Page 117: ... monitor is on If Off is selected pressing the button at the maximum optical zoom position has no effect digital zoom can still be used while recording movies Fixed Aperture This option controls whether aperture varies with zoom position On Off FIXED APERTURE On Off DIGITAL TELE Digital tele Fixed aperture ZOOM OPTIONS Option Description On In A and M modes aperture is kept as close as possible to...

Page 118: ...of 1 3 EV FLASH EXPOSURE COMP 0 3 0 0 3 Options for Optional Speedlights Speedlight Cntrl This option is used to control the built in and optional Speedlights when using optional flash accessories mounted on the camera s accessory shoe Auto Int ext active Internal off SPEEDLIGHT CNTRL Option Description Auto Optional Speedlight fires If no optional Speedlight is mounted on the camera built in Spee...

Page 119: ...3 Speedlights Set Speedlight cntrl to Auto or Internal off when using an SB 27 or SB 23 Speed light The HN CP10 Lens Hood Remove the HN CP10 lens hood available separately 148 when using the flash Optional Speedlights The following SB series Nikon Speedlights all available separately can be mounted directly on the camera accessory shoe without a sync cable 80DX 50DX 28DX 30 28 27 26 25 24 23 and 2...

Page 120: ...roduced by the optional Speedlight is measured by the camera s photocell and the length of the flash adjusted to ensure optimal exposure D TTL flash control available with the SB 80DX SB 50DX and SB 28DX is not supported When set to STBY standby the optional Speedlight will turn on when the camera is turned on but will not turn off when the camera is turned off The COOLPIX5400 does not support pow...

Page 121: ... fully pressed bracketing current white balance setting to produce one pic ture with normal white balance one picture with reddish cast and one picture with bluish cast Recording time roughly triples Use when un sure of appropriate value for white balance Restrictions on Auto Bracketing Autoexposure bracketing can not be used in combination with a shutter speed of BULB or TIME 104 BSS 97 exposure ...

Page 122: ...1EV 1 3 EV 2 3 EV 1EV 3 5 5 5 3 3 After taking a series of shots using bracketing you can view the results in quick review 74 or playback 75 and select the pictures with the de sired exposure discarding the remaining shots if so desired Continuous Shooting Autoexposure Bracketing At settings of Continuous H and Continuous L 63 shooting will pause after each bracketing cycle is complete Auto Flash ...

Page 123: ...lower Time required to save pictures to memory card more than doubles Off Noise reduction off camera functions normally Restrictions on Noise Reduction Noise reduction can not be used in combination with BSS 97 exposure BSS 97 bracketing 109 Continuous settings other than Single 63 or with a Lens setting of Slide copy adptr 101 Sensitivity ISO Equivalency Noise reduction will reduce the noise that...

Page 124: ...ring Single Continuous Off BSS Auto Image adjustment Normal Saturation control Auto Image sharpening Fine tuning reset to 0 Menu options Default Focus options Single AF Auto focus mode Manual focus Focus confirmation Auto AF area mode Zoom options Off Fixed aperture On Digital tele Speedlight options 0 Flash exposure comp Auto Speedlight cntrl Off Repeating flash Off Auto bracketing Off Noise redu...

Page 125: ...nt Saturation control User setting MY MENU 4 White balance Metering Continuous BSS Image adjustment Saturation control User setting MY MENU 1 3 Full shooting menu displayed 3 Metering Continuous BSS Image adjustment Saturation control User setting MY MENU Choose item you wish to change 2 Metering Continuous BSS Image adjustment Saturation control User setting MY MENU Display custom menu 1 Speedlig...

Page 126: ...ry cards for use in the camera Note that formatting memory cards permanently deletes all data they con tain including protected pictures and any other data that may be on the card Before formatting be sure to transfer any valued pic tures to a computer 83 85 No Format WARNING All images will be deleted CF CARD FORMAT Option Description No Exit without formatting memory card Format Format memory ca...

Page 127: ...BACK MENU 1 2 Delete 116 117 Folders 118 122 Slide show 123 124 Protect 125 Hide image 126 Print set 127 128 Auto transfer 129 130 PLAYBACK MENU 2 2 Move image 131 132 CF card format 114 Small pic 133 Delete Folders Slide show Protect Hide image Print set Auto transfer PLAYBACK MENU 1 2 Move image CF card format Small pic PLAYBACK MENU 2 2 Using the Menus For more information on menu operations se...

Page 128: ...s Erase all images DELETE Highlight Selected images 5 Repeat steps 3 and 4 to select additional pictures To deselect picture highlight and press multi selector up or down To exit without deleting pictures press button 4 ERASE SELECTED IMAGES Select Set Done Select highlighted picture Selected pictures marked by icon 2 ERASE SELECTED IMAGES Select Set Done Pictures on memory card displayed as thumb...

Page 129: ...LECTED IMAGES Confirmation dialog displayed Press multi selector up or down to highlight option press center to select Select No to exit without deleting selected pictures Select Yes to delete selected pictures 2 Exclude Erasing all images No Yes ERASE ALL IMAGES Confirmation dialog displayed Press multi selector up or down to highlight option press center to select Select No to exit without delet...

Page 130: ...and man age folders and to select the folder from which pictures will be played back Folder Options The Folders item in the playback Folders menu contains the following options Folders FOLDERS All folders NIKON Folders New Rename Delete FOLDERS Folder Options The Folders menu can also be accessed using the Folders item in the setup menu 135 Option Description New Create new folders Rename Rename e...

Page 131: ...sfer PLAYBACK MENU 1 2 Highlight last letter and press center of multi selector to create new folder Until another folder is selected in Folders menu all new images will be stored in new folder Display default folder name NIKON 4 NEW T O K Y Z X N Edit letter Folder names can include upper case letters A Z num bers and spaces 1 New Rename Delete FOLDERS 3 NEW N I K O O M N Highlight letter Highlig...

Page 132: ...rs on previ ous page Renaming Existing Folders 4 K Y O T L J O RENAME Select folder 2 KYOTO TOKYO KOBE RENAME Display list of existing folders folder NIKON can not be renamed 6 Delete Folders Slide show Protect Hide image Print set Auto transfer PLAYBACK MENU 1 2 Highlight last letter and press center of multi selector to rename folder To exit the RENAME dialog without renaming the folder press th...

Page 133: ...older deletion Delete OSAKA DELETE Confirmation dialog displayed Press multi selector up or down to highlight option press center to select Select No or press button to exit without deleting folder Select Yes to delete selected folder Hidden and Protected Pictures If the selected folder contains hidden or protected pictures the folder will not be deleted Note however that any pictures it contains ...

Page 134: ...s Panorama Assist Ultra HS Each series of pictures taken at a setting of Panorama assist 44 or Ultra HS 63 is stored in a separate folder Folders created at a setting of Panorama assist are listed in the Folders menu under names beginning with P_ followed by a three digit number folders taken at Ultra HS are listed under names beginning with N_ fol lowed by a three digit number To view only the pi...

Page 135: ...me Start Frame intvl SLIDE SHOW Pause Option Start Frame intvl Description Choose how long each picture will be displayed Start slide show 2 Start slide show 1 Start Frame intvl SLIDE SHOW Pause Highlight Start 3 Restart Frame intvl PAUSE When slide show ends PAUSE menu is dis played see following page Press multi selec tor left to return to playback menu or press button to return to full frame pl...

Page 136: ... or left to go back one frame down or right to skip ahead to next frame Restart Frame intvl PAUSE Changing the Display Interval The slide show menu on the previous page and the pause dialog shown above contain a Frame intvl option for choosing how long each picture will be displayed To change the display interval highlight Frame intvl and press the center of the multi selector The menu of interval...

Page 137: ...ct Set Done 3 Repeat steps 1 and 2 to se lect additional pictures To deselect picture highlight and press multi selector up or down To exit without changing protected status of pictures press button 2 PROTECT Select Set Done Select highlighted picture Selected pictures marked by icon 1 Select Set Done PROTECT Highlight picture 4 Delete Folders Slide show Protect Hide image Print set Auto transfer ...

Page 138: ...Auto transfer PLAYBACK MENU 1 2 Complete operation and return to playback menu 1 HIDE IMAGE Select Set Done Highlight picture 2 HIDE IMAGE Select Set Done Select highlighted picture Selected pictures marked by icon 3 Repeat steps 1 and 2 to se lect additional pictures To deselect picture highlight and press multi selector up or down To exit without chang ing hidden status of pictures press button ...

Page 139: ...re 3 4 1 PRINT SELECTION Select Set Done Select highlighted picture Selected pictures marked by icon Number of prints appears on picture 1 Print selection Delete print set PRINT SET Highlight Print selection PRINT SELECTION Select Set Done Pictures on memory card displayed as thumbnail images 2 Print selection Delete print set PRINT SET Option Print selection Delete print set Description Cancel pr...

Page 140: ...r To exit without altering print order press button 6 Date OFF Info OFF Done PRINT SELECTION Done 5 2 PRINT SELECTION Select Set Done Use multi selector to specify number of prints up to 9 To deselect picture press multi selector down when number of prints is 1 Repeat steps 3 5 to select ad ditional pictures To exit without altering print order press button Date If Date is selected in the PRINT SE...

Page 141: ...Select pictures for transfer All images Mark all pictures for transfer Marking Selected Pictures for Transfer Cancel transfer Remove transfer marking from all pictures 2 SELECTED IMAGES Select Set Done Pictures on memory card displayed as thumbnail images 1 Selected images All images Cancel transfer AUTO TRANSFER Highlight Selected images 3 SELECTED IMAGES Select Set Done Highlight picture 4 SELEC...

Page 142: ...ENU 1 2 Complete operation and return to playback menu 5 Repeat steps 3 and 4 to se lect additional pictures To deselect picture highlight and press multi selector up or down To exit without chang ing transfer status of pictures press button Marking All Pictures for Transfer Restrictions on Auto Transfer No more than 999 pictures can be transferred using Auto transfer To transfer more than 999 pic...

Page 143: ... folder 6 OSAKA TOKYO KOBE SELECT DEST FOLDER Display list of possible destination folders 2 SELECT IMAGE S Select Set Done Pictures on memory card displayed as thumbnail images 3 SELECT IMAGE S Select Set Done Highlight picture 5 Repeat steps 3 and 4 to se lect additional pictures To deselect picture highlight and press multi selector up or down 4 SELECT IMAGE S Select Set Done Select highlighted...

Page 144: ...he identifier DSCN or SSCN and extension TIF JPG MOV will not change Destination Folders The following can not be selected as destination folders Folders created at Ultra HS folder names begin with N_ Folders created at a setting of Panorama assist folder names begin with P_ Folders that already contain the maximum of two hundred pictures Folders that already contain a picture numbered 9999 Pictur...

Page 145: ...ith the small picture option 81 Choose from sizes of 640 480 320 240 and 160 120 640x480 320x240 160x120 SMALL PIC CF Card Format CF card format formats memory cards for use in the camera See Shooting Menu Options CF Card Format 114 No Format WARNING All images will be deleted CF CARD FORMAT ...

Page 146: ... Folders Monitor options Seq numbers Shutter sound Auto off En SET UP 1 3 CF card format Controls Shot confirmation info txt USB Video mode Reset all SET UP 2 3 SET UP 2 3 CF card format 114 Controls 141 142 Shot confirmation 143 info txt 143 USB 144 Video mode 144 Reset all 144 Using the Menus For more information on menu operations see Before You Begin Using the Menus 10 Date imprint Firmware ve...

Page 147: ...be stored in the chosen folder Folders FOLDERS NIKON TOKYO Folders Panorama Assist Ultra HS Folders created with the Panorama assist 44 and Ultra HS 63 options can not be used to store additional pictures Folder Options For more information on the Folders item in the Folders menu see Playback Menu Options Folders 118 Language Use the Language option to choose a language for camera menus and messag...

Page 148: ...gh lens is previewed in monitor this has no effect on pictures taken at this setting This setting does not take effect in and movie modes Normal Priority given to quality of preview image displayed in monitor If the shutter release button is pressed all the way down to take a picture during keep or delete 75 the focus exposure and auto white balance settings used in the previous shot will apply to...

Page 149: ...s monitor brightness Press the multi selector up or down to increase or decrease brightness The results of any changes are imme diately visible in the center of the display Press the center of the multi selector to put the change into effect and return to the setup menu BRIGHTNESS Hue This option controls monitor hue tone Pressing the multi selector up gives the display a bluish cast pressing it d...

Page 150: ...s taken when current folder contains picture numbered 9999 new folder will be created by adding one to current folder number and file numbering will begin again from 0001 Reset Clears last file number from memory If memory card is formatted or empty memory card inserted before Reset is selected file numbering will begin from 0001 If memory card already contains pictures next file number will be ge...

Page 151: ...ease shutter no beep will sound when Release speed is set to Quick response manual focus has been activated or converter lens option selected in Lens menu images have been deleted or memory card formatted changes have been made to image status with Protect Hide image Print set or Auto transfer items in playback menu Shutter sound has been set to on Camera beeps twice to warn that camera is not in ...

Page 152: ...en powered by a six volt 2CR5 DL245 lithium battery the camera may become hot if left on for an extended period We recommend that you set Auto off to five minutes or less when using this type of battery Standby Mode In standby mode all camera functions are deactivated and the camera itself is effec tively off consuming almost no power The camera can be reactivated by pressing the button or by pres...

Page 153: ...nce can be set by pressing FUNC button and rotating command dial when camera is in mode P S A or M White bal ance can not be fine tuned using FUNC button When preset white balance is selected camera will measure new value for preset white balance if FUNC button is kept pressed User setting When camera is in mode P S A or M User Setting bank changes each time FUNC button is pressed Sensitivity Sens...

Page 154: ... only one of focus and exposure AE L AF L AE L AF L AE L AF L Option Description AE L AE L AF L Pressing AE AF L button locks both focus and exposure Pressing AE AF L button locks exposure only Focus locks when shut ter release button is pressed halfway AF L Pressing AE AF L button locks focus only Exposure locks when shut ter release button is pressed halfway ...

Page 155: ... be read with a text brows er such as Notepad or SimpleText If Off the default option is selected photo information will no longer be recorded to the info txt file Information about pictures recorded when Off is selected can still be viewed in the photo information display 76 When On is selected the following information is recorded On Off SHOT CONFIRMATION On Off INFO TXT File number and type Cam...

Page 156: ...tandards USB USB configures the camera for connection to a computer See More on Playback Viewing Pictures on a Computer 83 PTP Mass storage USB NTSC PAL VIDEO MODE Reset All Choose this option to restore settings to their default values No Reset Reset all settings to default values RESET ALL Option Description No Reset Exit menu leaving settings unchanged Restore all settings except Language Date ...

Page 157: ...on imprints the date or the date and time of recording on still pictures as they are recorded to the memory card It can not be used to imprint date or time stamps after recording Imprinted data form a permanent part of the image and will appear whenever the image is printed regardless of whether the date option is chosen in the Print set menu Date imprint has no effect in mode DATE IMPRINT Off Dat...

Page 158: ...146 ...

Page 159: ...ist of the optional acces sories available for your camera tips on cleaning and storage troubleshooting advice and cam era specifications Optional Accessories 148 Caring for Your Camera 149 Error Messages 151 Troubleshooting 153 Specifications 156 ...

Page 160: ...le for this camera Contact your retailer or Nikon representative for details Optional Accessories Additional EN EL1 Li ion batteries are available from your re tailer or local Nikon representative Rechargeable batteries AC adapters battery chargers Carrying case CompactFlash memory card adapter Lens adapter rings Converter lenses and lens adapters require lens adapter ring Wired remote cable Lens ...

Page 161: ...ouching the skin or entering the eyes or mouth Body Use a blower to remove dust and lint then wipe gently with a soft dry cloth After using the camera at the beach or seaside wipe off any sand or salt with a cloth lightly dampened with fresh water then dry thoroughly Do not use alcohol thinner or other volatile chemicals Notes on the Monitor The monitor may contain a few pixels that are always lit...

Page 162: ...or example near a space heater or in a closed vehicle on a sunny day are subject to humidities of over 60 To prevent mold or mildew take the camera out of storage at least once a month Turn the camera on and release the shutter a few times before put ting the camera away again Store the battery in a cool dry place Batteries When turning the camera on check that the battery is charged The monitor w...

Page 163: ... card is correctly inserted Camera can not detect memory card CARD IS NOT FORMATTED FORMAT NO 14 Press multi selector down to highlight FORMAT and press to right to format card or turn camera off and replace card Memory card has not been formatted for use in camera THIS CARD CANNOT BE USED 17 Use approved card Check that connectors are clean If card is dam aged contact retailer or Nikon representa...

Page 164: ...idden FILE CONTAINS NO IMAGE DATA 83 View file on computer or correct make of camera File created by computer or different make of camera THE FOLDER CANNOT BE DELETED 125 126 Folder can only be deleted if all pictures in folder are neither hidden nor pro tected Folder contains hidden or protected pictures or pictures not created with COOLPIX5400 SYSTEM ERROR 14 Turn camera off unplug optional AC a...

Page 165: ...connecting the power source as described above may result in the loss of any data not recorded to the memory card at the time the problem occurred Data already recorded to the memory card will not be affected Troubleshooting Problem Possible cause Monitor is blank Camera is off Battery is not correctly inserted or battery cham ber cover is not properly latched Battery is exhausted AC adapter avail...

Page 166: ...er speed blinks shutter speed too fast Aperture blinks f number too high 32 33 33 36 50 52 51 52 Pictures are too bright overexposed Exposure compensation is too high Shutter speed blinks shutter speed too slow Aperture blinks f number too low 36 50 52 51 52 Pictures are out of focus Subject was not in focus area when shutter re lease button was pressed halfway or AE AF L button was pressed Green ...

Page 167: ...ntrol is too low or too high 60 62 67 Can not create small picture Small pictures can not be created in quick review or from movies small pictures or pictures taken at Ultra HS or image quality of HI 81 Can not zoom in on picture Can not zoom in on movies small pictures or pic tures taken at Ultra HS 79 TV blank when vid eo cable connected Video cable not correctly connected TV not tuned to video ...

Page 168: ...mately 80 horizontal and 80 vertical Diopter adjustment 3 1m 1 Monitor 1 5 134 000 dot High Transmissive Advanced TFT LCD monitor with brightness and hue adjustment Frame coverage shooting Approximately 97 horizontal and 97 vertical Storage Media Type I and II CompactFlash CF and Microdrive cards File system Compliant with Design Rule for Camera File System DCF Exif 2 2 and Digital Print Order For...

Page 169: ...ry shoe Standard ISO hot shoe contact with safety lock Sync contact X contact only Interface USB Video output User can choose from NTSC and PAL I O terminals DC in Audio video out Data output USB Power sources One rechargeable Nikon EN EL1 lithium ion battery supplied or six volt 2CR5 DL245 lithium battery available separately EH 53 AC adapter EH 21 AC adapter battery charger Approximate battery l...

Page 170: ...3 14 15 18 150 157 2CR5 DL245 ii iii 15 140 150 157 EN EL1 ii 14 15 148 157 charging 14 Beach Snow 37 39 Best Shot Selector see BSS Black and white 67 Blur 38 97 154 Brightness 137 BSS 41 95 96 97 154 155 BULB see Bulb Time Long time exposures Bulb Time 53 104 C Camera strap ii 5 CF card see Memory card CF card format 95 114 115 134 Clock see Date Close up 37 41 69 155 Close ups 34 41 72 Command d...

Page 171: ...image 115 123 126 Hue 137 I Image adjustment 66 95 Image files 89 138 Image quality 8 25 54 Image quality size 54 57 95 Image sharpening 65 95 Image size 8 25 55 Infinity see Focus mode Manual focus info txt 132 134 143 Information see Photo infor mation ISO see Mode dial Sensitivity J JPEG 54 156 JPG 138 L Lamp green AF 5 9 28 154 Lamp red 5 28 33 154 Landscape 37 40 Language 20 134 Language choo...

Page 172: ...imer 35 157 Self timer lamp 4 Sensitivity 32 58 59 95 154 155 157 Seq numbers 134 138 SET UP menu 93 134 146 Setup mode 8 20 21 134 146 Shooting menu 93 94 114 Shot confirmation 134 143 Show all menus 94 Shutter release button 4 9 28 29 Shutter release delay see Self timer Shutter sound 134 139 Shutter speed 25 49 50 52 154 Slide show 115 123 124 Slide shows 123 124 Small pic 81 115 133 Smear 149 ...

Page 173: ...En ...

Reviews: