ASSEMBLY INSTRUCTIONS
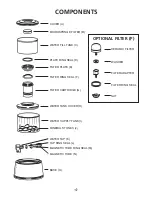
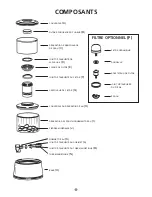
Prior to assembly, compare the main diagram with your PiMag
™
Aqua Pour
™
Gravity Water System, and make sure all the components are present.
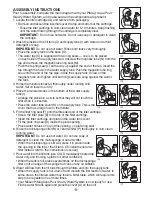
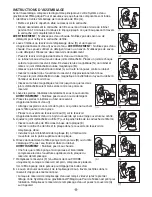
1. Locate the filter cartridge (G) and remove from packaging.
• Remove and discard the lids that cover the top and bottom of the cartridge.
• Rinse the filter cartridge in cold, clean water for 5-10 minutes. Keep flushing
until the water flowing through the cartridge is completely clear.
IMPORTANT:
Do not use hot water. Do not use soap or detergent to clean
the cartridge.
2. Wash the inside of the fill tank (C) and supply tank (I) with water and a mild
detergent or soap.
IMPORTANT:
Do not use hot water. Rinse both tanks very thoroughly.
• Place the supply tank on the base (O).
• The water tap (K) is supplied with two ring seals — one is to be placed
on each side of the supply tank wall. Unscrew the magnetic tube (N) from the
tap and remove the magnetic tube ring seal (M).
• Push the tap ring seal (L) all the way up against the end of the tap. Insert the
tap through the hole in the water supply tank. Push the magnetic tube ring
seal onto the end of the tap pipe, inside the supply tank. Screw on the
magnetic tube and tighten until both ring seals are snug against the wall of
the tank.
3. Rinse the mineral stones (J) thoroughly under running cold
water. Set on towel to air dry.
4. Place the mineral stones in the bottom of the water supply
tank (I).
• Arrange the stones in a circle so that they will not touch the
filter when it is inserted.
• Place the water tank cover (H) on the supply tank. This is the
cover that has a large hole in the middle.
5. Fit the filter ring seal (F) onto the threaded end of the filter cartridge.
• Screw the filter plate (E) to the top of the filter cartridge.
• Insert the filter cartridge and plate in the water tank cover.
• Fit the plate ring seal (D) inside the plate opening.
• Place water fill tank on top of this opening, on plate ring seal.
6. Rinse the microsponge filter (B) or ceramic filter (P) thoroughly in cold, clean
running water.
IMPORTANT:
Do not use hot water. Do not use soap or
detergent to clean the microsponge or ceramic filter.
• When the microsponge is still wet, press it in place inside
the opening in the top of the fill tank. (To install the ceramic
filter instead, refer to the instructions on its use.)
7. Pour water into the fill tank (use COLD municipally treated tap
water only and fill using a pitcher or other container).
• When the tank is full, press several times on the microsponge
filter or lift an edge of the sponge to drive out any air bubbles.
8. Water will flow from the fill tank through the filters and into the supply tank.
• When the supply tank is full, drain off and discard the first tankful of water. In
some areas, the filtered water may retain a bitter taste, which will require this
step to be repeated one or more times.
• Your Nikken PiMag Aqua Pour Gravity Water System is now ready for use.
Fill the water fill tank again and place the cover (A) on the unit.
(1)
(2)
(3)
(4)
(5)
(6)
(7)
(6)
(4)
-5-


