background image


12 


Operation (continued) 


Setting the time and date 


NOTE:


Time and Date must be set on the unit or it will not 
record.


This will allow the security video taken by 
NightWatcher NW750 to display the correct date and 
time it was taken. 
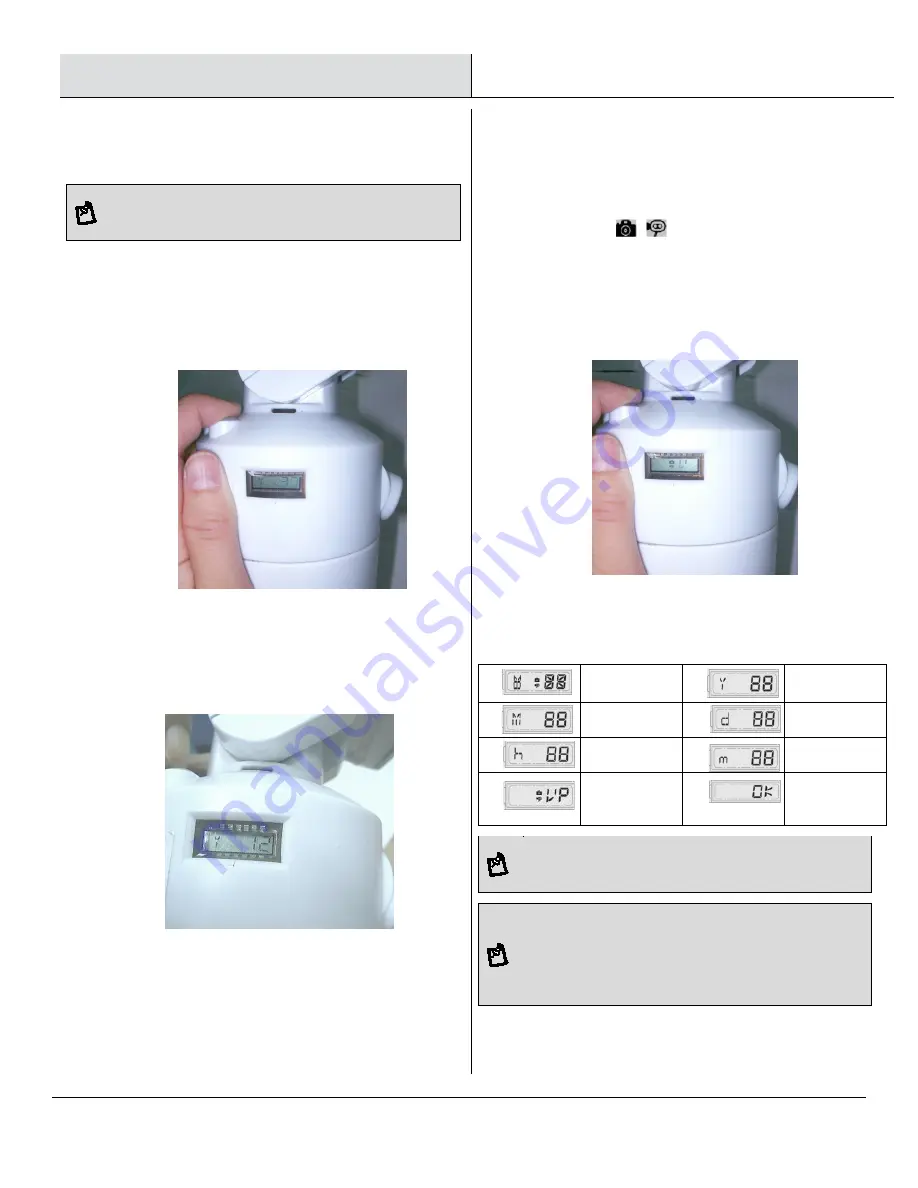
1. Push

 TIME/DATE SET 

button for 3 seconds. The 

LCD screen will flash 3 times indicating you have 
entered Time/Date setting mode. 


2.

 “YEAR” setting: 

“Y” and “10” are displayed on the 

screen.  Push the TIME/DATE SET button to set year 
from “10-99.” Holding this button for 3 seconds will 
enable rapid scrolling through numbers. If the button 
has not been pressed for 3 seconds, it will 
automatically save the year and advance to allow you 
to set the month. 


3. Repeat this same procedure for the TIME. 


4. “VIDEO/PHOTO” setting: when entering this mode, 

these two icons  

 and “V” appear on the screen. 

Push the button to choose “V” (Video) or “P” (Photo). If 
you have not pushed any buttons for 3 seconds, “OK” will 
appear on the screen, indicating it has automatically 
saved the current settings. The LCD screen will shut off 
automatically 10 seconds later 


5. On the “P” (photo) setting, NightWatcher NW750 will 
take a series of digital photographs at a rate of 1-3 photos 
every second when the motion sensor is triggered 


Start 


YEAR 

Setting 


MONTH 

Setting 


DATE 

Setting 


HOUR 

Settin 


MINUTE 

Setting 


VIDEO/ 

PHOTO 

Setting 


F

nish


NOTE:


In the event of a power outage please check that the 
time and date have been retained


NOTE:


The NW750 comes supplied with an internal 3 day 
standby battery for the Time and Date only. This 
battery is rechargeable and does not need to be 
replaced (This should be sufficient  for most cases of 
power outages)


Summary of Contents for NW750

Page 1: ...products designed to enhance your home Visit us online to see our full line of products available for your home improvement needs Thank you for choosing NightWatcherPro Model NWNW750 USER GUIDE NIGHTWATCHER NW 750 MOTORIZED LED FLOOD LIGHT WITH WI FI CAMERA IMPORTANT RETAIN FOR FUTURE REFERENCE READ CAREFULLY OS Windows 2000 XP Vista 7 8 10 MAC Micro Memory card 1GB SD 32GB SDHC max Class 4 ...

Page 2: ...residential installation This equipment generates uses and can radiate radio frequency energy and if not installed and used in accordance with the instructions may cause harmful interference to radio communications However there is no guarantee that interference will not occur in a particular installation 3 The installation of this light fixture must be done by a qualified electrician 4 The motion...

Page 3: ...right to replace or repair the faulty unit WHAT IS NOT COVERED The warranty does not cover damage to the unit that may occur as a result of improper installation This product is designed to illuminate it will not prevent the perpetration of any act legal or illegal The manufacturer assumes no liability for any damage to property injury to person or death ...

Page 4: ...ure that the electrical supply is switched off and the circuit fuses removed or the circuit breaker is in the OFF position TOOLS REQUIRED Hammer Safety goggles Phillips screwdriver Level HARDWARE INCLUDED NOTE Hardware not shown to actual size Part Description Quantity AA Mounting screw 2 BB Drywall screw 2 CC Plastic masonry plug 2 DD Wire nut 3 EE Cross bar 1 FF Allen Key 1 AA BB C D EE FF ...

Page 5: ... 1 NOTE NightWatcherPro NW750 is designed to illuminate record video and produce audio warnings when a person enters the detection area While it will detect a moving heat source there is no guarantee implied that it will provide total security or prevent illegal entry A EE AA C D Records 20 second video events at 15 frames per second 720 pixels VGA resolution Built in micro memory card slot for mi...

Page 6: ...6 NightWatcher NW750 Overview Camera angle adjustable downward by 25 degrees Bottom View Top View Front View Side View ...

Page 7: ...as direct sunlight window refection air condition units swimming pool reflection direct street lighting or large vegetation in the installation area To prolong the lifespan of the Night Watcher fixture it is advised to install the unit in a selected area that is not directly exposed to extreme weather conditions and only if possible under an eave based on the recommended Installing your NightWatch...

Page 8: ...8 Installation mounting height ...

Page 9: ...ed the coloured LED light will turn off after 30 seconds Mode 1 Recommended for home or business default setting Camera will follow motion and record during the day and night Light will illuminate at night only Speaker will operate at night only Mode 2 Light illuminates during the day and night Camera records motion during the day and night Speaker operates during the day and night Mode 3 Camera w...

Page 10: ...NW750 for 3 seconds to stop the light from turning the Mode LED will flash orange To resume working press the mode button again If you want to remove the micro memory card to view recorded files please press OFF REC button and take out the memory card within 30 seconds To remove micro memory card open the card compartment using the provided Allen key and push in micro memory card to eject then pul...

Page 11: ...you will hear a series of 2 beeps meaning the recording is finished If you do not push the button again after you have recorded the message the recording will stop automatically after 10 seconds 2 The NightWatcher NW750 can hold 2 custom recorded messages If you have recorded one message repeat above step for message 2 3 If you hear a series of 3 beeps when you want to record your message by press...

Page 12: ...e TIME 4 VIDEO PHOTO setting when entering this mode these two icons and V appear on the screen Push the button to choose V Video or P Photo If you have not pushed any buttons for 3 seconds OK will appear on the screen indicating it has automatically saved the current settings The LCD screen will shut off automatically 10 seconds later 5 On the P photo setting NightWatcher NW750 will take a series...

Page 13: ... to use a USB card adaptor not supplied Once your computer is powered on insert the card adapter into your computer Regardless of whether you are using Windows or MAC OS your memory card should be recognized by your computer after a few seconds Follow the instructions of your computer to view the contents of the removable storage device memory card Each recorded event will be listed in order by da...

Page 14: ... the red LED light on the fixture is on shown on this image below Please reset the fixture following steps of P11 if you find the LED status do not correct Step 2 Configure the fixture from your smartphone linked to your Wireless Network Step 3 Set Up Your Wireless Motion Detection Alert Features to send you an alert when the fixture detect an activity Install NightWatcher APP Access to Google Pla...

Page 15: ...ingle camera Device Login Add new camera to user account Connect camera to Wi Fi network o Click Device Login icon then click Set camera Wi Fi network button to enter page as below Input Device ID consisted of 7 digits Device name default name is admin Default password is 123456 ...

Page 16: ...ed of 7 digits enter Wi Fi configuration page and input the current Wi Fi network password which you want to connect then click next icon waiting for camera connected to Wi Fi network Wi Fi configuration Login user account to enter Device List page after camera accessed to Wi Fi network ...

Page 17: ...e and password device password then click add icon return to Device List page you can see new camera be added in Default user name is admin password is 123456 Add Device Device List after camera added Camera setting Login user account to enter Device List page click icon to enter camera setting page ...

Page 18: ...eo page automatically and the camera video will be displayed Click to modify the name of camera Click to modify the camera user name and password Click to flip video horizontally or vertically Open close motion detection Click to record streaming video or stop recording Modify the video resolution frame rate bit rate on mainstream substream viewing type Push close the notification select receive o...

Page 19: ...a View page In the Live View page double click any camera to view full screen mode Click screen Full screen viewing Click the More icon in the Video page to choose the number of streaming videos and viewing options Double click video ...

Page 20: ...g way numbers be displayed Send message to friends Add friend input the user name of your friend and send them a request you can view in the friend list after your friend has accepted your invitation Click Add icon Input username of friend ...

Page 21: ...21 Wait friend agree Friend List Send message click any one friend name then input message to send to him View Media View your pictures or videos saved on your device ...

Page 22: ... record then click the video icon Click again to stop the video View pictures captured from streaming video View videos recorded from streaming video Check the alarm message from camera Setting PTZ step and alarm sound Check the version and function information ...

Page 23: ...hen click Video file to see locally recorded videos Delete camera device Login to the user account to enter Device List page click icon to enter camera delete page 一 Click the icon to record video Click again to stop recording ...

Page 24: ... setting In the camera settings list click icon to enter alarm setting page Click Finish to complete alarm setting Then enter More List page click System Settings to view Open close receiver alarm setting Open close receiver push message setting ...

Page 25: ...nnected to the WiFi successfully the light will change to green After the WiFi has been successfully configured If the device is not connected to the WiFi for more than 5 minutes the light will change to red for 3 minutes and then try to connect to the WiFi again This operation will continue until the WiFi connection is successful Enable Alarm on off Select alarm type ...

Page 26: ...rd may be in the wrong format Remedy Format the memory card FAT format for SD and FAT32 format for SDHC 4 The computer is unable to open the files on the memory card You may need to update your computers drivers for your card reader or use the USB reader 5 The camera LED indicator is flashing green This may occur when a power failure happens during recording This will cause 3 situations A Hidden f...

Page 27: ...the App The NW750 records only to the SD card Q Can I change the light illumination time A No it has been programmed to illuminate for 3 minutes per motion detection If movement continues in the area the light will continue to illuminate Q Can I transfer pictures from the camera via cable A No you can t You will need to remove the memory card and use the card adaptor included or USB memory card ad...

Page 28: ...Retain this manual for future use ...

Reviews: