Night Owl HDA10 Series Quick Setup Manual Download Page 9

Power cable  

connectors

Power splitter 

connectors

Power  
splitter

Camera Power  

Adapter

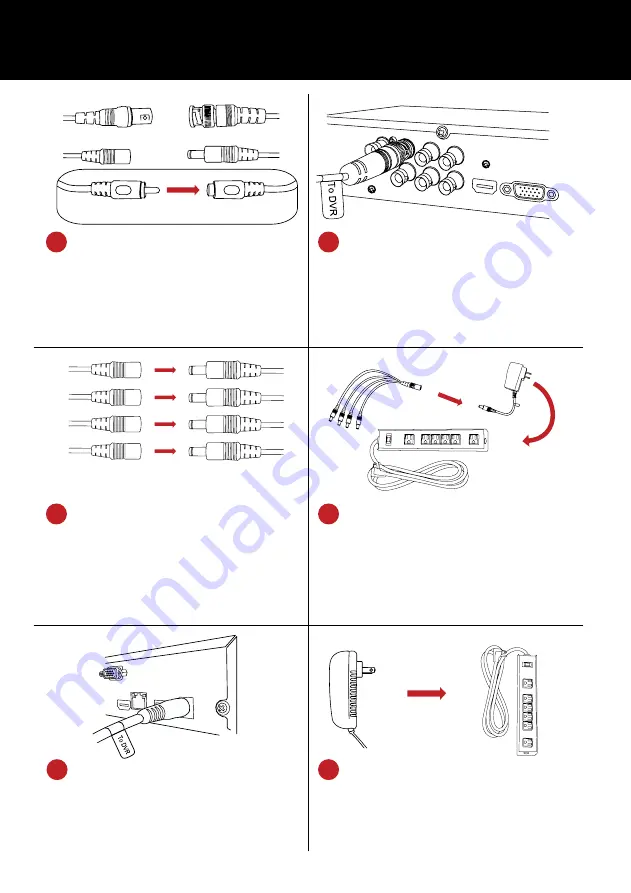
  Connect the female power  
  leads of the BNC cables to the  
  male power splitter ends.

Surge Protector

(not included)

Plug the DVR power adapter into a  
surge protector or Uninterruptible 
Power Supply (UPS). 

NOTE:

 Some 

systems will beep upon booting up.

11

Connect the power splitter to the 
camera power adapter and plug 
the adapter into a surge protector or 
Uninterruptible Power Supply (UPS). 

NOTE:

 Power adapters are labeled TO 

CAMERA ONLY and TO DVR ONLY.

9

  Connect the DVR power adapter 
  to the Power Input on the rear of 
  the DVR.

10

8

Surge 

Protector not 

included

8

Connect the BNC connector of 
the video/power cable labeled 

TO DVR ONLY to an open video  
input on the DVR.

NOTE:

 Make sure you twist and 

lock BNC connectors.

Make sure you twist and lock BNC connectors

TO CAMERA

FROM CAMERA

  Connect the ends of the cable  
  attached to the camera to the  
  ends of a video/power cable  
 labeled 

TO CAMERA ONLY.

6

7

Audio enabled cameras will have a white RCA  

connector to transmit audio signal (Optional).

Summary of Contents for HDA10 Series

Page 1: ...www NightOwlSP com QUICK SETUP GUIDE HDA10 SERIES...

Page 2: ...VR Power Adapter x1 Camera Power Adapter s 1 per 4 cameras RESET LAN1 LAN2 LAN3 LAN4 WAN 60 ft Video Power Audio Cables If applicable 1 cable per camera Your system may include an audio enabled camera...

Page 3: ...s have a VGA input connect the VGA cable from the VGA output port on the DVR to the VGA input port on your TV Monitor VGA cable is not included RJ 45 Ethernet Port RJ 45 port will be used to connect t...

Page 4: ...ave an Internet connection before powering on the DVR The lights in the LAN port on the back of the DVR will blink repeatedly when the Internet connection has been established Router Not Included ETHE...

Page 5: ...TV Monitor must be tuned to the same Input the HDMI is plugged into 3 Using the provided DVR power adapter power on the DVR NOTE Power adapters will be labeled as either DVR or Camera 4 Once the DVR...

Page 6: ...ted you will begin the Startup Wizard and will create a password at that time 7 This process may take up to 5 8 minutes It is crucial that you DO NOT power off the DVR during this process as that will...

Page 7: ...he firmware has finished updating your DVR will automatically reboot Once the reboot has occurred you will be directed to the Startup Wizard to begin configuring your system Thank you for updating you...

Page 8: ...the back of your TV or monitor NOTE To view cameras TV Monitor must be tuned to the same Input the HDMI is plugged into 1 Plug in the USB Mouse into the USB port on the back of the DVR 3 Plug one end...

Page 9: ...Uninterruptible Power Supply UPS NOTE Power adapters are labeled TO CAMERA ONLY and TO DVR ONLY 9 Connect the DVR power adapter to the Power Input on the rear of the DVR 10 8 Surge Protector not incl...

Page 10: ...provide a valid email address in case your ever forget your account information NOTE Password can be any alphanumeric combination between 6 and 20 characters Remember Your Password Night Owl strongly...

Page 11: ...final position will be key So if you would like to detect motion for the front door to your home place the camera to the side of the entrance The infrared sensor works best for side to side movement...

Page 12: ...ned user account will read Disable Select Edit to Enable the user account and assign a User Name and Password You may choose to enable or disable Password requirements for each user If the Password Re...

Page 13: ...p is the same for phone and tablet Download and Install Application 2 1 To add a device go to the Main Menu and select Device Manager 12 Disclaimer The images of the Night Owl HD App are taken from th...

Page 14: ...ht corner of your screen to add your DVR 4 Select the blue Scan button to utilize Owl Scan NOTE You may also elect to manually enter the P2P ID which can be located within the System Menu of your DVR...

Page 15: ...t in camera hover the lens over the QR code on the top of the DVR and wait for it to successfully scan 5 14 Enter the password of your DVR and then select Save NOTE Your DVR password should be stored...

Page 16: ...al resources regarding the Night Owl HD App Device To navigate to another added DVR View Change the channel view Local Record a video and save directly to the application Snap Take a snapshot image an...

Page 17: ...ere Main View Viewing live video controlling PTZ functionality and setting image parameters Remote Playback View system recordings and images and save them directly to your PC or Mac Group Device Mana...

Page 18: ...ayback recorded video save video and images directly to your PC or Mac configure numerous settings such as channel names and set record preferences To download the CMS Software Go to www NightOwlSP co...

Page 19: ...era s lifespan 4 Why does my camera stop working at night It is possible that your camera is not receiving enough power for the LEDs needed for Night Vision Try plugging that camera directly into the...

Page 20: ...wlSP com Please visit www NightOwlSP com Click the Support tab Type HDA10 in the top right search bar Access the support material needed For system manuals troubleshooting guides FAQs video tutorials...

Reviews: