Night Owl 8BL Series Instruction Manual Download Page 50

User’s Manual


48 

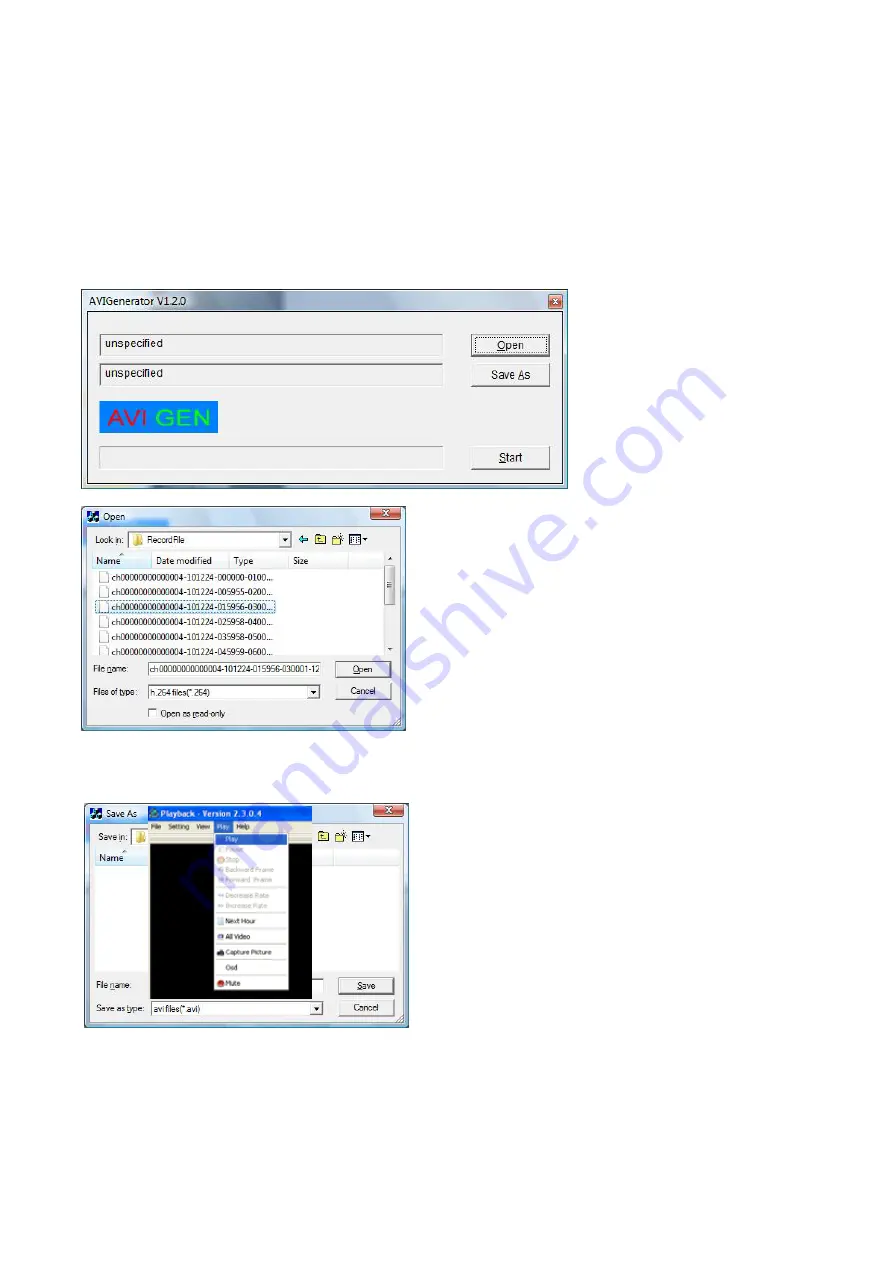
7.2.5 Multi Player File format 

1. If you would like to play any recorded file using video players that supports .avi format, first, 

copy or backup file to your PC.


2. Use the AVI Generator software included in the driver CD and install AVI Generator to your 

computer.   

3. Open the AVI Generator installed on your computer, click Open to find/select the backup file, 

and then click “Open”. 

Note: 

the file type you have selected should be *.264 format. 


4. Click “Save As” to specify the location and file name for your converted file. 


5. Click “Start” to start converting the file into AVI format. 


Summary of Contents for 8BL Series

Page 1: ...Rev 1100607...

Page 2: ...T UP 13 5 1 SYSTEM INITIALIZATION 13 5 2 MAIN INTERFACE 13 CHAPTER 6 DVR MENU AND OPTIONS 14 6 1 MAIN MENU PREVIEW 15 6 2 MAIN MENU 16 6 2 1 Recording Functions 16 6 2 1 1 Record Setup 16 6 2 1 2 Moti...

Page 3: ...43 6 5 1 Cruise Setup 43 6 6 PIP MODE 43 6 7 SEARCH 43 6 8 MUTE 43 6 9 MANUAL REC 43 6 10 START ROTATE 43 6 11 START CRUISE 43 CHAPTER 7 NET VIEWER PROGRAM 44 7 1 LOG IN TO NET VIEWER 44 7 2 MAIN INTE...

Page 4: ...o radio communication However there is no guarantee that interference will not occur in television reception which can be determined by turning the equipment off and on The user is encouraged to try a...

Page 5: ...items 8BL DVR5GB 8BL DVR1TB SYSTEM REQUIREMENTS Please be sure the computer that you install the included software with complies with the following specifications IBM PCs or 100 Compatibles Windows X...

Page 6: ...tempt to remove the top cover If any abnormal operation is observed unplug it immediately and contact technical support Warning You may be subjected to severe electrical shock if you remove the cover...

Page 7: ...drive Triplex operation view record playback simultaneously Easy control with USB mouse Instant viewing using Windows Mobile Symbian S60 Version 3 5 iPhone Blackberry OS 5 and Android Internet Remote...

Page 8: ...ideo Recorder DVR with pre installed Hard Disk Drive HDD please skip to Chapter 3 Opening DVRs with pre installed HDD will void the warranty To install Hard Disk Drive to the DVR please follow the ins...

Page 9: ...6 Use the 5 case screws removed from step 1 to mount the DVR Case to the DVR WARNING The DVR case must be secured to the DVR using all 5 mounting screws Operating the DVR without the cover is extremel...

Page 10: ...s to enter pop up menu Move Right Play Forward 5 Navigation Buttons Move Down 6 Power indicator PWR If the Green indicator is on the system is properly powered 7 HDD indicator HDD When the Red indicat...

Page 11: ...Ethernet Port Connect intranet internet RJ45 interface 4 USB Mouse Port Connect to USB Mouse only 5 VGA Connect to monitors with VGA input port 6 Video outputs Connect to monitor inputs BNC interface...

Page 12: ...To use the remote control 1 8 Channel Select 1 8 9 Digital Key 9 0 Digit Key 0 or press to switch between VGA and BNC output ALL Display all Channels Menu Enter Exit Menu UP Down SEL Select Rewind Pl...

Page 13: ...the USB port on the front panel is designed for data backup to a USB flash drive Do not connect a USB flash drive to the USB MOUSE port on the rear panel 2 Use the mouse buttons to perform the followi...

Page 14: ...ras power source into a UPS or battery backup system will provide you recorded coverage after power failures Time depends on type of UPS used NOTE Ensure the cable is pushed all the way into the power...

Page 15: ...d the Pop up Menu by clicking the left button of the mouse to select options when clicking any area outside the menu you will close the Pop up menu USING THE ONSCREEN DISPLAY Use the system s graphica...

Page 16: ...to start manual recording START ROTATE Start sequential display START CRUISE PTZ cruise settings To close the Sub Menu click anywhere onscreen Using the Virtual Keyboard Mouse Only When using the mous...

Page 17: ...n Menu Preview Internet LAN Camera Settings E mail Setup Alarm Setup PTZ Mobile Motion Record Password Advanced Language Date Time Record Functions Playback System Camera Network MAIN MENU A V Setup I...

Page 18: ...se between Time Schedule Record or Continuous Time Schedule will allow you to set motion detection or record at a specific time of day night File Size Set the file size limit of each recorded clip Cop...

Page 19: ...formed in those areas Copy Duplicate the setting of the selected channel to other channels Red Motion Detection Enabled Clear Motion Detection Disabled NOTE You can click and drag the mouse cursor whe...

Page 20: ...e before the one you are currently viewing except the first page NEXT Next page When viewing event list clicking Next page button will take you to the page after the one you are currently viewing exce...

Page 21: ...backup is successful click CLOSE in the confirmation window and then remove the USB flash drive NOTE If there is not enough space on the USB flash drive the system will display the following Space is...

Page 22: ...ur router 2 Reserve an IP Address in your router that is not used by other computers or devices connected to your internal network 3 Write down the assigned IP Address of your DVR Subnet Mask IP Addre...

Page 23: ...e three common types of Internet Services DHCP Cable Modem PPPoE DSL Modem and Static IP Fiber Optics Actual service type may vary please ask your ISP for the exact service type 2 Write down the IP Ad...

Page 24: ...of your router 8 Leave the UPNP option at Enable Click APPLY to save your changes PPPoE 1 If your ISP provides you a Static IP Address select STATIC as the network TYPE 2 Leave Media Port at 9000 3 S...

Page 25: ...for computer or devices outside of your local network to access your DVR through your router To do so please use the following method s NAT Network Address Translation Port Forwarding DMZ De Military...

Page 26: ...nt port like 1024 as the WEB PORT When selecting a different port forward the new port to the IP address of the DVR and change the settings in the DVR Network settings You will also need to add the ne...

Page 27: ...rt UPnP Most modern routers support this however check your router manufacturer s website just to make sure A Make sure that your DVR is plugged directly into your router with an Ethernet cord B Log i...

Page 28: ...sed call our technical support team at 1 866 390 1303 for assistance 6 2 8 Accessing the DVR through Internet Explorer Browser IE Once the network settings on the DVR match the settings of your router...

Page 29: ...ht This will open the window in scroll down to Security and select on the options to Allow software to run or install even if the signature is invalid and Allow Active Content to Run Files on My Compu...

Page 30: ...ection of this Manual for setup instruction Before you can access the DVR from a mobile phone you need to setup the Network Configuration on the DVR Go to section 6 2 4 or 6 2 5 for instructions You w...

Page 31: ...in the DVR under section 6 2 9 Notes Enter the user defined DVR name if configured Click OK to save the settings and to access your DVR remotely When accessing from a mobile phone with Symbian S60 Ve...

Page 32: ...is complete go to the Applications folder and select the Asee program and click Open to display the software interface Click the Setup button to open the Setting screen IP Enter the Public IP or DDNS...

Page 33: ...n ID and Password See Section 6 2 9 Mobile You will now be watching a live streaming video of your security camera on your iPhone Enjoy When accessing from a mobile phone with Blackberry phones follow...

Page 34: ...t 7 Follow the installation process and click Finish at the end to finish the installation Using the Software 1 Prior to running the software please make sure you have edited the Application permissio...

Page 35: ...screen 3 Snapshot 4 Setup 5 Help 6 Next Channels Group 7 Navigation Controls 4 Select the Setup options and enter the information of the DVR you want to connect in Settings Name Enter the Name of this...

Page 36: ...ifferent names under Settings and click save To open the list of DVRs that you have connected to click the History button to open the History List 1 Highlight one record and click the trackball trackp...

Page 37: ...y 2 Click the Full screen icon to view in full screen display mode click the Trackball on the mobile phone to quit full screen mode 3 Click Next page again button to view the Navigation Controls if yo...

Page 38: ...remember location 2 Copy the downloaded Asee pak to your phone 3 Make sure your mobile is connected to a network and can download software files 4 Go to All Program and select the Market icon 5 In the...

Page 39: ...ual 37 8 Goto All Programs and select ApkInstaller 9 Locate the ASee apk on the included CD and copy to your phone 10 Select and install the software to your phone 11 Goto All Programs and select the...

Page 40: ...Login User Name for you DVR under section 6 2 9 Password Enter the Login User Password for your DVR under section 6 2 9 History Click the History button at the upper right hand corner to view records...

Page 41: ...d Copy Use the function to duplicate of one channel to another COLOR SETUP Menu allows you to adjust image brightness saturation contrast and hue of each channel Click APPLY to and then click OK to sa...

Page 42: ...T Use the drop down menu to select ON OFF to enable disable Daylight Savings Time When you click the DST Setting button in the Date Time menu the DST STEEING menu will open Daylight Saving Time Enable...

Page 43: ...te old recordings or stop when HDD is full Select Format HDD to format the installed Hard Disk Drive and erase all recorded files Select Format USB to format the installed USB Drive by erasing all rec...

Page 44: ...u can setup system to restart regularly to clear up some temporary storage memory 6 2 13 7 Info Click Main Menu System Advanced Info to access the system information of your DVR 6 3 Lock Click Lock of...

Page 45: ...Cruise To start Cruise exit this screen and click Start Cruise of the pop up menu 6 6 PIP MODE Click PIP MODE of the pop up menu to select between one or two small pictures within the main display 6...

Page 46: ...ting is set properly as stated above Please also make sure all of the setup of your modem or router is setup properly 7 1 Log in to Net Viewer After the ActiveX plug in is installed please refresh the...

Page 47: ...n to system system will enter into Live display You can enable disable showing certain cameras control the volume or control the movement of PTZ cameras if you have such cameras installed 7 2 1 2 Play...

Page 48: ...ccessing your DVR with 7 2 1 5 Log out Log out of the system Open sub menu Record to access the same Record settings that you would see on the firmware menus of the DVR Open sub menu Network to access...

Page 49: ...up files are saved as 264 files NOTE Use the PlayBack Software included on the software CD to playback backed up video 1 PTZ direction control Control PTZ moving direction 2 Zoom Focus and Iris Contro...

Page 50: ...erator software included in the driver CD and install AVI Generator to your computer 3 Open the AVI Generator installed on your computer click Open to find select the backup file and then click Open N...

Page 51: ...ice provider Product has not been maintained in accordance with the instructions Accident fire flood or other acts of God Failure to use Night Owl approved accessories Defects or damages arising by us...

Page 52: ...e please make sure that you have registered your product on line no later than thirty 30 days after purchase at www NightOwlSP com in the warranty registration section or in any other matter described...

Page 53: ...User s Manual 51...

Page 54: ...User s Manual 52...

Reviews: