ENGLISH –
7
ELECTRICAL CONNECTIONS
Terminals
Function
Description
Cable type
Flash
Warning light
Output for warning light mounting a 12 V (maximum 21 W) lamp. The
output can be programmed (refer to the “
” paragraph).
2 x 0.5 mm
2
ELS
Electric lock
Output for 12 V
a
(maximum 15 VA) electric lock. The output can
be programmed (refer to the “
paragraph).
2 x 1.0 mm
2
OGI
OGI
“Open Gate Indicator” output for 24 V maximum 4 W signalling lamp.
The output can be programmed (refer to the “
1 x 0.5 mm
2
ENC
Encoder 1
Motor 1 encoder input. No pole markings to observed
2 x 1.0 mm
2
ENC
Encoder 2
Motor 2 encoder input. No pole markings to observed
2 x 1.0 mm
2
Antenna
Radio receiver antenna connection
1 x RG58-type
shielded cable
Bluebus
BlueBus
Input for compatible devices (MOFB, MOFOB, MOB and MOTB).
The devices must be connected in parallel through two conductors
carrying both the power supply and the communication signals. It
is not necessary to observe the pole markings. During the learning
function, each device connected to the control unit will be individually
recognised thanks to a univocal code. Whenever a device is added
or eliminated, the control unit must run the learning procedure (see “
2 x 0.5 mm
2
Stop
Stop
Input for devices that through their intervention trigger the immediate
stoppage of the current manoeuvre followed by a brief reversal. NO
(normally open) contacts, NC (normally closed) contacts or devices with
8.2 kΩ fixed resistor output, such as sensitive edges, can be connected
to this input. Each device connected to this input will be individually
recognised by the control unit during the learning phase (see “
” paragraph). During this phase, if the control
unit detects any variation with respect to the learned status, it triggers
a STOP. One or more devices, even different from one another, can
be connected to this input: any number of NO inputs in parallel; any
number of NC inputs in series; 2 devices with 8.2 kΩ fixed resistor
output in parallel. If there are more than 2 devices, they must all be
connected in cascade mode with a single 8.2 kΩ terminating resistor; 2
NO and NC devices in parallel, putting an 8.2 kΩ resistor in series with
the NC contact (this also allows for combining 3 devices: NO, NC and
8.2 kΩ).
1 x 0.5 mm
2
SbS
Step-by-step
Input for a NO (normally open) button, for sending commands in step-
by-step mode.
1 x 0.5 mm
2
Open
Open
Input for command devices that trigger the opening manoeuvre only,
when they intervene. NO (normally open) contacts can be connected to
this input.
1 x 0.5 mm
2
Close
Close
Input for command devices that trigger the closing manoeuvre only,
when they intervene. NO (normally open) contacts can be connected to
this input.
1 x 0.5 mm
2
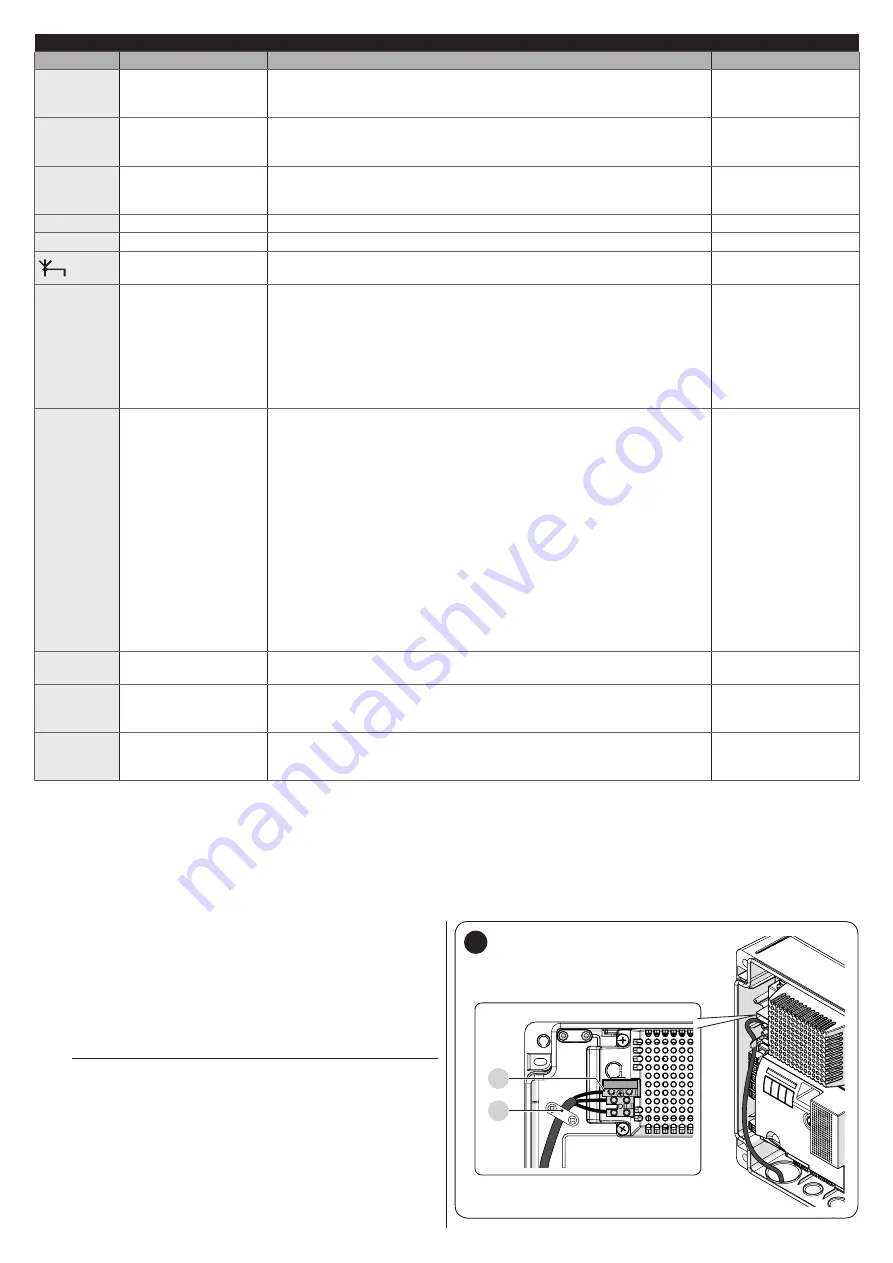
4.2.3 Operations for connection
To make the electrical connections (“
Figure
1.
remove the terminals from their housings
2.
connect the various devices to the relevant terminals
according to the diagram shown in “
Figure
3.
put the terminals back into their housings.
4.
connect the power supply cable to terminal (
A
) and secure
it with the cable clamp (
B
) (“
Figure
”).
m
If the system includes a single gearmotor only,
connect it to terminal M2 and leave terminal M1 free.
B
A
8
Summary of Contents for MC824HR
Page 1: ...Nice MC824HR Control unit EN Instructions and warnings for installation and use...
Page 24: ...24 ENGLISH NOTES...
Page 26: ...26 ENGLISH NOTES...
Page 27: ...ENGLISH 27 NOTES...


