background image

3. Determine fine placement by moving the speakers
inward or outward from each other

Move the 3.3's no more than 1/2" either toward or away from
each other. Again make sure that the speakers are parallel to
each other. Play the same three recordings again, listening
for image focus, stage width and depth. Evaluate whether
there is an improvement. If the overall performance is better,
mark the position with a piece of masking tape, and continue
moving the speakers in the same direction. Evaluate them
again. Continue this process until you have determined the
best balance of imaging, depth and sound-stage width.

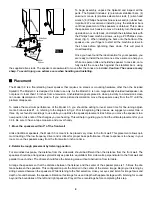
4. Install the metal cones

Now that you have the speakers in the best sounding position, install the metal cones onto the stabilizer bars (refer to
"SpikeKit Installation" above). Once all four cones are installed, re-check your measurements, making sure that the speak-
ers are still exactly parallel to each other.

If you have hardwood floors or floors with a scratchable surface, you may choose not to use the cones because they will
pierce the surface. Rubber feet are provided and can be used in place of the cones. Peel off the adhesive backings from
the rubber feet, and place them over the holes where the cones would screw in. The disadvantage of using rubber feet is
that you will not be able to adjust speaker tilt (step #5).

5. Adjust speaker tilt

To start, adjust the cones as needed to ensure that the 3.3 is level and does not rock in any direction (use your level to be
sure). Experiment with vertical axis by raising or lowering your ear level in the listening position. At one particular vertical
position, you may notice more ambience and depth in the soundstage. If the improvement occurs when your ears are at a
lower position, raise the height at the front of the speakers by slowly unscrewing the two metal cones on the front stabiliz-
er bar. Likewise, if the improved sound occurs when your ears are at a higher position, raise the height at the rear of the
speakers by slowly unscrewing the two metal cones on the rear stabilizer bar. Be sure not to unscrew too much, or the
cones may come off.

6. Final points to remember

You may want to repeat the setup procedures at some point after you have had a chance to live with the 3.3's for a while.
You will find that subtle improvements can be made that you may have overlooked during the initial setup. Experimentation
is the key to finding the best arrangement in your listening environment. Be patient, have fun, and remember that small
changes in speaker position can sometimes have a significant effect on the sound. In addition, room furnishings play an
important role in absorbing and reflecting soundwaves. Midrange and high frequencies in particular will be absorbed by
soft furnishings such as sofas, carpets and curtains. A large number of these soft furnishings will dull the sound, while a
"live" room with few furnishings will brighten the sound.

!

!

Connections

Before connecting speakers to your system, it is very important that you turn off the power to your amplifier /
receiver to avoid damage to the equipment.

5

D

1.5 x D

Speaker

Plane

3"

Center of

Speaker

Plane

fig. 2

Summary of Contents for 3.3

Page 1: ...OWNER S MANUAL Now Hear This 527 Stone Road Benicia CA 94510 800 NHT 9993 Reference Loudspeaker Model 3 3 ...

Page 2: ...to record the following infor mation in this owner s manual In the event that you misplace your sales receipt this information will help us to provide prompt and accurate service The Model 3 3 Reference Loudspeaker NHT loudspeakers are designed to deliver refined musical sound from attractive and affordable packages Our efforts are guided by the study of human hearing and are optimized for real wo...

Page 3: ...tabilized for a wider range of listening positions The cabinet shape also reduces the formation of internal standing waves resulting in smoother midrange response The thick walled and heavily braced cabinet not only provides a solid foundation for the sound producing elements it is also specially designed to provide each driver with the optimal radiating environment for its frequency range creatin...

Page 4: ...ze the maximum performance of the Model 3 3 you should be willing to invest some time for fine tuning adjust ments Follow steps 1 6 referring to the diagram in fig 2 Prior to beginning this process we suggest you select two or three of your favorite recordings to use while you optimize the speaker placement Each time you move the speakers to a new position take note of the changes you are hearing ...

Page 5: ...r level to be sure Experiment with vertical axis by raising or lowering your ear level in the listening position At one particular vertical position you may notice more ambience and depth in the soundstage If the improvement occurs when your ears are at a lower position raise the height at the front of the speakers by slowly unscrewing the two metal cones on the front stabiliz er bar Likewise if t...

Page 6: ... posts fig 3 with a metal jumper strap connecting the top and bottom pairs There are three different ways to connect the 3 3 s to your system full range with a single amplifier biampli fied with two amplifiers and two sets of speaker cable or biwired with one amplifier and two sets of speaker cable Full Range To run the 3 3 s full range with one amplifier receiver simply connect the speaker cables...

Page 7: ... perform better after they have had a chance to break in Several factors determine how long this process takes and it depends on such variables as room temperature type of music played and volume level You may be aware of subtle changes in sound quality during the first few days of listening as the mechanical parts of the drivers begin to loosen up Operation The Model 3 3 was designed to handle a ...

Page 8: ... sycamore laminate Driver Information Subwoofer 12 polymer cone in 70 liter acoustic suspension enclosure Ultra long throw 2 layer voice coil 59 oz magnet in die cast frame 19Hz free air resonance Fc 35Hz Q C 0 65 12dB octave low pass at 100Hz Lower Midrange 6 5 polymer cone in 10 liter anti modal enclosure Long throw 2 layer voice coil 42hfz free air resonance Fc 67Hz OK 0 66 12dB octave high pas...

Page 9: ... THD N 2 83 volts Audio Precision NHT INC 30 JUN 93 16 03 39 60 110 65 70 75 80 85 90 95 100 105 d B r 20 20k 50 100 200 500 1k 2k 5k 10k Hz Audio Precision NHT INC 02 MAR 93 22 42 51 0 01 100 0 02 0 05 0 1 0 2 0 5 1 2 5 10 20 50 20 20k 50 100 200 500 1k 2k 5k 10k Hz ...

Page 10: ... obtained from any source other than an authorized NHT service location This warranty does not cover defects or damage caused by the use of unauthorized parts or labor or from improper maintenance Altered defaced or removed serial numbers void this warranty Your Rights The liability of NHT will be limited to the purchase price of the product and NHT will not be liable for incidental or consequenti...

Reviews: