background image

All users should read the Nextiva 

HDR 1800 User Guide

 for complete details on installation, usage and 

functionality.

Quick Installation Guide

HDR 1800 High-Definition Receiver

Version 1.0

Nextiva

®

1

This installation guide provides instructions for installing and performing the initial configuration of 

the Nextiva

®

 HDR


1800

.

Package Contents

Each installation kit comes with the following:

One HDR 1800 featuring H.264 technology

One set of rack-mount brackets 

One set of wall-mount brackets

Six screws (Philips M4 x 6mm pan head)

Four bumpons

One 19V DC +/-5% power adaptor with cable.

One Nextiva HDR 1800 Quick Installation Guide

One RJ45 to DB9 adaptor 

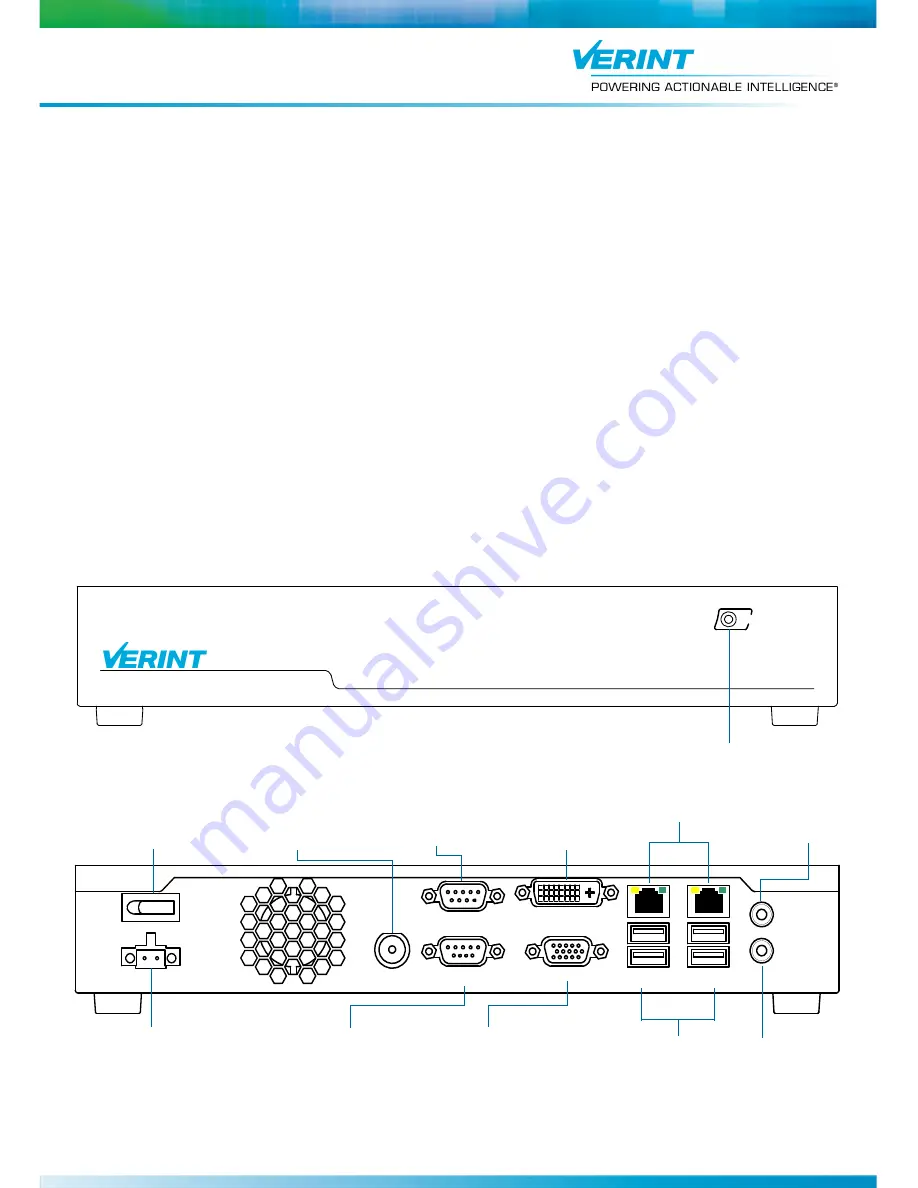
Hardware Overview

The HDR 1800 includes the following components:

One Power/Status LED

Power button 

19V DC +/-5% power receptacle

One BNC connector for composite video (NTSC/PAL)

One Digital DVI-D connector

One VGA (RGB) connector

One RS-232 (DB9) serial port for CCTV keyboard 

connection

One RS-422 (DB9) serial port for CCTV keyboard 

connection

Two RJ45 (Ethernet 10/100/1000 Base-T) network 

connectors

Four USB 2.0 ports

One Line-out, 1/8in (3.5mm) stereo jack for 

connecting external audio equipment

One Mic-in, 1/8in (3.5mm) stereo jack

HDR 1800 Front View

HDR 1800 Rear View

POWER

HDR 1800

High-Definition Receiver

Nextiva

Power LED

GND

+19V DC

POWER

TV-OUT

COM2

(RS-422)

COM1

(RS-232)

DVI-D

VGA

LAN1

USB1-2

LAN2

USB3-4

LINE-OUT

MIC-IN

19V DC +/-

5%

Power 

receptacle

RS-232 Input (DB9)

USB Ports

Power button

RS-422 Input 
(DB9)

Network Connectors (RJ-45)

DVI-D Connector

BNC Connector

Line-out

Mic-in

VGA Connector

Summary of Contents for HDR 1800

Page 1: ...The HDR 1800 includes the following components One Power Status LED Power button 19V DC 5 power receptacle One BNC connector for composite video NTSC PAL One Digital DVI D connector One VGA RGB connector One RS 232 DB9 serial port for CCTV keyboard connection One RS 422 DB9 serial port for CCTV keyboard connection Two RJ45 Ethernet 10 100 1000 Base T network connectors Four USB 2 0 ports One Line ...

Page 2: ...ing area 2 Attach the four bumpons provided to each corner of the HDR 1800 using the provided screws 3 Place the unit on the flat surface 4 Ensure that you have access to both the front and rear of the unit and that the fan airflow is not blocked To install the HDR 1800 on a rack 1 Align the rack mount brackets with the holes on the side of the HDR 1800 2 Screw the rack mount brackets to the HDR 1...

Page 3: ... on each side of the HDR 1800 Connecting the HDR 1800 This section provides the procedures for connecting the network and power cables video monitors and CCTV keyboards to the HDR 1800 Connecting the Network and Power Cables To connect the cable for network Plug an ethernet cable into the LAN1 network RJ 45 connector on the back of the HDR 1800 LAN2 is inactive To connect the cable for power 1 Con...

Page 4: ...t uses an RJ45 connection but you need to configure the RJ45 to DB9 adaptor wires color coded to the appropriate pins on the DB9 To connect a CCTV keyboard Use the following wiring scheme to connect the CCTV keyboard s serial cable to the corresponding serial DB9 port on the back of the HDR 1800 Once the connection is done you must set the baud rate parity and other parameters for the serial port ...

Page 5: ...ce Generator on the left The HDR 1800 Service Generator Browser pane is displayed on the right The HDR 1800 Service Generator Browser pane displays general information for discovered HDR 1800s including the current configuration state of the unit Partially Discovered Fully Discovered Configured or Foreign State Once an HDR 1800 is discovered you configure its network and monitor output settings Co...

Page 6: ...s for the HDR 1800 For a Single monitor configuration a Deselect the Monitor 2 option default selection b Select the Tile Layout for the monitor c Select the Connector Type for the monitor DVI default VGA or Composite For a Dual monitor configuration a Select the Monitor 2 option The configuration settings for Monitor 2 are enabled In a Dual monitor configuration the Connector Type for the first m...

Reviews: