background image

Access Files

Power On

PC Connection

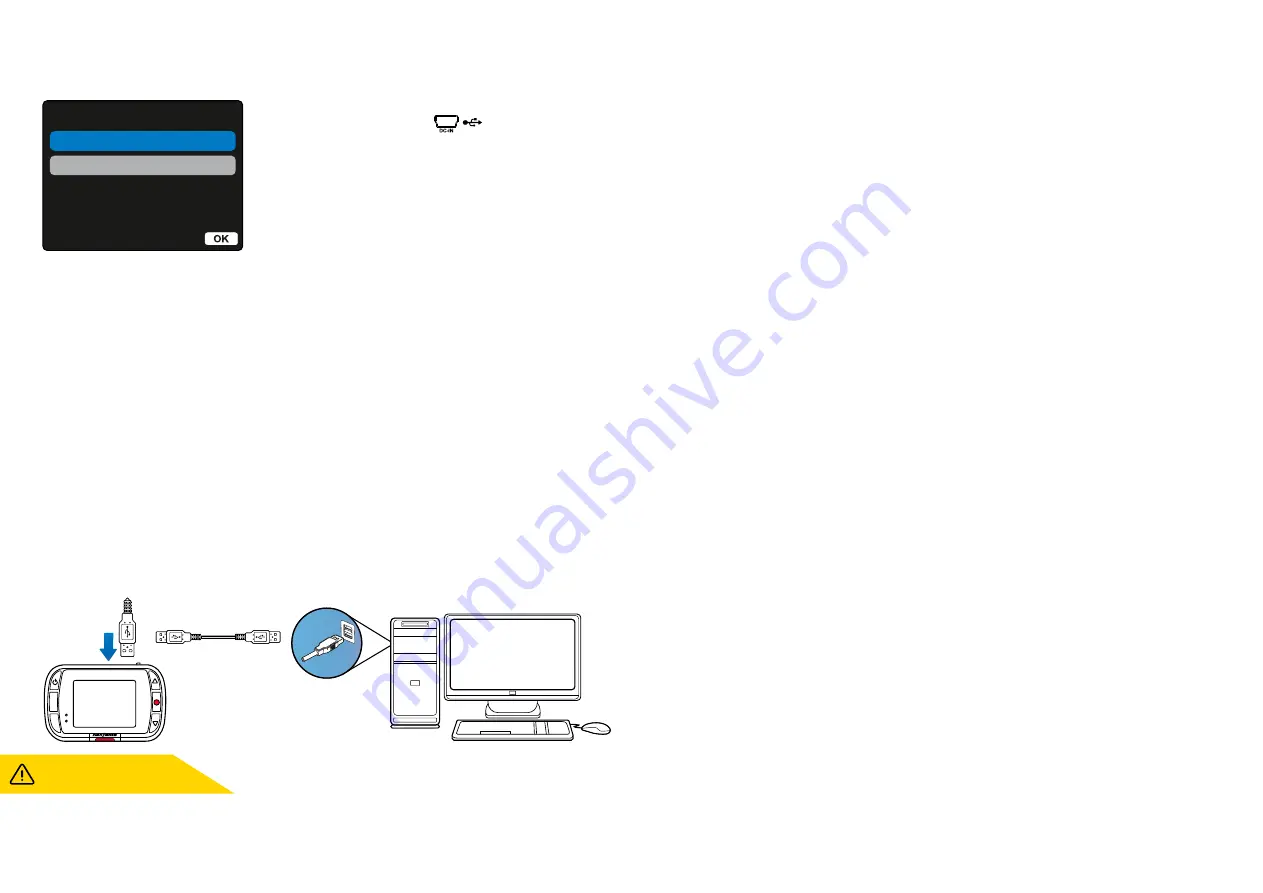
Use the supplied USB cable to connect the Dash Cam
directly to your PC via the                  socket on top of the
Dash Cam;
do NOT connect the USB cable to the Powered Mount. 

Once connected the Dash Cam will turn on with two options
available; ‘

Access Files

’ and ‘

 Power On

 ’, as described below.

Use the UP and DOWN buttons to select required function
and press OK to confirm selection.

Access Files (Windows)

When this option is selected, the Dash Cam will function as a card reader for your PC. An extra drive will
appear, e.g. NEXTBASE (D:) and you will be able to view / manage the stored files upon the MicroSD card
within the Dash Cam. You will be able to view your files using your system’s default media player.
The Dash Cam is a ‘read-only’ device, therefore uploading files to the SD card when in Mass Storage
mode is not possible. If you wish to add files to the SD card you can do this using a MicroSD card reader.

Access Files (Mac)

When this option is selected, the Dash Cam will function as a card reader for your MAC. The 'Nextbase’
external USB disk icon will appear on your MAC and you will be able to view and/or manage stored files.
You will be able to view your files using your system’s default media player.
The Dash Cam is a ‘read-only’ device, therefore uploading files to the SD card when in Mass Storage
mode is not possible. If you wish to add files to the SD card you can do this using a MicroSd card reader.

Power On (Windows & Mac)

When this option is selected, the Dash Cam will power on with all functions available. This includes
charging of the internal battery; a full charge will take approximately 2 hours.

MODE

MENU

PC Connection

25

Firmware Update Information

Firmware controls the basic functioning of the Dash Cam. If your Dash Cam is not functioning correctly,
you may need to update the firmware.

Firmware updates may also be released to fix bugs, and improve the general functionality of the Dash Cam.
In short, it’s important to keep the firmware on your Dash Cam up to date so it can operate to it’s full capacity.
We recommend you regularly check for updates to get the most from your Dash Cam.

How to Check your Dash Cam’s current Firmware Version

Within the Setup Menu, on page 3, select ‘System Info’. Here you will find information relating to your
Dash Cam, including what firmware version is currently active (i.e R05.3).

How to Update Firmware on your Dash Cam

Connect your Dash Cam’s SD Card to PC using a card reader. This will open a file explorer drive,
(e.g) Removable Disk (E:) and show the contents of your SD Card. Go to the ‘Support & Downloads’ page
on nextbase.com and download the newest firmware version (i.e R05.4); this will download as .bin file.
Drag and drop the .bin file to the SD Card explorer. 
Eject the SD card and insert it back into your Dash Cam. When you connect the power cable your Dash
Cam will turn on, and will automatically begin updating. While updating, both the Nextbase™ logo
beneath the screen and the red LED to the left of the screen will start flashing.

Once the update has been completed, the logo and LED will stop flashing, and your Dash Cam will
automatically restart.

 If ‘Keep User Settings’ is turned ON in the Setup Menu, your Dash Cam will boot up normally,

Notes:

straight into video live view mode, ready to use. If ‘Keep User Settings’ is turned OFF, after the update is
complete, the Dash Cam will boot up into the First Time Use menu, which must be completed before the
Dash Cam can be used.
Be sure to externally back up any files you want to keep before updating the firmware.

ALWAYS turn OFF the Dash Cam
before disconnecting from your PC/Mac.

Enter

Summary of Contents for NBDVR122

Page 1: ...User Manual...

Page 2: ...video or photographs upon the Dash Cam LCD screen Automatic Start Stop Technology The Dash Cam will automatically power on and be ready to use once power is available In some vehicles this will be wh...

Page 3: ...6 07 08 09 10 11 12 13 16 17 18 19 20 21 22 INTRODUCTION TO USING YOUR DASH CAM TABLE OF CONTENTS PRECAUTIONS CAUTIONS ON USING THIS PRODUCT PRODUCT WARNINGS USAGE PRECAUTIONS NOTICES CANADA COMPLIANC...

Page 4: ...r from both the 12 24Vdc outlet in your vehicle and the Dash Cam itself 4 Only clean the Dash Cam with a soft dry cloth for tough dirt apply some neutral detergent diluted in 5 to 6 parts water to a s...

Page 5: ...d in some countries or states Please adhere to these laws Vehicle Installation Warnings When installing the Dash Cam in a vehicle do not place the Dash Cam where it obstructs the driver s view of the...

Page 6: ...Dash Cam footage or may impose restrictions on it we recommend that you check the legal requirements with your legal advisor before disseminating any Dash Cam footage If the Dash Cam is to be used wi...

Page 7: ...nterference to radio or television reception which can be determined by turning the equipment o and on the user is encouraged to try to correct the interference by one or more of the following measure...

Page 8: ...ltek Services Shenzhen Co Ltd Address 1 F Fukangtai Building West Baima Rd Songgang Street Baoan District Shenzhen Guangdong People s Republic of China 518105 Contact Name Philo Zhong Tel 86 755 8355...

Page 9: ...attery Unit Dimensions Unit Weight NBDVR122 5V 1 5A 12 24Vdc Car Power Cable supplied Fuse Type 20mm 2A Output 5Vdc Hardwire Kit also available to purchase for a hidden permanent power supply 1M Pixel...

Page 10: ...arking Mode Intelligent Parking Mode automatically starts recording when motion is detected keeping your car safe when parked Built in Microphone Speaker Record audio to compliment the video recording...

Page 11: ...Photo Mode Press to take photo In the Menus Select Up Down Buttons In the Menus Use to navigate the menus within the camera Video Mode Down to turn the screen ON OFF Up to turn the audio recording ON...

Page 12: ...h Cam 14 MicroSD Card Slot Insert the MicroSD card here taking care that the gold contacts are facing towards the screen side of the Dash Cam Microphone Built in microphone to record audio for your vi...

Page 13: ...d 2 Remove dust cover from the Dash Cam Remove the dust cover that is located on the front of the Dash Cam to gain access to the mounting point To remove the dust cover lift the cover away from the bo...

Page 14: ...rging The Nextbase Hardwire Kit includes the necessary 12 24Vdc to 5Vdc convertor and battery protection circuitry See pages 9 10 of the Nextbase Accessories Manual for further information Route the p...

Page 15: ...ash Cam is horizontal and faces straight out of the windscreen Ensure that objects on the Dash Cam display appear level and adjust as required 8 Attach the Dash Cam to the windscreen When you are sati...

Page 16: ...that the road ahead is at the centre of the image in the central third of the display If too much of the sky is visible it may risk underexposing details on the road ensure that the road ahead is cle...

Page 17: ...th your Dash Cam this can be used to help pry open the lining of your car see illustration below right Notes On Positioning Your Dash Cam Do NOT mount the Dash Cam in front of the driver as depicted b...

Page 18: ...ng if necessary clean with a warm clean cloth Ensure that the Mount and Dash Cam do not obstruct the driver s view Removing Adhesive Residue If you wish to remove the adhesive mount from your windscre...

Page 19: ...e Time and Date This menu will appear when 1 The Dash Cam is first turned on 2 There has been a Firmware Update applied to the Dash Cam and Keep User Settings has been set to OFF If It is set to ON yo...

Page 20: ...exposure level for different lighting conditions Options Values range from 6 to 6 Default 0 Audio Recording Turn On Off the microphone for video recording Options On and Off Default On Video Length Se...

Page 21: ...sed Start up sound is NOT muted Options On and Off Default On Auto Power Off Adjust the timing of the Auto Power Off function this can be used to continue recording in event of loss of power within in...

Page 22: ...Turn this On in order to keep your preferred individual user settings during the Dash Cam update process Select Off in order to clear all user settings and return them to defaults during the Dash Cam...

Page 23: ...D card Playback options Press Record to Play Pause Press Mode to Stop and return to the preview screen 13 14 12 M O D E MENU 00000001 JPEG AVI 16 04 37 14 10 2017 PREV NEXT MODE OK 1234 ABC 1234 ABC 0...

Page 24: ...and will divert back to the Playback display When you successfully protect or unprotect a file a red padlock icon will be added or removed respectively This will be visible on the Playback display wh...

Page 25: ...ols the basic functioning of the Dash Cam If your Dash Cam is not functioning correctly you may need to update the firmware Firmware updates may also be released to fix bugs and improve the general fu...

Page 26: ...sed on many products across many industries for example SD cards as a mark of compliance with European standards In recent years many variations of this mark have appeared in the market While similar...

Page 27: ...o slow for HD video playback The sound is not synchronised with video during playback The Codecs upon your PC may not be compatible or the latest standard Download the latest Codecs from www nextbase...

Page 28: ...ptor I get the message SD Card Error on screen The SD card has become unusable by the Dash Cam Back up useful files to your PC and then Format your SD card from within the Dash Cam setup menu I get th...

Page 29: ...the United States of America and international copyright treaties You further acknowledge that the structure organization and code of the Software for which source code is not provided are valuable tr...

Page 30: ...In no event shall Nextbase be liable in a claim for breach of warranty for any incidental special indirect or consequential damages whether resulting from the use misuse or inability to use this produ...

Page 31: ...Mac software Nextbase Services and Software MyNextbase Cloud MyNextbase Connect MyNextbase Player Dash Cams Eyes on the Road Nextbase offers a wide range of Dash Cams to best suit your driving needs...

Page 32: ...32 Dash Cam Functions Nextbase Cloud Storage Nextbase Module Cam Compatible Rear Cam Rear Facing Cam Nextbase Emergency Response MyNextbase Player MyNextbase Connect...

Page 33: ...NBDVR122 ENG R2...

Reviews: