NextBase 222XR User Manual Download Page 16

16

Notes On Positioning Your Dash Cam

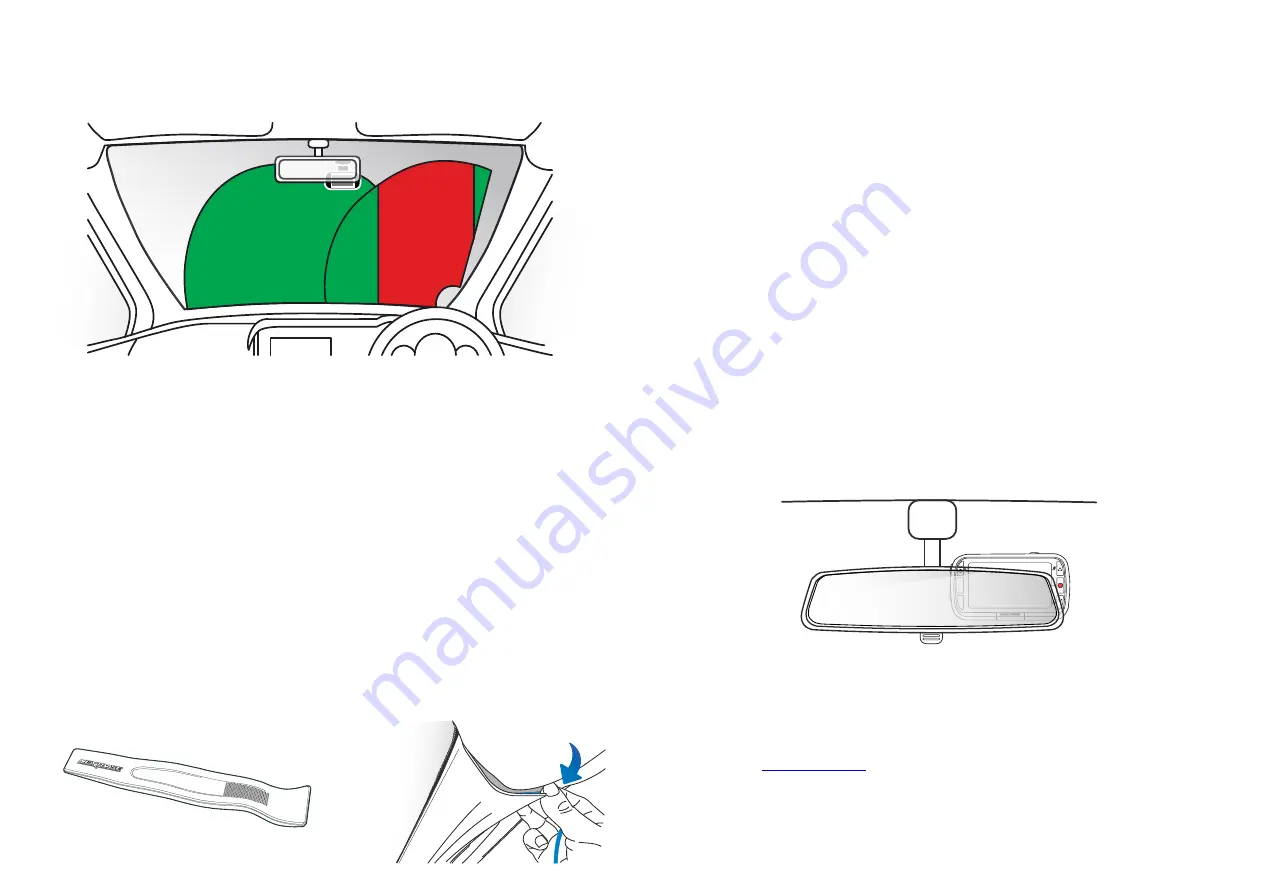
   - Do NOT mount the Dash Cam in front of the driver, as depicted by the red area in the illustration
      to the left of this page.

   - When installing the Dash Cam in a vehicle, always place the device securely against the
      windscreen and where possible conceal the power cable under trim.

   - Make sure that the Dash Cam power cable does not interfere with the drivers operating controls,
     such as the steering wheel, pedals or gear levers. 

   - Do NOT mount the Dash Cam in front of an airbag field of deployment or in a position to
     obscure any mirrors.

   - It is recommended NOT to operate the Dash Cam whilst driving. The automatic Start-Stop
     technology incorporated within the device negates any need to operate the controls whilst driving.

   - Adjust any settings or review recordings whilst stationery, not whilst driving.

   - After the preliminary SETUP has been carried out upon the Dash Cam, adjust the Screen Saver
     setting to ON; this will blank the screen automatically 30 seconds after starting the vehicle 
     and therefore the screen will NOT be a distraction in any way to the driver.

   - Below is a suggested position for your Dash Cam with Rear View Camera attachment. Ensure that
      both the Dash Cam and Rear Facing Camera’s lines of sight are unobstructed by in-car objects, such
      as the rear view mirror.

Accessories

Multiple accessories can be purchased for your Nextbase™ Dash Cam, including a Hardwire Kit and
Polarising Filter that can effect how best to set up your Dash Cam.
For more information on how to position and use these products, download the ‘

Nextbase Accessories

Manual

’ PDF at 

www.nextbase.com

Dash Cam Installation (cont.)

Please read and follow the notes below for the safe operation of your Dash Cam within your vehicle.

Before installing the Dash Cam on your windscreen, check the state and local laws and ordinances where
you drive. Some laws prohibit or restrict the placement of objects on the windscreen of a motor vehicle.
IT IS THE USER'S RESPONSIBILITY TO MOUNT THE DEVICE IN COMPLIANCE WITH ALL APPLICABLE LAWS
AND ORDINANCES.
Always mount your Nextbase™ Dash Cam in a location that does not obstruct the driver's view of the road. 
Nextbase™ does not assume any responsibility for any fines, penalties, or damages that may be incurred
as a result of any state or local law or ordinance relating to the use of your Nextbase™ Dash Cam.

As per the installation instructions, you must install the Dash Cam so it does NOT obstruct the driver’s view
of the road (red, above), preferably on the passenger side of the vehicle and behind the rear view mirror.
The Dash Cam needs to view through a clear section of windscreen in an area swept by the windscreen
wipers (green, above). However, the Dash Cam should be installed so as not to intrude significantly within
the wiped area.  A 40mm intrusion into the green wiped area is the maximum permitted by UK law.

Hiding the Cable:

Make sure the hanging cable does not obstruct your view out of your rear window. Ensure that there are 
no kinks in the cable as you are stowing it. If necessary, use the cable tidy tool supplied with your Dash Cam;
this can be used to help pry open the lining of your car (see illustration below, right).

MENU

MODE

Summary of Contents for 222XR

Page 1: ...User Manual...

Page 2: ...nce power is available In some vehicles this will be when connections are made for others the Dash Cam will power on once the ignition has been turned on When power is cut off or unavailable the Dash...

Page 3: ...27 28 29 30 31 32 33 34 35 36 37 38 INTRODUCTION TO USING YOUR DASH CAM TABLE OF CONTENTS PRECAUTIONS CAUTIONS ON USING THIS PRODUCT PRODUCT WARNINGS USAGE PRECAUTIONS NOTICES CANADA COMPLIANCE CE DEC...

Page 4: ...n use please disconnect the car adaptor from both the 12 24Vdc outlet in your vehicle and the Dash Cam itself 4 Only clean the Dash Cam with a soft dry cloth for tough dirt apply some neutral detergen...

Page 5: ...d in some countries or states Please adhere to these laws Vehicle Installation Warnings When installing the Dash Cam in a vehicle do not place the Dash Cam where it obstructs the driver s view of the...

Page 6: ...Dash Cam footage or may impose restrictions on it we recommend that you check the legal requirements with your legal advisor before disseminating any Dash Cam footage If the Dash Cam is to be used wi...

Page 7: ...tion distance of 20cm must be maintained between the antenna and the person for this appliance to satisfy the RF exposure requirements FCC CAUTION This product does not contain any user serviceable pa...

Page 8: ...7 Report No TBC 4 Test Firm Used to Take Measurements Name Waltek Services Shenzhen Co Ltd Address 1 F Fukangtai Building West Baima Rd Songgang Street Baoan District Shenzhen Guangdong People s Repub...

Page 9: ...native power source to replace the supplied car adaptor Front Camera 82 x 46 x 46 Front Camera 79g Model Number Name Power Requirements Power Supply Sensor Resolution Lens Type Angle Aperture Recordin...

Page 10: ...am with just one hand Supplied with adhesive fittings G Sensor File Protection In the event of an impact the device will automatically protect the recording stopping the file from being over written T...

Page 11: ...enus Use to navigate the menus within the camera Video Mode Up button toggles audio recording On Off Down button toggles screen On Off Playback Mode Scroll through your videos photos Camera Parts and...

Page 12: ...ra Connection Point Connect your Rear Window Camera to the Dash Cam ALWAYS ensure your Dash Cam is powered OFF before connecting or disconnecting the Rear Facing Camera Camera Parts and Controls cont...

Page 13: ...2 Remove dust cover from the Dash Cam Remove the dust cover that is located on the front of the Dash Cam to gain access to the mounting point To remove the dust cover lift the cover away from the body...

Page 14: ...t available for Phone Sat Nav charging The Nextbase Hardwire Kit includes the necessary 12 24Vdc to 5Vdc convertor and battery protection circuitry See pages 9 10 of the Nextbase Accessories Manual fo...

Page 15: ...ash Cam to the windscreen When you are satisfied with the placement and orientation of the Dash Cam firmly place the mount on the windscreen 6 8 7 Straighten the Dash Cam Ensure that the Dash Cam is h...

Page 16: ...information on how to position and use these products download the Nextbase Accessories Manual PDF at www nextbase com Dash Cam Installation cont Please read and follow the notes below for the safe op...

Page 17: ...ow Camera to the cable Ensure that the Dash Cam is turned OFF with no power being supplied 1 2 M EN U M O D E M EN U M O D E 4 1 2 1 Attach the mount to the Rear Window Camera Place the magnetic adjus...

Page 18: ...ng Camera cable Route the Rear Facing Camea cable through your vehicle to the rear window stowing the cable within the headlining using the Nextbase Cable Tidy Tool included with your Dash Cam if nece...

Page 19: ...to ensure you are capturing the intended area behind you You may want to ask someone else to assist you in this part See page 20 Camera Angle Adjustment for more details 4 Camera Placement It is advi...

Page 20: ...Window Camera to look out of the rear window of your vehicle Use both hands to steady the Rear Window Camera When the Rear Window Camera is adjusted press the Power Button to toggle the position of th...

Page 21: ...se a small sharp blade If this is the case protect your ngers and use the blade at against the surface of the glass to avoid causing scratches Mount Attachment To attach the mount align the pins on th...

Page 22: ...rst Time Use menu is in place to get you up and running quickly and smoothly The settings you choose during First Time Use can be changed at any later time in the setup menus MODE MENU OK First Time U...

Page 23: ...Window Camera attached you will be able to choose between 1080P or 720P recording for the Dash Cam the resolution of the attached Rear Window Camera is dictated by the chosen resolution of the Dash C...

Page 24: ...n and Off Default Off Setup Menu Options 1 2 3 4 Format SD Card Time Date Language Screen Saver Setup Menu Format SD Card Time Date Language Screen Saver Setup Menu MODE MENU OK Press the Menu button...

Page 25: ...lts during the Dash Cam update process Options On and Off Default Setting Off Default Settings Resets your Dash Cam to the default settings 9 10 11 12 Recording History System Info Keep User Settings...

Page 26: ...when your Dash Cam is in Playback mode Video Mode The key below explains the various information displayed on the screen when your Dash Cam is in Video mode some icons will only be displayed once the...

Page 27: ...ssfully protect or unprotect a file a red padlock icon will be added or removed respectively This will be visible on the Playback display which you will be immediately diverted to following your selec...

Page 28: ...xtbase Cloud Settings Opens the settings tab for MyNextbase Player Options available include language speed units software update options map provider Google maps or Open Street Maps connection tips e...

Page 29: ...e selected annotation When you have nished your annotation click Save and Close to return to the Add Annotation screen where more annotations can be added When you have nished adding annotations press...

Page 30: ...co uk Remember my e mail address Continue NEXTBASE Secure Server Upload To NEXTBASE Secure Server Upload To Videos uploaded to the Nextbase Secure Server can be viewed by anyone you share the link wit...

Page 31: ...Do not disconnect power www nextbase com Updating Firmware controls the basic functioning of the Dash Cam If your Dash Cam is not functioning correctly you may need to update the firmware Firmware upd...

Page 32: ...eavy user this would be every two weeks for a light user this would be once a month 16GB 32GB 64GB 128GB Approx 2 hours footage Approx 4 hours footage Approx 8 hours footage Approx 16 hours footage Ba...

Page 33: ...a different PC Copy the recorded video files onto the PC Mac for playback directly rather than use the Dash Cam as a card reader as the USB system on your PC may be too slow for HD video playback The...

Page 34: ...ptor I get the message SD Card Error on screen The SD card has become unusable by the Dash Cam Back up useful files to your PC and then Format your SD card from within the Dash Cam setup menu I get th...

Page 35: ...he Software or any part of it to be combined with or become incorporated in any other programs You agree not to export or re export the Software or Documentation to any country in violation of the exp...

Page 36: ...In no event shall Nextbase be liable in a claim for breach of warranty for any incidental special indirect or consequential damages whether resulting from the use misuse or inability to use this produ...

Page 37: ...share your footage on your computer with the new easy to use free PC Mac software Nextbase Services and Software Dash Cams Eyes on the Road Nextbase offers a wide range of Dash Cams to best suit your...

Page 38: ...Emergency Response Parking Mode Alexa Built in 622GW 4K 30 FPS 1440P 30 FPS 1440P 30 FPS Alexa Built in Alexa Built in Alexa Built in 1080P 60 FPS 1080P 30 FPS 720P 30 FPS Yes Front 4K 1440p 1080p Re...

Page 39: ...NBDVR222XR ENG R2...

Reviews: