background image


8

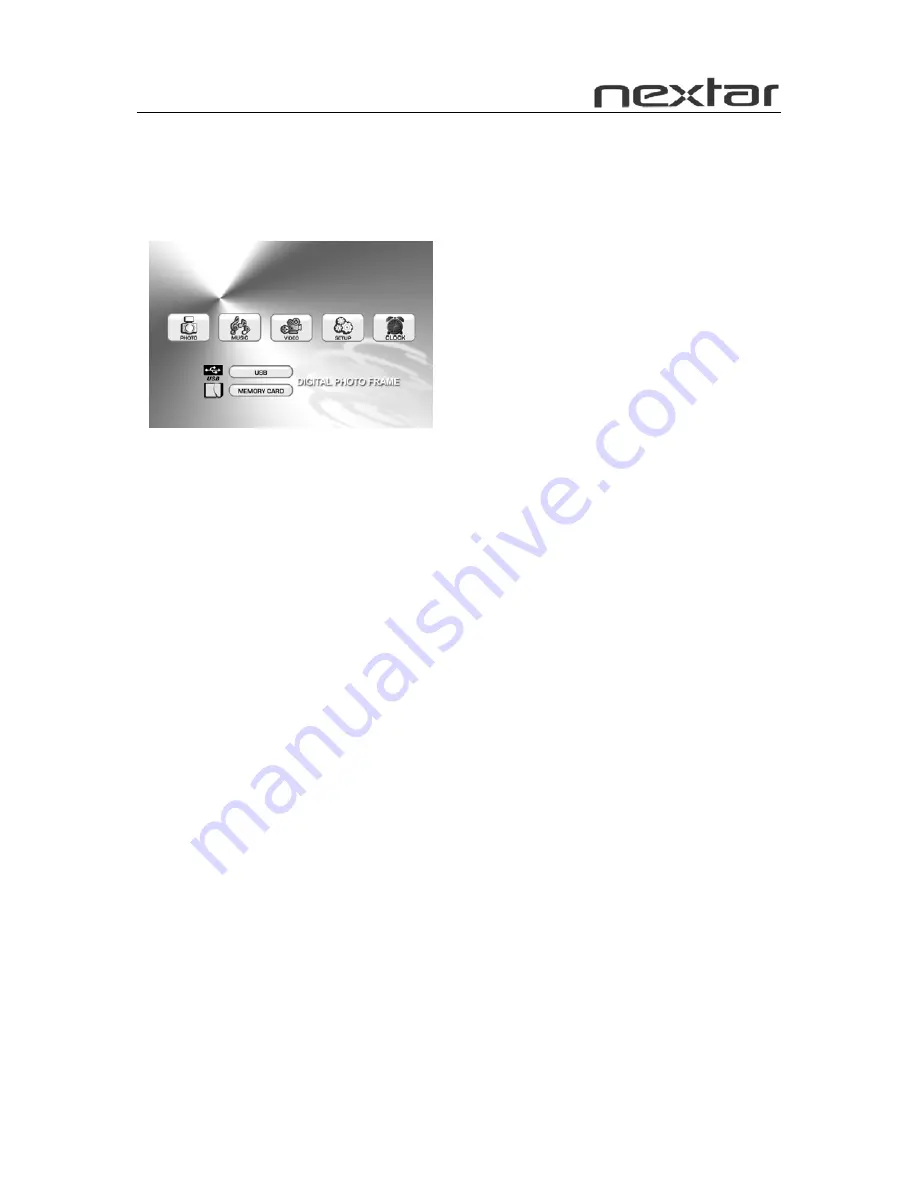
Main Menu 

The screen will display as follows if the memory card has been correctly inserted. 

Make sure you have stored a song, photo, or video file on your memory card.   


PHOTO   

Enter the Photo display mode directly 

MUSIC   

Enter the music play mode directly 

VIDEO   

Enter the video play mode directly   

SETUP   

Enter the setup mode directly   

CLOCK   

Enter the clock mode directly 

Viewing your Pictures 

1.  Press the buttons either on the remote control or on the screen to operate the 

Digital Photo Frame. 

2.  Press the arrow keys on the remote control to navigate through the menu items 

displayed on the screen and select 

PHOTO

. Press the Enter button to confirm the 

selection or simply press the 

PHOTO 

button to select the function. 

3.  Place the cursor on one picture and press the 

ENTER 

button to view the picture.   

4. Press the 

SLIDE SHOW

 button on the remote control to enter 

Slide Show Mode

.  

5. Press the 

VIEW

 button while reviewing the photo list menu to enter a 

6-picture-view 

and use the arrow keys to choose the picture you would like to see 

in a full-screen view.   

6. Press the 

MENU

 button to return to the main menu and select 

SETUP

 to enter the 

Setup Mode.   

7. Move the cursor


to “

Video Setup

” by pressing the 

Right 

arrow Key.   

8. Press the 

Down 

arrow Key and select “Time”. Press the 

Right

 arrow to adjust the 

time interval for viewing each picture in the Slide Show, and then press the 

ENTER 

button to confirm the setting. Press the 

SETUP

 button again to exit the Setup 

Menu.  


Summary of Contents for N7-102 - Widescreen Digital Photo Frame/MP3 Player

Page 1: ...N7 102 User s Manual Digital Photo Frame ...

Page 2: ...memory cards and ports SD MultiMedia Card Memory Stick and Memory Stick PRO and USB Main Features This device can display digital pictures JPEG and play MP3 music or supported video files without connecting a computer memory card not included Compatible with Secure Digital Card SD MultiMedia Card MMC Memory Stick and Memory Stick Pro Compatible with USB 2 0 The device can play MP3 files with high ...

Page 3: ... How to Clean LCD Screen Wipe the screen gently The screen is made of glass and may be easily scratched or broken To clean fingerprints and dust from the LCD screen a soft non abrasive cloth such as camera lens cleaning cloth is recommended Do not apply cleaning liquid directly to the LCD screen if using LCD screen cleaning kits available at retail outlets Moisten the cleaning cloth with the clean...

Page 4: ...lace the panel over the frame and press down with thumbs and index fingers With both hands on the picture frame panel place thumbs on the upper portion of the frame and index fingers at the corners Lift the corners with the index finger Photo 1 Photo 2 Frame will lift off Photo 3 ...

Page 5: ... Memory Cards Your Digital Photo Frame is compatible with the following memory cards Secure Digital Card SD Multimedia Card MMC Memory Stick and Memory Stick Pro Insert the memory card with its label facing up Do not try to force a memory card into the slot If it is difficult to insert the card you may be inserting the card incorrectly Note Only JPEG format digital image files can be read by the D...

Page 6: ...button to select the PHOTO Mode available on the main menu 4 MOVIE Press this button to enter the VIDEO Mode 5 MUSIC Press this button to enter the MUSIC Mode 6 A V OUT AV output Interface to connect to a 2 channel audio amplifier or a TV set 7 USB USB interface to connect to U disc MP3 player 8 SD MMC MS CARD Slots for SD MMC MS card insertion 9 DC IN DC power input 10 RESET ...

Page 7: ...ictures for navigation SETUP Press this button to display the device s setup menu MENU Press this button to display the main menu BACK MUSIC Press this button to play background MP3 music while displaying slide shows or pictures SLIDE SHOW Press this button to view the pictures one by one automatically STEP SHOW Press this button to view the pictures one by one manually Press buttons to select the...

Page 8: ...nd return to the main menu Press to return to the previous title chapter track picture Press to skip ahead to the next title chapter track picture How to Install and Replace Remote Control Battery 1 Hold the remote control with the buttons facing downward 2 Hold the remote control cover with one hand and use the other hand to pull the battery tray out of the remote control cover 3 Put a CR2025 lit...

Page 9: ...er button to confirm the selection or simply press the PHOTO button to select the function 3 Place the cursor on one picture and press the ENTER button to view the picture 4 Press the SLIDE SHOW button on the remote control to enter Slide Show Mode 5 Press the VIEW button while reviewing the photo list menu to enter a 6 picture view and use the arrow keys to choose the picture you would like to se...

Page 10: ...ton to confirm your selection 3 Press the VOL or VOL keys to adjust the volume 4 Press the FWD and REV keys on the remote control to fast forward or fast reverse the track 5 Press the Up arrow key or Down arrow key or PREV NEXT key to select the previous or next music file respectively How to Play Video Files The Digital Photo Frame is compatible with MPEG 1 and AVI Make sure these files are store...

Page 11: ...into the TV s AV interfaces usually yellow red and white to connect the Digital Photo Frame to your TV Turn off both the frame and the TV before connecting them to each other Once connected make sure that your TV settings are correct usually labeled AV Video or AUX SETUP Main menu z SYSTEM SETUP Parameter settings z PHOTO SETUP Picture settings z VIDEO SETUP Video display settings z CLOCK SETUP Cl...

Page 12: ...ight or Left arrow keys and the ENTER button to turn OFF or ON 16 effects in total FREQUENCY Allows you to set the interval frequency with which the display will change the photos Press the Right or Left arrow keys and the ENTER button to set the frame to DEFAULT and the interval 10SECOND 30SECOND 1MINUTE 30MINUTE 1HOUR MUSIC Allows you to turn on or off the background music while displaying photo...

Page 13: ... the ENTER button to switch the mode between NORMAL or RANDOM mode VIDEO SETUP Operation Press the Up and Down arrow keys to select functions Press the Right and Left arrow keys to adjust the settings Press the ENTER button to confirm your settings Function BRIGHTNESS Level of light CONTRAST Color contrast HUE Color tone SATURATION Color saturation adjust SHARPNESS Color sharpness adjust Not all A...

Page 14: ...ton to setup the time of alarm POWER ON Press arrow keys and ENTER button to setup the time of power on POWER OFF Press arrow keys and ENTER button to setup the time of power off How to Setup the Clock Setup the local time and calendar Press the Up and Down arrow keys to select functions Press the Right and Left arrow keys to select desired settings Press the ENTER key to confirm settings ...

Page 15: ...er presents some troubleshooting problems you may encounter while using the device Even if the following guide fails to solve your problem please do not disassemble the device but leave the repairs to professional staff ...

Page 16: ...Memory Card or U Disc Can I insert several memory cards into the Digital Photo Frame No You can only insert one memory card into the Digital Photo Frame at a time Does it play all types of AVI video files Not all AVI format video files will be supported What is the optimal resolution of the display 480 X 234 RGB Can the device play MPEG 1 files stored on a memory card The device can play MPEG 1 vi...

Page 17: ...terface Speakers stereo Power AC Adapter Input 100 240V Output 12V 1 1 5A Environmental Requirements Operation 0 35 Humidity 0 85 Storage 20 60 Humidity 10 90 Accessories AV Adapter Remote Control Warranty Card Registration Card Return Card AV Cable USB Cable Manual ...

Reviews: