background image

Copyright © 2021 NEXCOM International Co., Ltd. All Rights Reserved.

17

NDiS B560 User Manual 

Chapter 2: Jumpers and Connectors

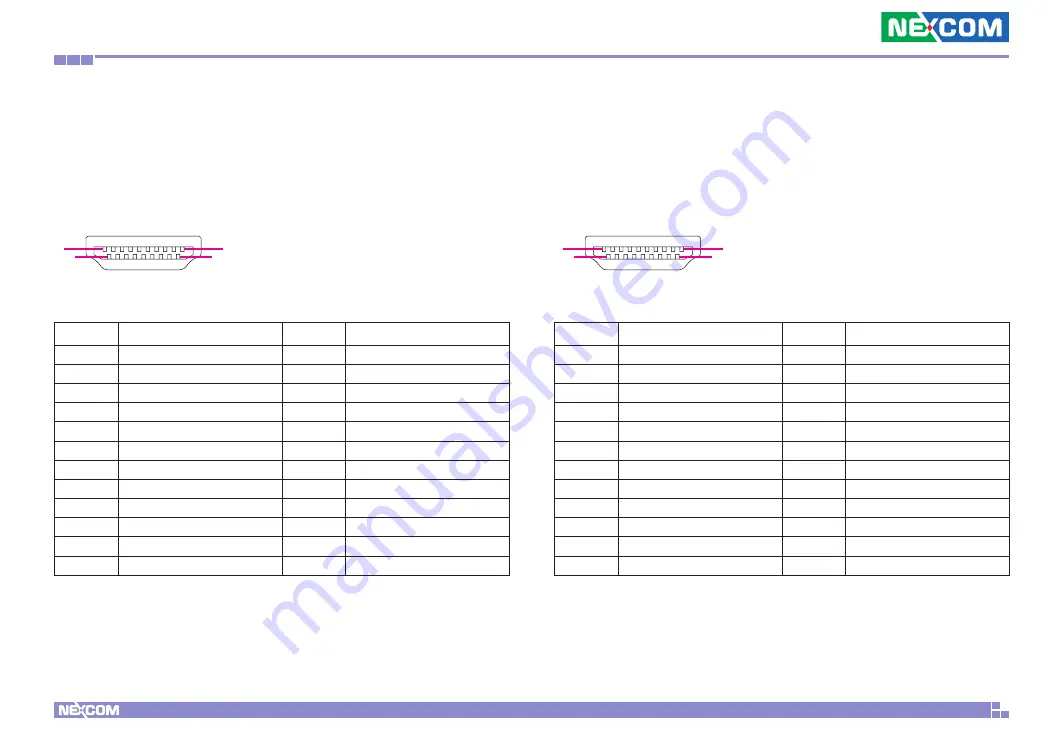
HDMI2 Connector

Connector type: HDMI port
Connector location: HDMI2

1

2

18

19

Pin

Definition

Pin

Definition

1

HDMI2_TX2_P_CN

2

GND

3

HDMI2_TX2_N_CN

4

HDMI2_TX1_P_CN

5

GND

6

HDMI2_TX1_N_CN

7

HDMI2_TX0_P_CN

8

GND

9

HDMI2_TX0_N_CN

10

HDMI2_CLK_P_CN

11

GND

12

HDMI2_CLK_N_CN

13

HDMI2_CEC

14

NC

15

HDMI2_SCL

16

HDMI2_SDA

17

GND

18

HDMI2_PWR_C

19

HDMI2_HPD_C

MH1

REAR_GND

MH2

REAR_GND

MH3

REAR_GND

MH4

REAR_GND

HDMI3 Connector

Connector type: HDMI port (NDiS B560-Q370 Only)
Connector location: HDMI3

1

2

18

19

Pin

Definition

Pin

Definition

1

HDMI3_TX2_P_CN

2

GND

3

HDMI3_TX2_N_CN

4

HDMI3_TX1_P_CN

5

GND

6

HDMI3_TX1_N_CN

7

HDMI3_TX0_P_CN

8

GND

9

HDMI3_TX0_N_CN

10

HDMI3_CLK_P_CN

11

GND

12

HDMI3_CLK_N_CN

13

HDMI3_CEC

14

NC

15

HDMI3_SCL

16

HDMI3_SDA

17

GND

18

HDMI3_PWR_C

19

HDMI3_HPD_C

MH1

REAR_GND

MH2

REAR_GND

MH3

REAR_GND

MH4

REAR_GND

Summary of Contents for NDiS B560

Page 1: ...NEXCOM International Co Ltd NEXCOM International Co Ltd Published August 2021 www nexcom com Intelligent Platform Services Business Unit Digital Signage Platform NDiS B560 User Manual ...

Page 2: ... Introduction Overview 1 Key Features 1 Physical Features 2 Front Panel 2 Rear Panel 2 Hardware Specifications 3 Mechanical Dimensions 5 Chapter 2 Jumpers and Connectors Before You Begin 6 Precautions 6 Locations of the Jumpers and Connectors for NDiB B560 7 NDiB B560 7 Top View 7 Bottom View 8 Jumper Settings 9 Jumper and DIP Switch Settings 10 CMOS Clear Selection 10 AT ATX Mode Selection 10 Con...

Page 3: ... 26 SIM Card Connector 27 NGFF Key E Connector 28 NGFF Key M Connector 29 NGFF Key B Connector 30 Block Diagram 31 Chapter 3 System Setup Removing the Chassis Cover 32 Installing a CPU 34 Installing a SO DIMM DIMM2 37 Installing a SO DIMM DIMM1 38 Installing a HDD 39 Installing a M 2 Storage Module 41 M key 2280 41 Installing a M 2 WiFi Module 43 E key 2230 43 Assembling The Top Cover To The Chass...

Page 4: ...NEXCOM International Co Ltd All other product names mentioned herein are registered trademarks of their respective owners Regulatory Compliance Statements This section provides the FCC compliance statement for Class B devices and describes how to keep the system CE compliant Declaration of Conformity FCC This equipment has been tested and verified to comply with the limits for a Class B digital de...

Page 5: ...nd Polybrominated diphenyl Ethers PBDE 0 1 or 1 000ppm In order to meet the RoHS compliant directives NEXCOM has established an engineering and manufacturing task force to implement the introduction of green products The task force will ensure that we follow the standard NEXCOM development procedure and that all the new RoHS components and new manufacturing processes maintain the highest industry ...

Page 6: ...onsible for the safe packaging of defective products making sure it is durable enough to be resistant against further damage and deterioration during transportation In case of damages occurred during transportation the repair is treated as Out of Warranty Any products returned by NEXCOM to other locations besides the customers site will bear an extra charge and will be billed to the customer Repai...

Page 7: ...and power supply are inconsistent with these instructions or the instructions for accessory modules contact the supplier to find out how you can ensure that your computer meets safety and regulatory requirements Cautions Electrostatic discharge ESD can damage system components Do the described procedures only at an ESD workstation If no such station is available you can provide some ESD protection...

Page 8: ...the following precautions Read all instructions carefully Do not place the unit on an unstable surface cart or stand Follow all warnings and cautions in this manual When replacing parts ensure that your service technician uses parts specified by the manufacturer Avoid using the system near water in direct sunlight or near a heating device The load of the system unit does not solely rely for suppor...

Page 9: ... to avoid damage by transient overvoltage 12 Never pour any liquid into an opening This may cause fire or electrical shock 13 This equipment is not suitable for use in locations where children are likely to be present 14 Never open the equipment For safety reasons the equipment should be opened only by qualified service personnel 15 If one of the following situations arises get the equipment check...

Page 10: ...rsion application software etc A complete description of the problem The exact wordings of the error messages Warning 1 Handling the unit carry the unit with both hands and handle it with care 2 Maintenance to keep the unit clean use only approved cleaning products or clean with a dry cloth 3 CompactFlash Turn off the unit s power before inserting or removing a CompactFlash storage card Convention...

Page 11: ...el 886 2 8226 7786 Fax 886 2 8226 7926 Email sales nexcobot com www nexcobot com GreenBase Technology Corp 13F No 922 Chung Cheng Rd Zhonghe District New Taipei City 23586 Taiwan R O C Tel 886 2 8226 7786 Fax 886 2 8226 7900 Email sales nexcom com tw www nexcom com tw EMBUX Technology Co Ltd 13F No 916 Chung Cheng Rd Zhonghe District New Taipei City 23586 Taiwan R O C Tel 886 2 8226 7786 Fax 886 2...

Page 12: ...501 Building 1 Haichuang Building No 7 Qingyi Road Guicheng Street Nanhai District Foshan City Guangdong Province 528314 China Tel 86 757 8625 7118 Email sales nexcobot com www nexcobot com cn Beijing NexGemo Technology Co Ltd 5F Gemotech Building No 1 Development Rd Changping International Information Industry Base Changping District Beijing 102206 China Tel 86 10 8190 9328 Fax 86 10 8190 9456 Em...

Page 13: ... 0mm K 4 2W mk PK404 for M 2 1 4 5060200579X00 Thermal Pad E LIN 50x25x2mm K 4 2 W mk PK404 9448 for M 2 1 5 5060200307X00 Thermal Pad For NDiS B426 Heat Sink E LIN 60x20x1mm S3S form memory 1 6 5040420101X00 NDiS B535 HDD Bracket VER A JAN YU 8x10 4x95mm SPCC NI 2 7 50311F0326X00 Flat Head Screw Long Fei F3x5 Nylok Ni Heat Treatment for HDD Bracket 4 8 5040430540X00 Wall Mount Bracket for NDiS B5...

Page 14: ...Reserved xiv NDiS B560 User Manual Preface Ordering Information The following information below provides ordering information for NDiS B560 NDiS B560 P N 10W00B56000X0 9th and 8th generation Intel Core processor up to 35W fanless system Intel Q370 chipset ...

Page 15: ...gn Support a wide temperature range of 20 to 60 C Overview Powered by the 9th and 8th generation Intel Core processor series and Intel 300 Series chipset integrated graphics controller the NDiS B560 fanless embedded player can handle powerful multimedia content In addition the NDiS B560 can be operated in an extended operating temperature range between 20 to 60 C with three 4K2K independent displa...

Page 16: ...d All Rights Reserved 2 NDiS B560 User Manual Chapter 1 Product Introduction Physical Features Front Panel Rear Panel 12V DC in HDMI1 HDMI3 HDMI2 Power Button USB 3 0 LAN LAN COM1 Power LED COM4 HDD LED Reset Mic In Line out USB 3 0 COM3 COM2 ...

Page 17: ...ockets supports DDR4 2666MHz non ECC un buffered memory up to 32GB single socket max 16GB I O Interface Front 1x Power status LED 1x HDD status LED 1x Power button with LED 1x Reset switch 2x USB 3 0 4x DB9 for COM1 COM4 COM1 RS232 422 485 COM2 4 RS232 2 x Antenna hole I O Interface Rear 12V DC in 3x HDMI 2 0 4x USB3 0 2x RJ45 with LED for 10 100 1000Mbs Ethernet 1x Mic in 1x Line out 2x Antenna h...

Page 18: ...ter 1 Product Introduction Power Supply 1x External 96W AC DC power adapter Input 100 240VAC Output DC 12VDC Environment Operating temperature 20 C to 60 C Storage temperature 20 C to 80 C Humidity 10 to 90 non condensing Certification CE approval FCC Class A Operating System Windows 10 Linux ...

Page 19: ...Copyright 2021 NEXCOM International Co Ltd All Rights Reserved 5 NDiS B560 User Manual Chapter 1 Product Introduction Mechanical Dimensions 192 00 238 00 67 30 ...

Page 20: ...urself before touching any internal components by touching a metal object Static electricity can damage many of the electronic components Humid environments tend to have less static electricity than dry environments A grounding strap is warranted whenever danger of static electricity exists Precautions Computer components and electronic circuit boards can be damaged by discharges of static electri...

Page 21: ... 2 1 14 13 10 64 17 32 33 36 25 24 13 12 1 1 1 1 2 1 1 3 1 2 74 259 260 1 2 145 143 146 144 1 4 4 C1 C2 A1 4 5 9 6 1 5 9 6 1 1 1 5 5 1 6 9 5 1 10 1 1 P15 P1 S7 S1 2 9 10 6 9 9 18 14 5 4 A2 75 3 4 6 1 6 48 37 48 16 1 49 9 2 1 12 11 14 13 10 9 2 1 12 11 1 5 4 9 18 14 1 5 4 9 18 1 9 36 25 24 13 12 75 74 1 2 1 48 37 36 25 24 13 1 3 5 7 9 11 13 15 17 19 21 23 23 25 27 29 31 33 35 37 39 2 4 6 8 10 12 14...

Page 22: ...td All Rights Reserved 8 NDiS B560 User Manual Chapter 2 Jumpers and Connectors Bottom View SIM1 DIMM1 M2B U75 1 1 10 50 30 40 49 75 74 97 158 146 144 R394 C369 C411 C456 143 145 259 260 2 1 1 35 33 64 65 96 5 C608 C621 M2B_42 M2B_52 M2B SIM1 ...

Page 23: ...e jumpers ensure that the jumper caps are placed on the correct pins When the jumper cap is placed on both pins the jumper is short If you remove the jumper cap or place the jumper cap on just one pin the jumper is open Refer to the illustrations below for examples of what the 2 pin and 3 pin jumpers look like when they are short on and open off Two Pin Jumpers Open Left and Short Right Three Pin ...

Page 24: ...lection Connector type 1x3 3 pin header Connector location CLRCMOS Pin Definition 1 NC 2 S_RTCRST 3 DND CLRCMOS 1 2 On Normal 2 3 On Clear CMOS 1 2 On default 1 3 AT ATX Mode Selection Connector type 1x3 3 pin header 2 54mm pitch Connector location ATATX Pin Definition 1 ATX_AT 2 S_PWRBTN 3 PBT_SW ATATX AT ATX Mode 1 2 On AT Mode 2 3 On ATX Mode 2 3 On default 1 3 ...

Page 25: ...t Panel Power LED Definition ON Blue OFF Red Power HDD LED Connector Connector location LED4 Pin Definition Pin Definition A1 POWER_LED C1 LED_PWRN A2 HD_LED C2 HD_LEDN A1 A2 C1 C2 LEDs LED Definition HDD Red Power Green HDD Power Pin Definition Pin Definition 1 GND 2 H_PWRBTN _M 3 H_PWRBTN _M 4 GND A1 PWRLED_N C1 PWRLED_P MH1 HM2 2 3 4 1 Power Button Connector location SW2 ...

Page 26: ...n Pin Definition 1 COM2DCDL 2 COM2RXD 3 COM2TXD 4 COM2DTRL 5 GND 6 COM2DSRL 7 COM2RTSL 8 COM2CTSL 9 COM2RIL MH1 Front_GND MH2 Front_GND RS232 Pin Definition Pin Definition 1 COM1DCDL 2 COM1RXD 3 COM1TXD 4 COM1DTRL 5 GND 6 COM1DSRL 7 COM1RTSL 8 COM1CTSL 9 COM1RIL MH1 Front_GND MH2 Front_GND RS422 1 COM1DCDL 2 COM1RXD 3 COM1TXD 4 COM1DTRL MH1 FRONT_GND MH2 FRONT_GND RS485 1 COM1DCDL 2 COM1RXD MH1 FR...

Page 27: ...3 1 5 6 9 Pin Definition Pin Definition 1 COM3DCDL 2 COM3RXD 3 COM3TXD 4 COM3DTRL 5 GND 6 COM3DSRL 7 COM3RTSL 8 COM3CTSL 9 RI_VCC12_VCC5 MH1 Front_GND MH2 Front_GND COM 4 Port Connector location COM4 1 5 6 9 Pin Definition Pin Definition 1 COM4DCDL 2 COM4RXD 3 COM4TXD 4 COM4DTRL 5 GND 6 COM4DSRL 7 COM4RTSL 8 COM4CTSL 9 COM4RIL MH1 Front_GND MH2 Front_GND ...

Page 28: ...inition Pin Definition 1 5VUSB1 2 USB2N_5 3 USB2P_5 4 GND 5 S_USB31_RXN5 6 S_USB31_RXP5 7 GND 8 USB31_TXN5 9 USB31_TXP5 10 5VUSB1 11 USB2N_6 12 USB2P_6 13 GND 14 S_USB31_RXN6 15 S_USB31_RXP6 16 GND 17 USB31_TXN6 18 USB31_TXP6 MH1 FRONT_GND MH2 FRONT_GND MH3 FRONT_GND MH4 FRONT_GND 9 1 5 4 10 13 18 14 Reset Connector Connector type 1x2 2 pin header 3 85mm pitch Connector location SW1 Pin Definition...

Page 29: ...10 5VUSB4 11 USB2N_4 12 USB2P_4 13 GND 14 S_USB31_RXN4 15 S_USB31_RXP4 16 GND 17 USB31_TXN4 18 USB31_TXP4 MH1 REAR_GND MH2 REAR_GND MH3 REAR_GND MH4 REAR_GND 9 1 5 4 10 13 18 14 USB3 1 Ports Connector type Dual USB 3 1 ports Connector location USB3 Pin Definition Pin Definition 1 5VUSB3 2 USB2N_1 3 USB2P_1 4 GND 5 S_USB31_RXN1 6 S_USB31_RXP1 7 GND 8 USB31_TXN1 9 USB31_TXP1 10 5VUSB3 11 USB2N_2 12 ...

Page 30: ...R_H_GND MH3 REAR_H_GND MH4 REAR_GND 5 1 2 3 4 HDMI1 Connector Connector type HDMI port Connector location HDMI1 1 2 18 19 Pin Definition Pin Definition 1 HDMI1_TX2_P_CN 2 GND 3 HDMI1_TX2_N_CN 4 HDMI1_TX1_P_CN 5 GND 6 HDMI1_TX1_N_CN 7 HDMI1_TX0_P_CN 8 GND 9 HDMI1_TX0_N_CN 10 HDMI1_CLK_P_CN 11 GND 12 HDMI1_CLK_N_CN 13 HDMI1_CEC 14 NC 15 HDMI1_SCL 16 HDMI1_SDA 17 GND 18 HDMI1_PWR_C 19 HDMI1_HPD_C MH1...

Page 31: ...12 HDMI2_CLK_N_CN 13 HDMI2_CEC 14 NC 15 HDMI2_SCL 16 HDMI2_SDA 17 GND 18 HDMI2_PWR_C 19 HDMI2_HPD_C MH1 REAR_GND MH2 REAR_GND MH3 REAR_GND MH4 REAR_GND HDMI3 Connector Connector type HDMI port NDiS B560 Q370 Only Connector location HDMI3 1 2 18 19 Pin Definition Pin Definition 1 HDMI3_TX2_P_CN 2 GND 3 HDMI3_TX2_N_CN 4 HDMI3_TX1_P_CN 5 GND 6 HDMI3_TX1_N_CN 7 HDMI3_TX0_P_CN 8 GND 9 HDMI3_TX0_N_CN 10...

Page 32: ...pe HDMI port Connector location LAN2 Pin Definition Pin Definition 1 LAN2TCT 2 LAN2MDI3N 3 LAN2MDI3P 4 LAN2MDI2N 5 LAN2MDI2P 6 LAN2MDI1N 7 LAN2MDI1P 8 LAN2MDI0N 9 LAN2MDI0P 10 GND 11 LAN2ACTCON 12 LAN2LEDACTN 13 LAN2100CON 14 LAN2LINK1GN NH1 NC NH2 NC MH1 REAR_GND MH2 REAR_GND Act Status Flashing Yellow Connected Flashing Yellow Data activity Off No activity Link Status Steady Green 1G network lin...

Page 33: ...apter 2 Jumpers and Connectors Mic In Pink Connector Connector location CN1 Pin Definition Pin Definition 1 AGND 2 MIC_OUT L 3 AGND 4 MIC_JD 5 MIC_OUT R Audio Connector Connector location CN2 Pin Definition Pin Definition 1 LINE_OUT_RC 2 LINEOUT_JD 3 AGND 4 LINE_OUT_LC 5 AGND Mic In Line Out ...

Page 34: ...onnector type 1x10 10 pin header Connector location J2 Pin Definition Pin Definition 1 GND 2 SIO_PLTRSTN 3 CLKOUT_LPCI 4 ESPI_CS0 5 ESPI_IO3 6 ESPI_IO2 7 ESPI_IO1 8 ESPI_IO0 9 SERIRQ 10 VCC3 MH1 GND MH2 GND 10 1 Fan1 Connector Connector type 1x4 4 pin Wafer 2 54mm pitch Connector location FAN1 Pin Definition Pin Definition 1 GND 2 VCC12 3 FANIN1 4 FANOUT1 1 4 ...

Page 35: ...type 1x4 4 pin Wafer 2 54mm pitch Connector location FAN2 Pin Definition Pin Definition 1 GND 2 VCC12 3 FANIN2 4 FANOUT2 1 4 GPIO Connector Connector type 2x5 10 pin header 2 0mm pitch Connector location GPIO Pin Definition Pin Definition 1 GPIO_PWR 2 GND 3 GPO0_OUT 4 GPI0_IN 5 GPO1_OUT 6 GP1_IN 7 GPO2_OUT 8 GPI2_IN 9 GPO3_OUT 10 GPI3_IN 2 1 10 9 ...

Page 36: ...1 Pin Definition Pin Definition S1 GND S2 SATA_TXP2 S3 SATA_TXN2 S4 GND S5 SATA_RXN2 S6 SATA_RXP2 S7 GND P1 NC P2 NC P3 NC P4 GND P5 GND P6 GND P7 SATA_5V P8 SATA_5V P9 SATA_5V P10 GND P11 NC P12 GND P13 NC P14 NC P15 NC S1 P15 SPEK Pin Header Connector Connector type 1x5 5 pin header 2 0mm pitch Connector location SPEK Pin Definition Pin Definition 1 OUT LR _C 2 OUT LR _C 3 GND 4 OUT RR _C 5 OUT ...

Page 37: ...e 1x4 4 pin header 2 54mm pitch Connector location JP2 Pin Definition Pin Definition 1 H_PWRBTN _M 2 GND 3 GND 4 PM_RESET _J 1 4 DC In for NTK B560 PW Connector Connector type 2x6 12 pin header 2 0mm pitch Connector location PW1 Pin Definition Pin Definition 1 12VSB 2 GND 3 12VSB 4 GND 5 12VSB 6 GND 7 12VSB 8 GND 9 12VSB 10 GND 11 12VSB 12 GND 1 2 11 12 ...

Page 38: ...header 2 0mm pitch NDiS B560 Q370 Only Connector location USB4 Pin Definition Pin Definition 1 P5V_USB_P10 2 USB2N_10 3 USB2P_10 4 USB2N_11 5 USB2P_11 6 GND 6 1 USB2 0 Pin Header Connector Connector type 1x6 6 pin header 2 0mm pitch NDiS B560 Q370 Only Connector location USB5 Pin Definition Pin Definition 1 P5V_USB_P1213 2 USB2N_12 3 USB2P_12 4 USB2N_13 5 USB2P_13 6 GND 1 6 ...

Page 39: ...tors SMABUS Pin Header Connector type 1x4 4 pin header 2 0mm pitch Connector location SMBUS Pin Definition Pin Definition 1 VCC3 2 SMB_CLK 3 SMB_DATA 4 GND 1 4 RI Connector Connector type 1x5 5 pin header Connector location RI Pin Definition Pin Definition 1 VCC5 2 RI_VCC12_VCC5 3 VCC12 4 RI_VCC12_VCC5 5 COM3RIL 1 5 ...

Page 40: ...anual Chapter 2 Jumpers and Connectors Battery Connector Connector type 1x2 2 pin header Connector location BAT 1 2 Pin Definition 1 3V_BAT1 2 GND CON1 Connector Connector type 2x2 4 pin header Connector location CON1 1 2 3 4 Pin Definition Pin Definition 1 GND 2 GND 3 12VSB 4 12VSB ...

Page 41: ... Reserved 27 NDiS B560 User Manual Chapter 2 Jumpers and Connectors SIM Card Connector Connector location SIM1 Pin Definition Pin Definition C1 UIM_PWR C2 UIM_RESET C3 UIM_CLK C5 GND C6 UIM_VPP C7 UIM_DATA MH1 GND MH2 GND CD GND COM GND C1 C2 C3 C5 C6 C7 ...

Page 42: ...C 28 NC 29 NC 30 NC 31 NC 32 NC Pin Definition Pin Definition 33 GND 34 NC 35 M2E_PCIE_TXP0 36 NC 37 M2E_PCIE_TXN0 38 M 2_CLINK_RST_ WLAN_N 39 GND 40 M 2_CLINK_DATA_WLAN 41 H_PCIERXP8 42 M 2_CLINK_CLK_WLAN 43 H_PCIERXN8 44 NC 45 GND 46 NC 47 I_CLKOUTPCIEP7 48 NC 49 I_CLKOUTPCIEN7 50 PCIEREQ _NGFF_R 51 GND 52 CONFIG_0 53 SRCCLKREQ7N 54 CONFIG_1 55 I_WAKEN 56 CONFIG_2 57 GND 58 NC 59 M2E_PCIE_TXP1 6...

Page 43: ...VSB 19 H_PCIERXP19 20 NC 21 GND 22 NC 23 PCIETXN19 24 NC 25 PCIETXP19 26 NC 27 GND 28 NC 29 H_PCIERXN18 30 NC 31 H_PCIERXP18 32 NC Pin Definition Pin Definition 33 GND 34 NC 35 PCIETXN18 36 NC 37 PCIETXP18 38 DEVSLP_0 39 GND 40 NC 41 PCIERXP17 42 NC 43 PCIERXN17 44 NC 45 GND 46 NC 47 PCIETXN17 48 NC 49 PCIETXP17 50 M2_PLTRSTN1 51 GND 52 SRCCLKREQ3N 53 I_CLKOUTPCIEN3 54 I_WAKEN 55 I_CLKOUTPCIEP3 56...

Page 44: ...8 19 20 NC 21 CONFIG_0 22 NC 23 I_WAKEN 24 NC 25 NC 26 NC 27 GND 28 NC 29 H_USB31_RXN7 30 UIM_RESET 31 H_USB31_RXP7 32 UIM_CLK Pin Definition Pin Definition 33 GND 34 UIM_DATA 35 H_USB31_TXN7 36 UIM_PWR 37 H_USB31_TXP7 38 NC 39 GND 40 NC 41 NC 42 NC 43 NC 44 NC 45 GND 46 NC 47 NC 48 NC 49 NC 50 M2_B_PERST 51 GND 52 NC 53 NC 54 M2_B_PEWAKE 55 NC 56 NC 57 GND 58 NC 59 NC 60 NC 61 NC 62 NC 63 NC 64 N...

Page 45: ...I HDA SPI DMI X4 DMI HSIO Lane 0 29 DDR4 Channel A DDR4 Channel B DDR4 NON ECC SO DIMM MAX 2666 MT S AUDIO ALC886 DDI1 USB2 x2 SATA 22P SATA3 0 PORT2 PCH H Q370 LPC eSPI BUS USB2 0 RJ45 USB3 1 USB31 1 2 PORT USB3 x2 Front USB31 7PORT PCIE17 20 SATA3 0 PORT3 PCIE7 PCIE8 USB2 PORT7 USB2 PORT9 only support 35W GPIO 4 in 4 out USB31 3 6 PORT 4 Ohm 2 1W Mic in Line out FAN RJ45 USB2 x2 USB3 x2 Rear USB...

Page 46: ... the Chassis Cover Prior to removing the chassis cover make sure the unit s power is off and disconnected from the power sources to prevent electric shock or system damage CAUTION CAUTION CAUTION 1 The screws on the front rear and bottom are used to secure the cover to the chassis Remove these screws and put them in a safe place for later use ...

Page 47: ...Copyright 2021 NEXCOM International Co Ltd All Rights Reserved 33 NDiS B560 User Manual Chapter 3 System Setup 2 Remove the top cover ...

Page 48: ...etup Installing a CPU 1 Remove the four screws and CPU heatsink 2 Locate the CPU socket on the board Unlock the socket by pushing the load lever down moving it sideways until it is released from the retantion tab 3 Lift the load lever up to open the CPU retention bracket CPU Socket Retention Tab Load Lever ...

Page 49: ...N CAUTION CAUTION CAUTION Handle the CPU by its edges and avoid touching the pins The CPU will fit only in one orientation and can easily be inserted without exerting any force 5 With the CPU installed close the retention bracket and then hook the load lever under the retention tab Ensure that the notch on the retention bracket is slid under the screw before lowering the load lever as shown below ...

Page 50: ...Copyright 2021 NEXCOM International Co Ltd All Rights Reserved 36 NDiS B560 User Manual Chapter 3 System Setup 6 Align the CPU heatsink 7 Secure the CPU heatsink with the four screws ...

Page 51: ...stem Setup Installing a SO DIMM DIMM2 2 Insert the module into the socket the an approximately 30 degrees angle The ejector tabs at the ends of the socket will automatically snap into the locked position to hold the module in place 1 Locate the SO DIMM socket on the board SO DIMM socket Memory module ...

Page 52: ...lling a SO DIMM DIMM1 1 Remove the screw from the SO DIMM cover at the bottom side 2 Insert the module into the socket at an approximately 30 degrees angle The ejector tabs at the ends of the socket will automatically snap into the locked position holding the module in place 3 Secure the SO DIMM cover with the screw ...

Page 53: ... Reserved 39 NDiS B560 User Manual Chapter 3 System Setup CAUTION CAUTION CAUTION Please correctly follow the below instructions and noted items to avoid making unnecessary damages Installing a HDD 1 Secure the HDD bracket to the HDD with the four screws ...

Page 54: ... All Rights Reserved 40 NDiS B560 User Manual Chapter 3 System Setup 2 Locate the SATA connector on the board 3 Insert the HDD and the SATA connector and then secure the HDD with the HDD bracket to the board with the four screws SATA connector ...

Page 55: ...Installing a M 2 Storage Module M key 2280 1 Locate the M 2 M key slot on the board M 2 M key slot 2 Remove the screws and keep it for later use For step 4 3 Insert the M 2 module into the M 2 slot at a 45 degree angle until the gold plated connector on the edge of the module completely dissapears into the slot ...

Page 56: ...0 User Manual Chapter 3 System Setup 4 Push the module down and secure it with the mouting screw From step 2 5 When purchasing a M 2 storage it is recommended to use a complementary dedicated thermal pad Stick it to the original set of M 2 module for a better heat dissipation ...

Page 57: ...onal Co Ltd All Rights Reserved 43 NDiS B560 User Manual Chapter 3 System Setup Installing a M 2 WiFi Module E key 2230 1 Locate the M 2 M key slot on the board M 2 E key slot 2 Remove the screws and keep it for later use For step 4 ...

Page 58: ...B560 User Manual Chapter 3 System Setup 3 Insert the WiFi module into the M 2 E key slot at a 45 degree angle until the gold plated connector on the edge of the module completely dissapears into the slot 4 Push the WiFi module down and secure it with the screw From step 2 ...

Page 59: ...2021 NEXCOM International Co Ltd All Rights Reserved 45 NDiS B560 User Manual Chapter 3 System Setup Assembling The Top Cover To The Chassis 1 Align the top cover and PCB Heatsink for memory module Memory module ...

Page 60: ...Copyright 2021 NEXCOM International Co Ltd All Rights Reserved 46 NDiS B560 User Manual Chapter 3 System Setup 2 Slide the top cover to the chassis and secure it with the 10 screws ...

Page 61: ...d All Rights Reserved 47 NDiS B560 User Manual Chapter 3 System Setup Installing a M 2 LTE 5G module B key 3042 3052 and SIM card 1 Remove the screw from the LTE cover at the bottom side 2 Remove the screws and keep it for later use For Step 4 ...

Page 62: ...p 4 Push the LTE 5G module down then secure it with the screw From step 2 3 Insert the LTE 5G module into the M 2 B key slot at an approximately 30 degrees angle The ejector tabs at the ends of the socket will automatically snap into the locked position holding the module in place LTE 5G module M 2 B key slot ...

Page 63: ...ights Reserved 49 NDiS B560 User Manual Chapter 3 System Setup 5 Open the SIM card holder and place the SIM card onto the holder SIM card holder SIM card 6 Close the holder and secure it to the original position 7 Secure the LTE cover with the screw ...

Page 64: ...m is configured with the values found in CMOS With easy to use pull down menus you can configure such items as Hard drives diskette drives and peripherals Video display type and display options Password protection from unauthorized use Power management features The settings made in the setup program affect how the computer performs It is important therefore first to try to understand all the setup...

Page 65: ...l be reported in one of two different ways If the error occurs before the display device is initialized a series of beeps will be transmitted If the error occurs after the display device is initialized the screen will display the error message Powering on the computer and immediately pressing Del allows you to enter Setup Press the key to enter Setup Legends Key Function Moves the highlight left o...

Page 66: ...tup screen it indicates that there are more available fields not shown on the screen Use the up and down arrow keys to scroll through all the available fields Submenu When appears on the left of a particular field it indicates that a submenu which contains additional options are available for that field To display the submenu move the highlight to that field and press ...

Page 67: ...i9 9900T CPU 2 10GHz 2100 MHz 0x906ED R0 8Core s 16 Thread s D2 32768 MB 2667 MHz Q370 B0 System Date The date format is day month date year Day displays a day from Monday to Sunday Month displays the month from January to December Date displays the date from 1 to 31 Year displays the year from 1999 to 2099 System Time The time format is hour minute second The time is based on the 24 hour military...

Page 68: ...e Setting incorrect field values may cause the system to malfunction CPU Configuration This section is used to configure the CPU Exit Advanced Chipset PCIPnP Security Main Version 2 20 1275 Copyright C 2021 American Megatrends Inc Aptio Setup Utility Copyright C 2021 American Megatrends Inc Select Screen Select Item Enter Select Change Opt F1 General Help F2 Previous Values F3 Optimized Defaults F...

Page 69: ...2 20 1275 Copyright C 2021 American Megatrends Inc Aptio Setup Utility Copyright C 2021 American Megatrends Inc Select Screen Select Item Enter Select Change Opt F1 General Help F2 Previous Values F3 Optimized Defaults F4 Save Exit ESC Exit Allows more than two frequency ranges to be supported CPU Power Management Control Intel R SpeedStep tm Enabled Turbo Mode Enabled C states Disabled Intel Spee...

Page 70: ...ion 12 0 64 1551 ME Firmware Mode Normal Mode ME Firmware SKU Corporate SKU ME Firmware Status 1 0x90000255 ME Firmware Status 2 0x8910810E ME State Enabled Manageability Features State Enabled AMT BIOS Features Enabled ME Unconfig on RTC Clear Enabled ME State Enable or disables ME state When disabled ME will be placed into ME Temporarily Disabled Mode Manageability Features State Enable or disab...

Page 71: ...Configuration ASF Configuration Secure Erase Configuration OEM Flags Settings MEBx Resolution Settings ASF support Enables or disables Alert Standard Format support USB Provisioning of AMT Enables or disables USB Provisioning of AMT CIRA Configuration Exit Advanced Chipset PCIPnP Security Main Version 2 20 1275 Copyright C 2021 American Megatrends Inc Aptio Setup Utility Copyright C 2021 American ...

Page 72: ... PET Events WatchDog Enables or disables watchdog timer ASF Sensors Table Enables or disables the option to add ASF Sensor Table into ASF ACPI Table Secure Erase Configuration Exit Advanced Chipset PCIPnP Security Main Version 2 20 1275 Copyright C 2021 American Megatrends Inc Aptio Setup Utility Copyright C 2021 American Megatrends Inc Select Screen Select Item Enter Select Change Opt F1 General ...

Page 73: ...essed Disabled MEBx Selection Screen Disabled Hide Unconfigure ME Confirmation Disabled Prompt MEBx OEM Debug Menu Enable Disabled Unconfigure ME Disabled MEBx hotkey Pressed Enables or disables automatic MEBx hotkey press MEBx Selection Screen Enables or disables MEBx selection screen with 2 options Press 1 to enter ME configuration screens Press 2 to initiate a remote connection Hide Unconfigure...

Page 74: ...275 Copyright C 2021 American Megatrends Inc Aptio Setup Utility Copyright C 2021 American Megatrends Inc Select Screen Select Item Enter Select Change Opt F1 General Help F2 Previous Values F3 Optimized Defaults F4 Save Exit ESC Exit Enables or Disables BIOS support for security device O S will not show Security Device TCG EFI protocol and INT1A interface will not be available TPM20 Device Found ...

Page 75: ...to TPM 1 2 devices TPM 2 0 will restrict support to TPM 2 0 devices Auto will support both TPM 1 2 and 2 0 devices with the default set to TPM 2 0 devices if not found and TPM 1 2 devices will be enumerated Disable Block Sid Enables or disables the option to allow SID authentication in TCG storage device IT8786 Super IO Configuration This section is used to configure the serial ports Exit Advanced...

Page 76: ...ice Settings IO 3F8h IRQ 4 Onboard Serial Port 1 Mode RS232 Serial Port Enables or disables the serial port Onboard Serial Port Mode Select this to change the serial port mode to RS232 RS422 RS485 No Terminator or RS485 With Terminator Serial Port 2 Configuration This section is used to configure serial port 2 Exit Advanced Chipset PCIPnP Security Main Version 2 20 1275 Copyright C 2021 American M...

Page 77: ...ort COM Serial Port 3 Configuration Serial Port Enabled Device Settings IO 3E8h IRQ 11 Change Settings Auto Serial Port Enables or disables the serial port Serial Port 4 Configuration This section is used to configure serial port 4 Exit Advanced Chipset PCIPnP Security Main Version 2 20 1275 Copyright C 2021 American Megatrends Inc Aptio Setup Utility Copyright C 2021 American Megatrends Inc Selec...

Page 78: ...s USB Configuration This section is used to configure the USB Exit Advanced Chipset PCIPnP Security Main Version 2 20 1275 Copyright C 2021 American Megatrends Inc Aptio Setup Utility Copyright C 2021 American Megatrends Inc Select Screen Select Item Enter Select Change Opt F1 General Help F2 Previous Values F3 Optimized Defaults F4 Save Exit ESC Exit Enables Legacy USB support AUTO option disable...

Page 79: ...ult value for a Root port it is 100 ms for a Hub port the delay is taken from Hub descriptor NVMe Configuration This section is used to display information on the NVMe devices installed Exit Advanced Chipset PCIPnP Security Main Version 2 20 1275 Copyright C 2021 American Megatrends Inc Aptio Setup Utility Copyright C 2021 American Megatrends Inc Select Screen Select Item Enter Select Change Opt F...

Page 80: ...SAMSUNG M2VLW128HEGR 00000 Total Size 128 0 GB Vendor ID 144D Device ID A804 Namespace 1 Size 128 0 GB Device Self Test Self Test Option Short Self Test Action Controller Only Test Run Device Self Test Short Device Selftest Result Not Available Extended Device Selftest Result Not Available Run Device Self Test Run the device self test according to the self test option and action selected Pressing ...

Page 81: ...ck Network Stack Enabled Ipv4 PXE Support Disabled Ipv4 HTTP Support Disabled Ipv6 PXE Support Disabled Ipv6 HTTP Support Disabled PXE boot wait time 0 Media detect count 1 Network Stack Enables or disables UEFI network stack Ipv4 PXE Support Enables or disables IPv4 PXE support If disabled the IPv4 boot option will not be created Ipv4 HTTP Support Enables or disables IPv4 HTTP support Ipv6 PXE Su...

Page 82: ...Megatrends Inc Select Screen Select Item Enter Select Change Opt F1 General Help F2 Previous Values F3 Optimized Defaults F4 Save Exit ESC Exit Click to configure the network device port NIC Configuration Blink LEDs 0 UEFI Driver Intel R PRO 1000 8 7 08 PCI E Adapter PBA 0003000 000 Device Name Intel R I210 Gigabit Network Connection Chip Type Intel i210 PCI Device ID 1533 PCI Address 03 00 00 Lin...

Page 83: ...t ESC Exit System Agent SA Parameters System Agent SA Configuration PCH IO Configuration EDID Mode Control Setting incorrect field values may cause the system to malfunction System Agent SA Configuration Save Exit Advanced Chipset Security Boot Main Version 2 20 1275 Copyright C 2021 American Megatrends Inc Aptio Setup Utility Copyright C 2021 American Megatrends Inc Select Screen Select Item Ente...

Page 84: ...tion Primary Display Internal Graphics IGFX Auto Primary Display Select which IGFX PEG PCI graphics device should be the primary display Internal Graphics Keep IGD enabled based on the setup options PEG Port Configuration Save Exit Advanced Chipset Security Boot Main Version 2 20 1275 Copyright C 2021 American Megatrends Inc Aptio Setup Utility Copyright C 2021 American Megatrends Inc Select Scree...

Page 85: ...nabled S0 State PCH LAN Controller Enables or disables onboard NIC Wake on LAN Enables or disables integrated LAN to wake the system State After G3 Configures the power state when power is re applied after a power failure G3 state SATA And RST Configuration Save Exit Advanced Chipset Security Boot Main Version 2 20 1275 Copyright C 2021 American Megatrends Inc Aptio Setup Utility Copyright C 2021 ...

Page 86: ...ration Save Exit Advanced Chipset Security Boot Main Version 2 20 1275 Copyright C 2021 American Megatrends Inc Aptio Setup Utility Copyright C 2021 American Megatrends Inc Select Screen Select Item Enter Select Change Opt F1 General Help F2 Previous Values F3 Optimized Defaults F4 Save Exit ESC Exit Control Detection of the HD Audio device Disabled HDA will be unconditionally disabled Enabled HDA...

Page 87: ...n Version 2 20 1275 Copyright C 2021 American Megatrends Inc Aptio Setup Utility Copyright C 2021 American Megatrends Inc Select Screen Select Item Enter Select Change Opt F1 General Help F2 Previous Values F3 Optimized Defaults F4 Save Exit ESC Exit Set Administrator Password Password Description If ONLY the Administrator s password is set then this only limits access to Setup and is only asked f...

Page 88: ...American Megatrends Inc Aptio Setup Utility Copyright C 2021 American Megatrends Inc Select Screen Select Item Enter Select Change Opt F1 General Help F2 Previous Values F3 Optimized Defaults F4 Save Exit ESC Exit Number of seconds to wait for setup activation key 65535 0xFFFF means indefinite waiting Boot Configuration Setup Prompt Timeout Bootup NumLock State Quiet Boot Boot Option Priorities Bo...

Page 89: ... To save the changes and exit the Setup utility select this field then press Enter A dialog box will appear Confirm by selecting Yes You can also press F4 to save and exit Setup Discard Changes and Reset To exit the Setup utility without saving the changes select this field then press Enter You may be prompted to confirm again before exiting You can also press ESC to exit without saving the change...

Reviews: