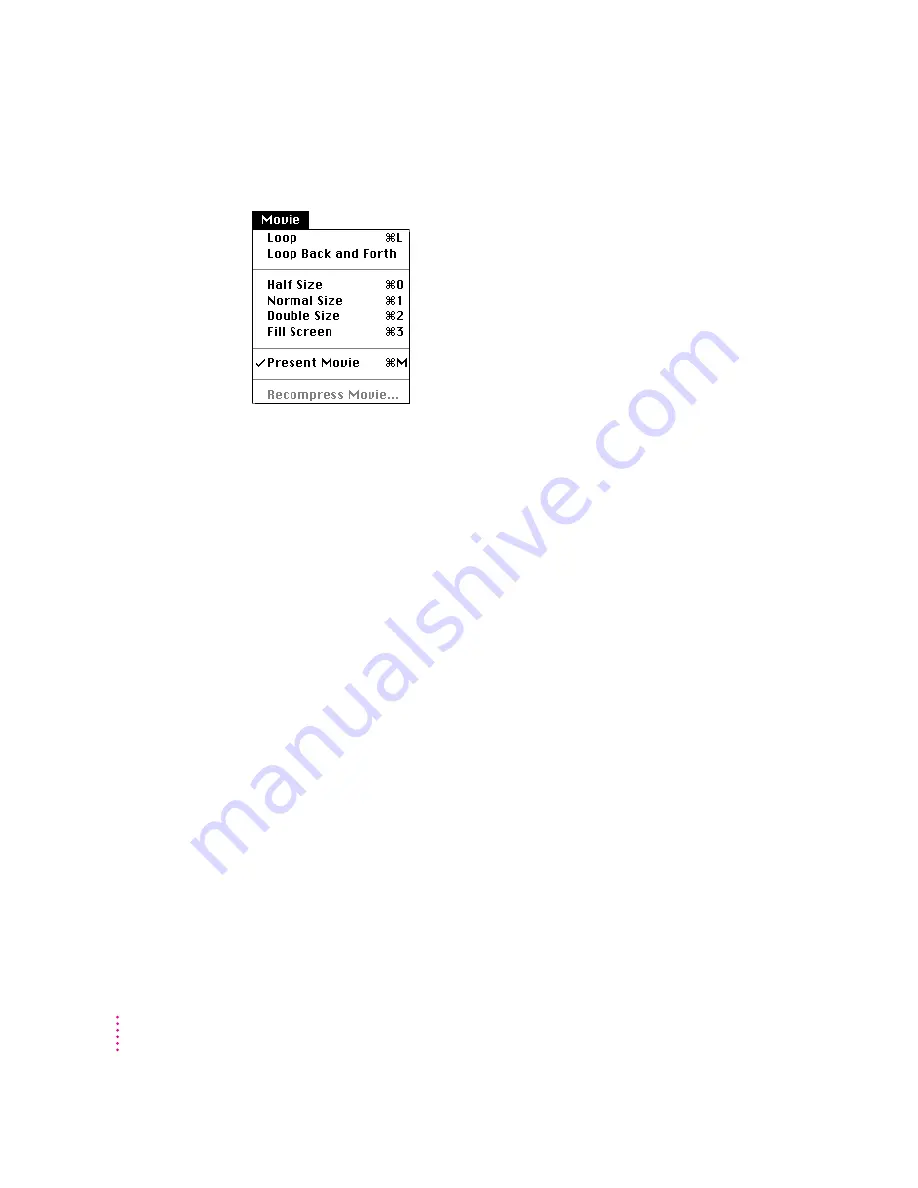
Newton QuickTake 200 Camera Getting Started Download Page 52

The Movie Menu

m

Loop

Choose Loop to continuously run your movie from beginning to end.

m

Loop Back and Forth

Choose “Loop Back and Forth” to run your movie

continuously starting with the first image to the last and then going
backwards by running the movie from the last image to the first.

m

Size

Choose one of the sizes to change the size of your movie panel.

m

Present Movie

Choose Present Movie to run your movie; a checkmark

appears. Choose Present Movie again to stop playing; the checkmark
disappears.

m

Recompress Movie

For information about recompressing your movie, see

your Apple Video Player documentation.

Note that you can also use the Edit menu to cut, copy, and paste images and to
undo your commands.

52

Chapter 3

Summary of Contents for QuickTake 200 Camera

Page 1: ...it your purposes The QuickTake 200 is a valuable tool for graphic artists publishing professionals and anyone who wants to use images to communicate IMPORTANT Save this manual It contains important sa...

Page 2: ...ac OS version 7 5 or later m QuickTime version 2 0 or later m Apple recommends that you have at least 16 megabytes MB of random access memory RAM with at least an 8 MB RAM partition available m a hard...

Page 3: ...rrying strap mount Storage card door I Power switch Front view Back view Shutter release Timer sleep light Mode dial LCD screen liquid crystal display Bottom view Storage card slot Battery door releas...

Page 4: ...era to take a picture after 10 seconds 1 Record mode Use this mode to take good quality pictures Record Fine mode Use this mode when you want the highest picture quality You can also change the date a...

Page 5: ...computer correctly 4 In the Welcome dialog box that appears click Continue 5 In the Installer dialog box click Install Easy Install is already selected to ensure that all the necessary software is ins...

Page 6: ...battery door 2 Insert the batteries into the camera as shown 3 Close the battery door by sliding it into place See also Appendix B Battery Information Push button Battery door WARNING Installing the...

Page 7: ...our local environmental guidelines Installing the storage card Before you can use your QuickTake 200 camera you must install the storage card that you received with the camera After you install the ca...

Page 8: ...oor always turns off the camera 2 Hold the card as shown and gently push it all the way into the card slot 3 Close the card door IMPORTANT When storing the camera you should remove the card and store...

Page 9: ...card Write protecting the storage card To prevent erasing important data from your storage card place a write protect seal over the write protect circle on the card You receive 4 seals with every car...

Page 10: ...ying strap to avoid dropping the camera 1 Pass the end of the strap through the strap mount on the camera 2 Pull the strap through the strap fastener Loop the carrying strap over your wrist before gra...

Page 11: ...mber is reached the display goes back to the lowest number For example when you set the month the display goes from 12 back to 1 4 Press the button to set the year and advance to the month The month a...

Page 12: ...date and time remain set for up to 5 minutes while you change the battery You must reset the date and time after 5 minutes have elapsed without batteries in the camera What if you upgrade your system...

Page 13: ...ictures using the optical viewfinder using the camera mode dial the auto power off function and using the camera with the optional AC power adapter Turning on the camera To turn on the camera slide th...

Page 14: ...o preserve the details of the image m Turn the mode dial to the Record 1 mode when you want good quality images but you don t need to show as much detail To turn off the camera again slide the power s...

Page 15: ...umber is automatically assigned to each photograph that you take It appears in the top right corner of the LCD screen during Play Auto Play Erase and Protect modes when you have screen information dis...

Page 16: ...graphed 2 Set the focus for the correct distance Icon Name Description 4 Close up 3 5 to 5 1 inches 9 to 13 cm Portrait 17 7 to 35 4 inches 45 to 90 cm 5 Far 35 4 inches and farther 90 cm and farther...

Page 17: ...ndicating too much light change the setting to 8 0 If the underexposure warning is flashing on the LCD screen indicating too little light change the setting to X 2 2 Adjusting the LCD screen brightnes...

Page 18: ...before you take the picture because the LCD screen is asleep However the overexposure or underexposure warning will appear flashing on the screen after you take the picture if the condition exists IM...

Page 19: ...the viewfinder see Battery Saving Mode later in this chapter Using the camera mode dial The mode dial on the right side of the top of the camera provides eight settings represented by icons that let...

Page 20: ...using the focus selector 4 Press the shutter release The photographed image is displayed for about 5 to 8 seconds REC or REC FINE to indicate that the camera is recording appears flashing in the uppe...

Page 21: ...he mode dial to another setting Play mode for the camera and the television Use the Play 2 mode to view the images in the camera on your LCD screen or on a television screen To view one image on the L...

Page 22: ...r television IMPORTANT Your television must meet NTSC National Television System Committee color television telecasting specifications adopted mainly in the United States Canada and Japan 1 Make sure...

Page 23: ...s of images on your television 1 Follow the steps in Play mode to connect the camera to the television 2 Follow the steps in Auto Play mode to view images on your television Computer mode In Computer...

Page 24: ...at you want m FRAME Erase one image m ALL Erase all images m FORMAT Format a storage card IMPORTANT See Chapter 1 for information about formatting a card 3 Press the action button The function you sel...

Page 25: ...press the and buttons at the same time again A single image appears on your LCD screen Protect mode Use Protect 3 mode to assign read only protected status to an image to prevent it from being erased...

Page 26: ...er switch 3 In either Record or Record Fine mode to take pictures press the action button twice to put the LCD screen to sleep The red sleep light on the front of the camera goes on You cannot see liv...

Page 27: ...ion button while turning on the camera The camera will continue to use battery power even if you do not use it for several minutes When you turn off the camera and then turn it back on auto power off...

Page 28: ...ou disable the auto power off function Note The power adapter does not recharge batteries in the camera If you have rechargeable batteries use a charger designed for them WARNING Never alter the plug...

Page 29: ...e pictures that you ve taken from the camera to your computer Read Chapter 3 for instructions about connecting the camera to your computer and transferring images and about using the Camera Access sof...

Page 30: ......

Page 31: ...r Mac OS based computer use the serial cable that came with your camera IMPORTANT Apple recommends that you use the optional QuickTake 200 AC Adapter whenever your QuickTake camera is connected to the...

Page 32: ...al cable However if you want to connect or disconnect other devices in many cases you must turn off the computer before you connect or disconnect a cable 3 Connect the other end of the cable to the Di...

Page 33: ...e camera to your computer m delete images from your camera m open and edit your images m place images in other application programs m create and run movies m print images Connecting to the QuickTake 2...

Page 34: ...images are stored in your camera IMPORTANT When your camera is not connected to the computer or not turned on the QuickTake 200 panel is disabled You cannot work with your camera s contents but by us...

Page 35: ...e camera to your computer For instructions see Connecting the Camera to Your Computer earlier in this chapter 2 Turn the mode dial to Computer 3 Turn on the camera by sliding the power switch 4 Double...

Page 36: ...ile menu or click the i in the upper right corner of the image frame An information box appears Opening an image to its full size To see an image full size double click the thumbnail image in the Came...

Page 37: ...m the Image menu To reduce the image choose the Zoom Out command You can also reduce and enlarge the image using the Scale pop up menu located in the lower left corner of the screen 37 Using the Camer...

Page 38: ...er double click the Camera Access icon The QuickTake 200 panel appears If Camera Access is already running the panel becomes active after you attach your camera and turn the mode dial to Computer mode...

Page 39: ...image has the prefix Image You can change that to Book to indicate images that you are going to use to put together a book Uploading transferring images from your computer to the camera You can trans...

Page 40: ...y other applications you can upload only PICT and JPEG files to the camera 5 Click Open to upload the image The image is now part of your camera contents It appears in the Camera Contents viewer with...

Page 41: ...is moved to the Viewer folder or uploaded to the camera Viewing images on your computer After you transfer images to your computer you can view thumbnails of all the images in a folder You can also op...

Page 42: ...alog box appears 3 Locate the folder that contains the images that you want to view and click Select folder name You are not selecting a file you are selecting a folder of images The Folder window app...

Page 43: ...er menu to delete them from the camera to make room for new images IMPORTANT You cannot delete images that have been protected 1 Select the images that you want to delete To select more than one image...

Page 44: ...image in the Camera Contents viewer or open it from your computer You can then edit your images using Camera Access or your favorite application See Using the Camera Access Dispatcher to Start Other A...

Page 45: ...arken or Lighten The image is lightened or darkened accordingly If you re not satisfied choose Undo from the Edit menu You can use Lighten and Darken until the image has the appearance that you want 3...

Page 46: ...elete the rest 1 Open the image that you want to crop 2 Click and drag the crosshair cursor to define the part of the image that you want to keep 3 From the Image menu choose Crop After you select par...

Page 47: ...with the cropping 4 Save your image Flipping an image You can flip an image horizontally or vertically 1 Open the image that you want to flip 2 From the Image menu choose Flip and select either Horiz...

Page 48: ...ftware you can create your own movies using still images stored on your computer and you can make your own videos using the camera IMPORTANT Apple recommends that you use the optional AC adapter whene...

Page 49: ...e from the File menu 3 In the Save dialog box that appears type the name for your movie in the New file name box and click Save The QuickTime IC movie panel appears 49 Using the Camera With Your Mac O...

Page 50: ...o the QuickTime IC movie panel in the order that you want them to appear You are limited in the number of images you use only by memory 6 Click the scroll arrow in the lower left corner of the QuickTi...

Page 51: ...arrow changes to a double bar while the movie is playing 9 Choose Present Movie from the Movie menu to return to the desktop Your movie file still remains for you to run and edit it After you close th...

Page 52: ...the last image to the first m Size Choose one of the sizes to change the size of your movie panel m Present Movie Choose Present Movie to run your movie a checkmark appears Choose Present Movie again...

Page 53: ...ys use the optional power adapter when you disable the auto power off function IMPORTANT To use the Video in function your computer must be A V compatible otherwise you will not have a digitizer 1 Att...

Page 54: ...on your LCD screen 6 To stop recording press the mouse button A new screen showing your movie appears 7 Choose Present Movie from the Movie menu A checkmark appears next to Present Movie 8 Click the R...

Page 55: ...obe PhotoDeluxe software as well as any other compatible software You can then drag a Camera Access image over the software icon to start the application IMPORTANT To use images with Adobe PageMill fi...

Page 56: ...choose Show Dispatcher The Dispatcher panel appears showing no software assigned to it Note You can display the Dispatcher horizontally or vertically by choosing Horizontal or Vertical from the Dispat...

Page 57: ...n The Dispatcher panel appears with the Adobe PhotoDeluxe icon in place 7 Repeat Steps 5 and 6 for the NetCard application You can also assign other graphics editing applications 57 Using the Camera W...

Page 58: ...plications 9 Find the folder where you want to save the image and type a name for the image 10 Click Save The NetCard application opens with your image in the center of a card IMPORTANT Only image fil...

Page 59: ...our image Printing your images You can use Camera Access to print your image while it is on the camera or after you transfer it to your computer You can also print a collection of thumbnails Printing...

Page 60: ...sure to select Color Grayscale to print images 4 Click Print to send your images to the printer Quitting the QuickTake 200 software Choose the Quit command in the File menu to end a session with the...

Page 61: ...blem with your QuickTake 200 camera and nothing presented in this chapter solves it consult the service and support information that came with you Apple product for instructions about how to contact a...

Page 62: ...eries are out of the camera for more than 5 minutes m If the camera is taken from a very cold to a very warm area water drops condensation might form on the inside of the camera or on the lens If this...

Page 63: ...some of the problems that you might encounter and offers solutions that you can try The camera LCD screen won t go on when you slide the power switch m The storage card is not loaded m The storage ca...

Page 64: ...computer If there s a problem a message tells you that the camera is not responding Make sure the serial cable is connected properly the camera is turned on and the batteries have enough power m If yo...

Page 65: ...he subject or the camera moved Hold the camera steady m The subject is out of focal range Check the focus m The image quality setting is not appropriate for the subject Change to Record Fine to preser...

Page 66: ......

Page 67: ...hysical m Depth 1 9 in 47 mm m Width 5 1 in 129 mm m Height 3 0 in 77 mm m Weight 8 5 oz 240 g Technical m Type Digital Camera m Image size 640 x 480 pixels m Interface RS 232C m Bit depth 24 bit 16 m...

Page 68: ...second to 1 5000 second m Input output ports Digital RS 232C port Video Out port NTIS required Temperature m Operating 0 to 40 C 32 to 104 F m Storage 6 months 20 to 60 C 4 to 140 F Power requirement...

Page 69: ...and to ensure that you insert them correctly Incorrect battery polarity may cause batteries to split or leak which could result in a fire injury or damage to the camera m Do not attempt to charge lith...

Page 70: ...ys to improve battery performance Here are some tips that may help you get the most from your batteries m For longest battery life use lithium batteries m When you replace used batteries replace all t...

Page 71: ...lor with desktop computers is a technical challenge because different color devices use different methods for representing color and they produce different ranges of colors For example the colored lig...

Page 72: ...color capabilities of your equipment is saved with the image For example when you scan a photograph a profile describing the scanner is saved inside the image file If you later print the image even u...

Page 73: ...ed to create the image as described in the embedded profile and then picks appropriate matching colors For example your monitor may be able to display a vivid red but your printer inks may not be able...

Page 74: ...automatically installed in the Extensions folder of your System Folder during AppleVision software installation Unless you ve removed or disabled it it s already installed Finally you need to set a C...

Page 75: ...2 Choose Control Panels from the Apple K menu and open the ColorSync System Profile control panel The ColorSync System Profile control panel appears 3 Click Set Profile A dialog box appears with a lis...

Page 76: ...a profile or to activate ColorSync be sure to use it Tips for best results After you ve made sure ColorSync is installed set the System Profile and set any necessary ColorSync options for your applica...

Page 77: ...olorSync or color matching and color technology in general refer to these publications and resources Publications Advanced Color Imaging on the Mac OS Apple Computer Inc Addison Wesley Developers Pres...

Page 78: ......

Page 79: ...on your computer and you can work with the image files using the Camera Access software IMPORTANT Always transfer all images to your computer before working with them Do not work with images that rema...

Page 80: ...f the Camera Access application You can open and view DOS JPG files in Camera Access and you can save files in other formats EXIF PICT and TIFF 7 Place your storage card in the PC card adapter 8 Inser...

Page 81: ...older 5 Apple QuickTake 200 Software CD ROM disc 5 AppleTalk 31 64 applications Adobe PageMill 55 Adobe PhotoDeluxe 55 PictureWorks Netcard 55 QuickTake Camera Access 5 33 34 48 54 scanning applicatio...

Page 82: ...rting other applications with 55 58 Camera Access icon 33 38 Camera Contents window moving images between Camera Contents and Viewer folder 41 43 purpose of 35 selecting images in 36 camera mode dial...

Page 83: ...ges to Disk command Viewer menu 38 Copy Selected Images to Disk command Viewer menu 38 cropping images 46 crosshair cursor 46 D date and time displaying and hiding 12 resetting 62 setting 11 12 DC IN...

Page 84: ...frame numbers 15 frames playing back 23 scrolling through 21 selecting seconds between 23 framing the subject 14 fuzzy images 64 65 G gamma curve for monitor setting 76 Get Info command File menu 36...

Page 85: ...ing with 44 48 write protecting 25 26 image size specifications 67 indoor pictures 17 Industry Canada statement vii input output ports on camera 68 installing batteries 6 7 optical viewfinder 18 19 Qu...

Page 86: ...age card 63 monitor ColorSync profile for 75 gamma curve 76 movie icon 51 54 Movie menu Loop Back and Forth command 52 Loop command 52 Size command 52 Present Movie command 50 52 54 Recompress Movie c...

Page 87: ...ower off function 27 power requirements 68 power specifications 68 power switch 3 13 Present Movie command Movie menu 50 51 52 54 Print command File menu 60 printer port on computer 23 31 32 printing...

Page 88: ...applications with Camera Access Dispatcher 55 58 static electricity storage card and 63 storage card cleaning 63 cleaning seal on 9 erasing frames on 24 25 erasing images from 4 formatting 4 9 24 25...

Page 89: ...70 memory 64 mode dial 63 overheated camera 64 70 power goes out during operation 64 storage card 63 turning off the camera 14 safety shutoff when camera overheats 64 70 turning on the camera 13 14 t...

Page 90: ...ate 43 images by name 43 images in camera 35 images on LCD screen 21 23 movies on LCD screen 54 multiple images 4 23 single images 4 thumbnails images on computer 41 43 W X Y weight specifications 67...

Page 91: ...ForMacOSusers Apple QuickTake200...

Page 92: ...demarks of Apple Computer Inc Adobe Adobe Illustrator Adobe PageMill Adobe PhotoDeluxe Photoshop and PostScript are trademarks of Adobe Systems Incorporated or its subsidiaries and may be registered i...

Page 93: ...nce 3 The camera mode dial 4 Installing the QuickTake software 5 Installing the batteries 6 Replacing the batteries 7 Installing the storage card 7 Formatting the storage card 9 Write protecting the s...

Page 94: ...to Play mode 23 Computer mode 23 Erase mode 24 Protect mode 25 Battery saving mode 26 Auto power off function 27 Using the camera with the optional AC power adapter 28 What s next 29 3 Using the Camer...

Page 95: ...a QuickTime movie 53 Using the Camera Access Dispatcher to start other applications 55 Saving an image 59 Printing your images 59 Printing a single image 59 Printing a collection of images 60 Quittin...

Page 96: ...ollowing measures m Turn the television or radio antenna until the interference stops m Move the computer to one side or the other of the television or radio m Move the computer farther away from the...

Page 97: ...in the literature accompanying the appliance WARNING The QuickTake 200 AC Adapter sold separately is designed to work with the electrical system of the region in which you purchased it It works with...

Page 98: ...Protect your equipment from high temperatures For example do not leave the camera in a sealed vehicle or direct sunlight m Always use the camera the AC adapter and its accessories in well ventilated...

Reviews: