01455872145
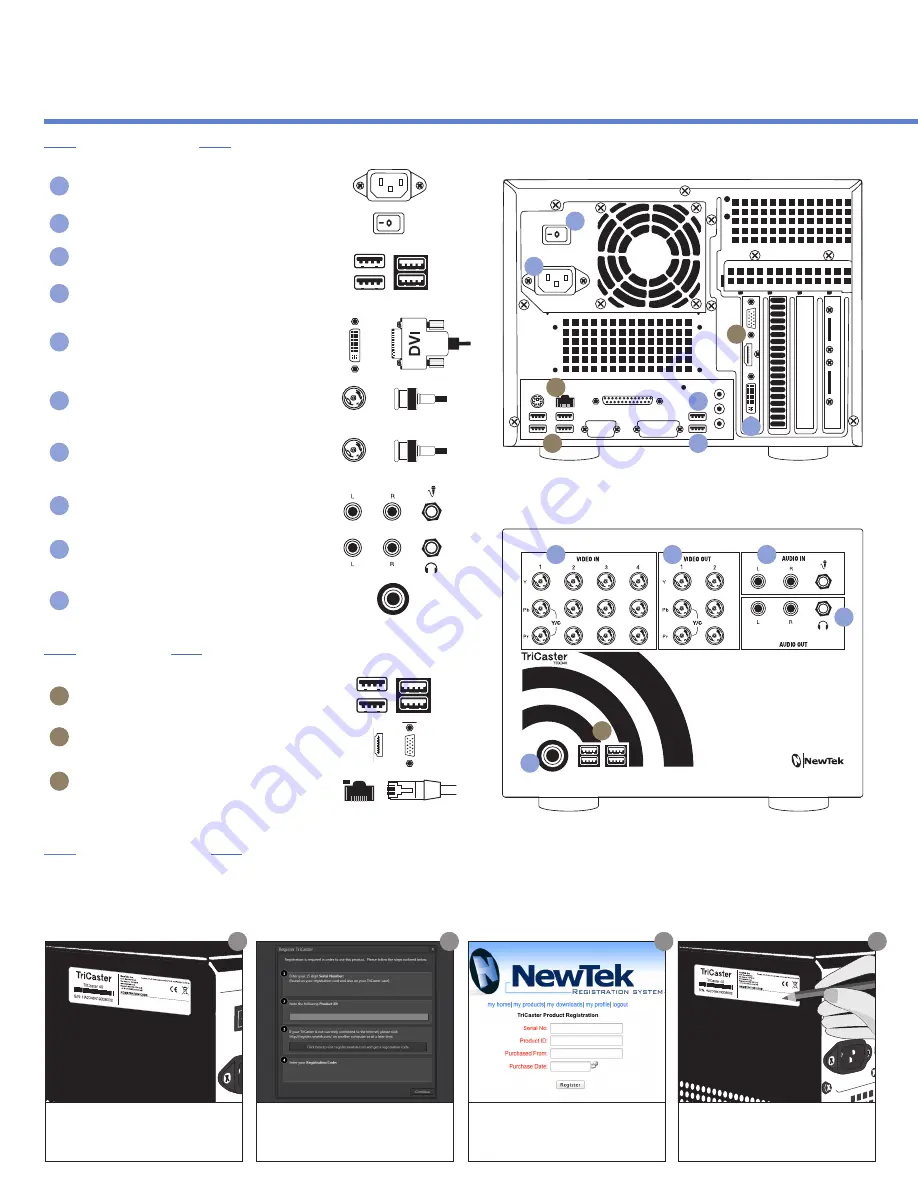
Registration is required to begin using your TriCaster. If you have connected your system to the Web, the NewTek Registration site will load automatically upon submitting your serial number. You may also
register from any Web browser at register.newtek.com.
40
Quick Start Guide
Power on TriCaster 40 and accept the End User
License Agreement
10
7
10
A
TriCaster 40 front view
Connect the power cable to the rear panel and plug in
1
Flip the power switch to ON
2
Connect the mouse to any USB port on the
front or rear of the system
4
Connect the keyboard to any USB port on the
front or rear of the system
3
Plug in audio sources using the appropriate
AUDIO IN connectors
8
Plug in cables for audio output to the
appropriate AUDIO OUT connectors
9
2
4
1
5
6
8
9
3
TriCaster 40 rear view
Locate the sticker with the Serial Number for
your TriCaster
Complete the required steps in the Register
TriCaster dialog box to proceed to the NewTek
Registration site
Create a new User Account if needed, select
your product to register, and then enter
all required fields. A valid email address is
required
Once you’ve received an email with your
Registration Code, write it on the TriCaster
sticker for future reference
C
A
B
Connect cable for Multiview monitor to the HDMI or VGA
port on the rear panel
B
Connect Ethernet cable to the network port and plug
in to an active connection. (This step will make system
registration possible directly from the TriCaster.)
C
Plug in cameras using the appropriate VIDEO IN connectors
(BNC connection required – use the included BNC-to-RCA
adapters as needed)
6
Connect cables for video output to the appropriate VIDEO
OUT connectors (BNC connection required – use the
included BNC-to-RCA adapters as needed)
7
Connect cable for User Interface monitor to the DVI port on
the rear panel
5
CONNECTION
OPTIONAL
REGISTRATION
Connect TriCaster 40 control surface to a USB port on the
front or rear of the system using the included USB cable
A
1
2
3
4
Summary of Contents for TriCaster 40
Page 1: ...40 Quick Start Guide...


