background image

Dirt Doctor Jr  

Finishing Broom 

10003680 


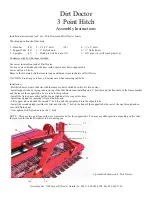
Step 1. Attach broom mount assembly to the back of the Dirt Doctor Jr frame with the two 3/8 bolts, washers 
and nylock nuts. 
 
Step 2.  Grease the studs on the broom mount and attach the broom arms to the studs with one washer on both 
sides of each arm and place a nut on the end of each stud. Tighten the nut so that the arm rotates freely. 
 
Step 3. Attach each broom arm to broom retainer studs with two washers and nuts. Tighten securely. 
 

Parts List 

 1. 

Left 

Side 

Mounting 

Bracket 

    10002678 

 2. 

Right 

Side 

Mounting 

Bracket 

    10002679 

 3. 

Lifting 

Arms 

(2) 

     10002671 

 4. 

Broom 

Retainer      10002680 

 5. 

Detent 

Ball 

(2) 

      10001680 

 6. 

Jam 

Nut 

for 

Detent 

Ball 

(2) 

    10001074 

  18” 

Broom 

Segment 

(1) 

    10002638 

  24” 

Broom 

Segment 

(2) 

    10003333 


Newstripe, Inc   1700 Jasper St Unit F   Aurora, CO 80011    303-364-7786 

3. 

1. 

2. 

Step 1 & 2 

Step 3. 

Summary of Contents for Dirt Doctor Junior

Page 1: ...en lower the rear wheels to remove the unit from the pallet To lower the wheels for transport raise rear roller off of ground Step to one side of the unit remove lynch pin and slide wheel arm pin out until it clears plate Lift wheel arm up and back to lower wheel Slide wheel arm pin into plate top hole is the transport position and secure with lynch pin Repeat procedure on other side CAUTION The u...

Page 2: ...e correct results for your particular soil and application Adjusting Ripper and Pulverizer Bars Use the tongue jack to raise the front of the unit to adjust the Ripper blades and Pulverizer bar The Ripper blades are adjusted by pulling the Hitch Pins on either side of the unit and moving ripper bar up or down The Full Up position is used for transport or non cutting The pulverizer bar height is ad...

Page 3: ...in Repeat with the other side NOTE The other hole positions allow you to use the ripper pulverizer bar and drag without the compacting roller or with the compacting roller only compacting lightly Adjust drag height so it will drag the surface but will not be loose enough to interfere with the roller Position scraper bar against roller Optional Finish Drag may be attached now or when ready to make ...

Page 4: ...6706 Fax 303 364 7796 Fig 1 Operating position one hitch pin removed Fig 2 Tow position both hitch pins in place Tongue nose support 11 Ripper and pulverizer bar adjustment 7 Reversible center drag Typical pillow block with roller bearing 19 4 11a 1 9 8 Unit in tow position 21 14 15 11 12 6 ...

Page 5: ...Pulverizer lift lever bracket right 10000733 14 Pulverizer lift lever bracket left 10000734 15 T pin w quick release button 10000738 Pillow block with roller bearing 10003220 used on pulverizer roller 21 Hitch draw bar 10000438 These items not included on 3 pt hitch model 3 Point Hitch models 16 Lift pin 3 pt hitch 10003212 17 Uprights 3 pt hitch 2 required 10003301 18 Support tube 3 pt hitch 1000...

Page 6: ... one way Install support tube by laying tube it on top of the Dirt Doctor and installing one 1 bolt through the front hole of the frame bracket and the rear of the support tube Leave tube in this position Install the Nylock nut on this bolt but do not tighten all the way at this time Install one upright by inserting lift pin at bottom end Lift support tube and slide the second 1 bolt through the u...

Page 7: ... end of each stud Tighten the nut so that the arm rotates freely Step 3 Attach each broom arm to broom retainer studs with two washers and nuts Tighten securely Parts List 1 Left Side Mounting Bracket 10002678 2 Right Side Mounting Bracket 10002679 3 Lifting Arms 2 10002671 4 Broom Retainer 10002680 5 Detent Ball 2 10001680 6 Jam Nut for Detent Ball 2 10001074 18 Broom Segment 1 10002638 24 Broom ...

Page 8: ...soline engines compressors pumps including airless and Transaxles are furnished with their respective manufacturer s warranties only Such components are not covered by any warranty of Newstripe Inc Where Newstripe elects to extend manufacturers warranties the warranty shall be pro rated as to cover 100 of the cost to replace or repair materials and parts for the first 12 months of ownership and 60...

Reviews: