background image

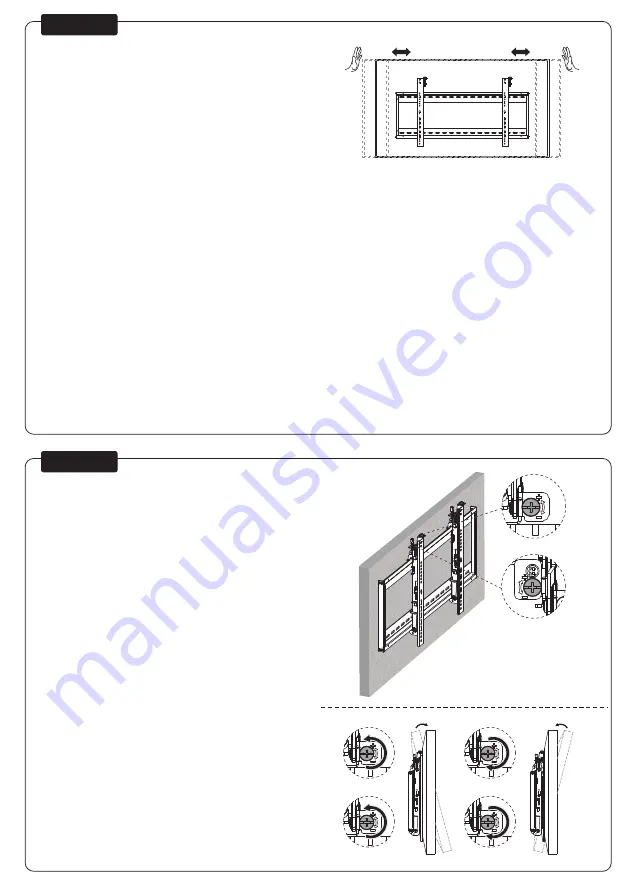
Adjust the mount to your desired position. A) Screws for 
tilt adjustment | B) Screws for micro height adjustment
Stel de steun in op de gewenste positie. A) Schroeven
voor kantelverstelling | B) Schroeven voor micro-

hoogteverstelling

Positionieren die Halterung in die gewünschte Position. 
A) Schrauben zur Neigungsverstellung | B) Schrauben 

zur Höhenverstellung

Ajustez le support à la position souhaitée. A) Vis de
réglage de l'inclinaison | B) Vis de micro-réglage de la

hauteur

Regolare il supporto nella posizione desiderata. A) Viti
per la regolazione dell'inclinazione B) Viti per 

microregolazione dell'altezza

Ajuste el soporte a la posición deseada. A) Tornillos para
ajuste de inclinación B) Tornillos para micro ajuste de

altura

Ajuste o suporte na posição desejada. A) Parafusos para
ajuste de inclinação | B) Parafusos para micro ajuste de

altura

Dostosuj pozycję uchwytu do twoich wymagań. A)
Śruby do regulacji nachylenia | B) Śruby do 
mikroregulacji wysokości

EN

NL

DE

FR

IT

ES

PT

PL

Align the screen if necessary

Stel het scherm af, indien nodig
Richten Sie den Bildschirm aus, falls nötig

Alignez I'écran si nécessaire
Allineamento dello schermo se necessario
Alinear pantalla si es necesario

Alinhar tela, se necessário
Wyrównaj monitor jeśli jest taka potrzeba

EN
NL
DE
FR
IT
ES
PT
PL

STEP 6

STEP 7

a

b

Left

Right

Right

Left

Summary of Contents for NeoMounts LED-VW500BLACK

Page 1: ...t mural pour mur d images Supporto parete video wall Soporte de video wall Suporte de video wall Video vægbeslag NO SE FI PL CS SK RO Videovegg feste Videoväggfäste Videoseinäteline Uchwyt do sciany video Držák na videostěny Držiak na videosteny Suport pentru video wall min200mm max600mm 934mm 76mm 483mm 28mm 5 3 3 3 min200mm max450mm ...

Page 2: ...stigen die Halterungsplatte an einer Wand Installez la plaque murale sur un mur en brique ou en béton Installare la piastra da parete su un muro di mattoni o cemento Fije el soporte de pared a una piedra sólida o muro de hormigón Instale a placa do suporte de parede numa parede Zamontuj płytę ścienną do ściany z cegły lub betonu EN NL DE FR IT ES PT PL A x2 B x2 C x2 M F x4 M G x8 M H x4 W A x6 W ...

Page 3: ... Install the adapter brackets Bevestig de adapter steunen Montage die Halterungsschienen Installez les articulations sur les adaptateurs Montaggio dell adattatore Coloque los soportes del adaptador Instalação de braços adaptadores Zainstaluj ramiona uchwytu EN NL DE FR IT ES PT PL Attach the adapter brackets onto a TV with a flat back side Bevestig de adapter steunen aan een televisie met vlakke ac...

Page 4: ...egeln Sie die Installationsknöpfe hängen Sie den Bildschirm an die Wandplatte verriegeln Sie die Installationsknöpfe und bringen Sie je nach Wunsch ein Vorhängeschloss nicht im Lieferumfang enthalten an Déverrouillez les boutons d installation accrochez l écran au support mural verrouillez le à l aide des boutons d installation et fixez un cadenas non fourni si vous le souhaitez Sbloccare le manopo...

Page 5: ...e B Viti per microregolazione dell altezza Ajuste el soporte a la posición deseada A Tornillos para ajuste de inclinación B Tornillos para micro ajuste de altura Ajuste o suporte na posição desejada A Parafusos para ajuste de inclinação B Parafusos para micro ajuste de altura Dostosuj pozycję uchwytu do twoich wymagań A Śruby do regulacji nachylenia B Śruby do mikroregulacji wysokości EN NL DE FR ...

Page 6: ...der gewünschten Position Ajustez le support à la position souhaitée Regolare il supporto nella posizione desiderata Establecer el soporte en la posición deseada Ajuste o suporte na posição desejada Dostosuj pozycję uchwytu do twoich wymagań EN NL DE FR IT ES PT PL OPTION Left Right Left Right Left Right Left Right ...

Page 7: ... alle zijden Installieren Sie die Bildschirme in der richtigen Reihenfolge 1 2 3 4 richten Sie sie mit einer Wasserwaage aus und lassen Sie auf allen Seiten einen Abstand von 1 2 mm Installez les écrans dans le bon ordre 1 2 3 4 alignez les avec un niveau à bulle et gardez un espace de 1 2 mm de chaque côté Installare gli schermi nell ordine corretto 1 2 3 4 allineare con una livella a bolla e man...

Page 8: ......

Reviews: