FEATURES OVERVIEW
1. Precise analog levels are generated from digital code
using a 14-bit DAC chip.
2. Voltage (to 10 V) is available at the same time as current
(to 22 mA), but the total current drawn should not exceed
24 mA.
3. Load resistance for the voltage output can be as low as
500 ohms (20 mA at 10 V out) when current output is not
used.
4. Loop resistance for the current output can be as high as
600 ohms (12 volts compliance) with negligible current
from the voltage output.
5. Both outputs are galvanically isolated from both power
and measurement circuits of the meter.
6. Precision calibration is applied by the meter to either the
voltage output or the current output (but not to both
simultaneously). When both outputs are used
simultaneously, the non-calibrated output is stable but
does require external adjustment if fine-trimming is
required.
7. Independent, 14-bit resolution OuTput SCale and OFfset
(OT.SC.OF) can convert a wide range of meter readings
to the desired current or voltage output span.
8. The output resolution permits good accuracy for
turndown ratios (offset/span) as high as 100:1.
9. 50° to 104°F (10° to 40°C) accuracy within 0.1% after
installation calibration.
10. 10% to 90% step response time is 6 milliseconds (plus
filter delay, if any, programmed for the analog output).
11. Configurable so that output will track the PEAK or
VALLEY measurement.
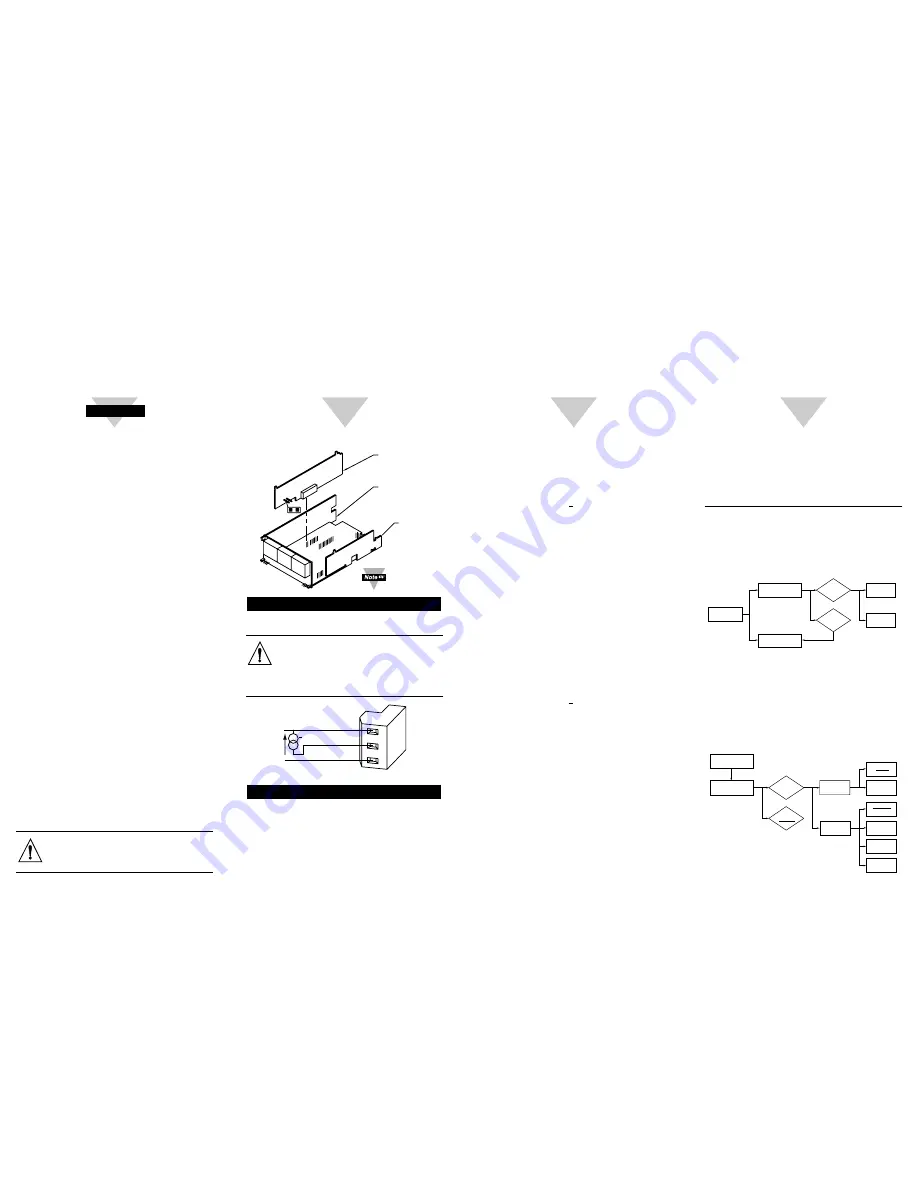
BOARD INSTALLATION
To install optional Analog Output printed circuit board:
1. Refer to “Reveal the Main Board” in Main Operator’s
Manual
Section 5.2
, Disassembly.
2. Using figure below as a reference, insert analog option
board(s) into J12 connector on the main board.
WARNING:
To avoid electrical shock be sure to
disconnect the unit from its power supply. After
you have opened the meter you are ready to
install option card.
LCk.CNF
ENTER LOCKOUT (ACCESS SECURITY)
CONFIGURATION SUBMENU:
Press ‘
MENU
’
1) Ten times, Display shows
"
LCk.CNF
" Lockout (Access
Security) Configuration Menu.
Press ‘
RESET/ENTER
’
2) Display shows "
Id
" Access
Security ID menu.
Press ‘
RESET/ENTER
’
3) Display shows 4 numbers 0
(
0000
) with the first digit flashing.
Press ‘
䊱
/MAX
’ & ‘
䊳
/MIN
’ 4) To enter Access Security ID
code.
• The default code is any 4-digit number that has the sum
of its 4 digits equal 10. For example 1234 is one of the
default ID code since 1+2+3+4 = 10.
• Use numbers that are easy for you to remember. If the ID
Code is forgotten or lost, Call customer service with your
serial number to access and reset to the default ID code.
Press ‘
RESET/ENTER
’
5) Display shows "
CHNG. Id
"
Change ID Code menu; which
Implies that the ID code, was
just entered, is accepted other-
wise the meter will return to “
Id
"
ID Code menu and allows user
enter the ID code again if the
correct ID code still is not found
for over 3 attempts then display
shows "
ERROR
" and advances
to "
RUN
" Run mode.
Press ‘
RESET/ENTER
’
6) Display shows 4 numbers 0
(
0000
) with the first digit flashing.
Press ‘
䊱
/MAX
’ & ‘
䊳
/MIN
’ 7) To modify and enter new ID
code if necessary, otherwise
skip this menu by Press
‘
RESET/ENTER
’ again.
LOCk
Press ‘
RESET/ENTER
’
8) Display shows "
StOREd
"
stored message momentarily and
then advances to the "
LOCk
"
Lockout menu.
Press ‘
RESET/ENTER
’
9) Display shows "
SP1
" Setpoint 1
submenu. Use ‘
MENU
’ button to
regain accessibility or lockout the
other following menu functions in
the Main Menu:
"
SP2
", "
SP3
", "
SP4
", "
INPUt
",
"
RdG.CNF
", "
INP.CNF
", "
MP.SC.OF
",
"
OUt.CNF
", "
SP.CNF
", "
AL.CNF
",
"
COMM
" (If Communication Option
Board installed), and "
COLOR
".
Press ‘
RESET/ENTER
’
10) Display flashes "
dISAbL
"
disable option or previous setting.
LOCk
(continued)
Press ‘
䊱
/MAX
’
11) Scroll and select "
ENAbLE
" to
lockout "
OUt.CNF
" Output Configuration
from any unauthorized modification or
skip this menu, just Press ‘
RESET/ENTER
’.
Press ‘
RESET/ENTER
’
12) Display shows "
StOREd
" stored
message momentarily and then
advances to the "
SP.CNF
" submenu.
CONFIGURING THE OUTPUT
OUt.CNF
ENTER OUTPUT CONFIGURATION MENU:
Press ‘
MENU
’
1) 5 times or scroll though main
Menu until Display shows "
OUt.CNF
"
Output Configuration Menu.
ANA.OUt
Press ‘
RESET/ENTER
’
2) Display shows "
ANA.OUt
"
Analog Output Configuration
submenu.
Press ‘
RESET/ENTER
’
3) Display flashes "
dISAbL
"
(Default) or previous setting option.
Press ‘
䊱
/MAX
’
4) Select "
ENAbLE
" to setup
Analog Output if your controller is
equipped With the optional Analog
Output board.
ANA.OUt
(Analog Output)
OUt.CNF
ENAbLE
MOdE
dISAbL
OUt.tyP
(Output Type)
CURRNt
VOLt
FILtRd
(Filtered)
UNFILt
(Unfiltered)
PEAk
VALLy
OUt.CNF
ANA.OUt
(Analog Output)
Ot.SC.OF
(Output Scale & Offset)
ENAbLE
MOdE
DISAbL
OUt.tyP
(Output Type)
4
Start Here
2
3
BOARD INSTALLATION
(continued)
Press This Button
Analog Option Board and
Figure 1. Board Installation
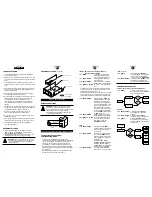
WIRING CONNECTIONS
WARNING:
Do not connect ac power to your
meter until you have completed all input and
output connections. Failure to do so may result in
injury! This device must only be installed
electrically by specially trained electrician with
corresponding qualifications.
Press This Button
Isolated Analog Output
Figure 2. Analog Output Option Board Wiring Connection
LOCKOUT (ACCESS SECURITY)
CONFIGURATION MENU
• To prevent unauthorized tampering with the setup
parameters, this instrument provides protection by requiring
the user to enter the ID (Access Security) Code before
allowing access any locked menu item on Main menu.
• The locked menu will be skipped and invisible during
Menu Navigation, however Display will show the locked
setpoint and value but editing mode is disabled (first digit
is not flashing).
• Whether multiple or single menu accessibility/restriction
desired, there is only one ID code needed.
P5
1
2
3
Analog Voltage
0-10Vdc
Analog Current
4-20mA
Analog Return
+
+
SIGNAL INPUT BD
AC POWER BD
J12
10
1
ANALOG OUTPUT BD
P12
1
1
0
S1
A
S1
S1-A must
be closed.


