6
PROCEDURE DI INSTALLAZIONE_ INSTALLATION PROCEDURE_ PROCÉDURES D’INSTALLATION_
INSTALLATIONSANWEISUNGEN_ INSTRUCCIONES DE MONTAJE
67620E
67621E
67622E
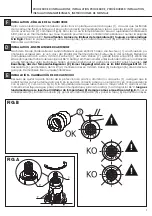
Dopo aver rimosso la parte frontale delle protezioni in plastica avvitare le boccole (1), assicurarsi che l’estremi-
tà della cartuccia termostatica sia in posizione corretta (normalmente verso il basso, con il segno (X) che cor-
risponde con il piano (Y) come in Fig.A). Nel caso in cui la temperatura dell’acqua fosse maggiore o minore
di 38°C, posizionare un termometro sotto l’acqua corrente per tenere sotto controllo la temperatura e ruotare
la manopola (J) fino al raggiungimento dei 38°C,
fare attenzione poi ad inserire il limitatore di temperatura
(2) sempre come mostrato in Fig.B.
Posizionare il decoro (3), montare la maniglia (4), fissarla con il grano (5)
e mettere il tappino (6). Smontare in senso inverso.
INSTALLAZIONE - TARATURA DELLA CARTUCCIA
I
After removing the front of the protection, screw the bushes (1), make sure that the end of the thermostatic
cartridge in the correct position (usually downward, with the sign (X) that corresponds with the plane (Y) as
in Fig.A). If the water temperature is warmer or cooler than 38°C, place a thermometer under running water in
order to keep an eye on the temperature and rotate the knob (J) until reaching 38°C,
make sure to insert the
temperature limit control (2) always as shown in Fig. B on the assembly instructions.
Place the decor plate
(3), install the handle (4), secure it with the fixing screw (5) and put the cover cap (6). Disassemble in reverse.
INSTALLATION - CALIBRATION OF THE CARTRIDGE
GB


