background image

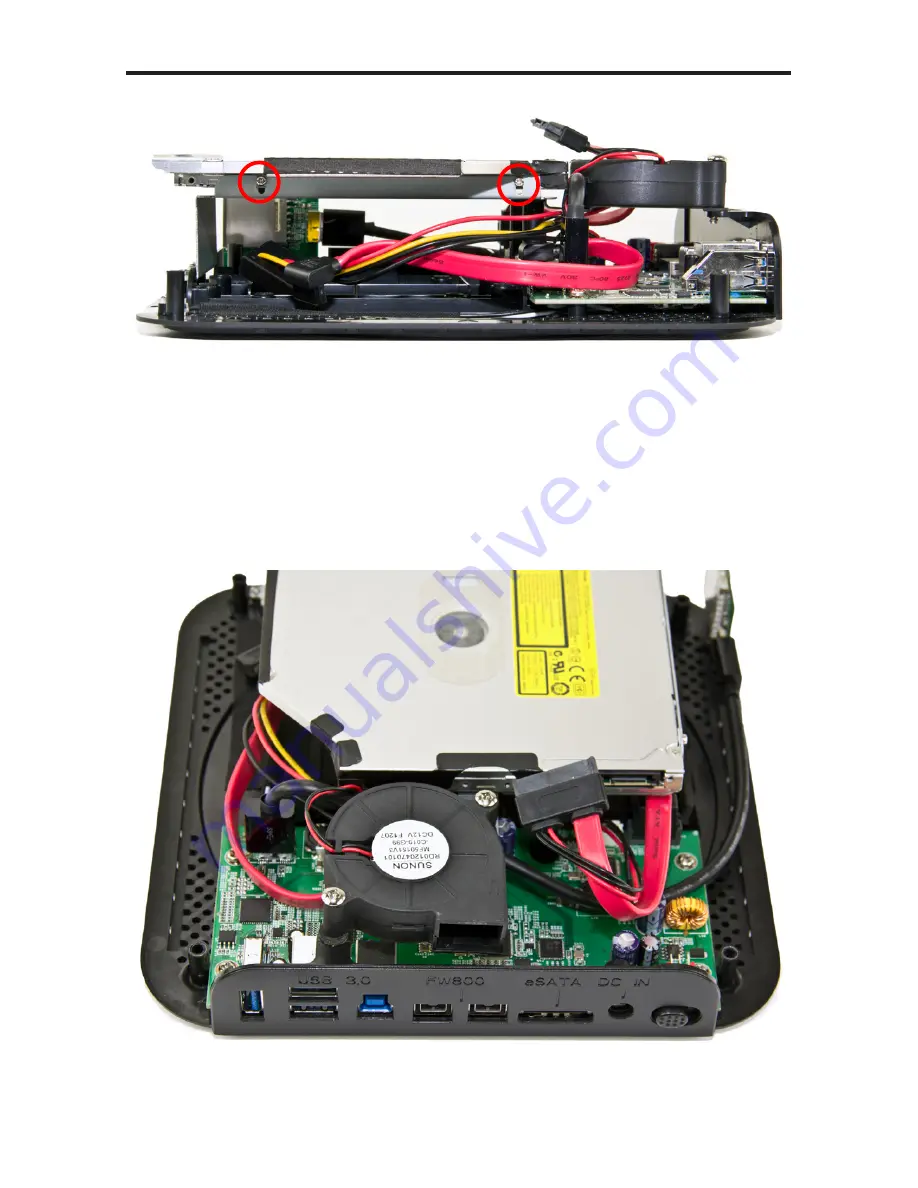
Insert 2 of the smallest screws into the optical drive through the drive 

carrier bracket. Note that the holes that this side of the bracket uses are “U” 

shaped and the drive will need to be aligned to the top of the bracket. This 

is to accommodate the larger 12.7mm drive mechanisms that the Newer 

Technology miniStack MAX is also compatible with.

Newer Technology miniStack MAX 

Chapter 2 - Assembly

Turn the Newer Technology miniStack MAX so that you are looking at the 

rear ports as shown.

Summary of Contents for miniStack MAX

Page 1: ...Owner s Guide Assembly Manual ...

Page 2: ......

Page 3: ...MAX 1 3 4 LED Indicator 2 ASSEMBLY 6 TECHNICAL SUPPORT 6 1 BEFORE CONTACTING TECHNICAL SUPPORT 6 2 TECHNICAL SUPPORT HOURS OF OPERATION 4 TROUBLESHOOTING TIPS 3 1 MACINTOSH FORMATTING 3 2 REMOVING AN EXISTING GUID PARTITION 3 3 WINDOWS FORMATTING 5 APPENDIX 4 1 TROUBLESHOOTING 4 2 USAGE TIPS 5 1 FAQ 5 2 ABOUT DATA PROTECTION 3 FORMATTING 2 1 3 5 DRIVE INSTALLATION 2 2 2 5 DRIVE INSTALLATION 2 3 9 ...

Page 4: ...MB RAM eSATA interface Windows XP or later FireWire interface Windows XP or later USB 3 0 interface Windows XP or later 1 2 Package Contents Firmware images and descriptions may vary between this manual and the unit shipped Functions and features may change depending on the firmware version Visit the product webpage for the most recent specifications Item ______ Newer Technology miniStack MAX Powe...

Page 5: ...ter to both use the miniStack MAX as a hard drive and as a USB hub eSATA Port Connect an eSATA cable here to connect the miniStack MAX at SATA II speeds FireWire 800 Ports Connect one FireWire 800 port to your computer using the included cable and use the other FireWire 800 port to connect additional peripherals NOTE FireWire takes priority over both eSATA and USB for drive use DC IN port Plug the...

Page 6: ...D cards Active USB connection required for optical drive to function 1 3 3 Powering on the Newer Technology miniStack MAX To use the Newer Technology miniStack MAX connect your preferred interface cable NOTE You can have both the FireWire and USB cables connected at the same time to the drive and the computer Turn the power switch to the ON position and verify the LED on the front of the drive is ...

Page 7: ...re looking at the chassis with the circuit board on the right and the hard drive bay facing you 2 1 Assembling the Newer Technology miniStack MAX There are 4 types of screws included in the plastic bag From longest to shortest Chassis to top housing 3 5 Hard Drive 2 5 Hard Drive Optical Drive 2 ASSEMBLY not pictured and not normally used 2 screws to attach optical drive slot cover ...

Page 8: ... as shown with the ports facing towards you 2 2 3 5 Drive Installation Newer Technology miniStack MAX Chapter 2 Assembly Insert the SATA Power and SATA Data cable into your 3 5 SATA drive as shown The connectors are keyed to only insert in the correct orientation ...

Page 9: ...nes with the coarsest thread in through the bottom chassis into the 3 5 drive holes circled securing it into the chassis Turn to section 12 4 Top Cover Assembly to finish assembling your Newer Technology miniStack MAX Take your 2 5 SATA drive and insert it into the drive chassis as shown with the ports facing towards you 2 3 2 5 Drive Installation ...

Page 10: ... to only insert in the correct orientation Turn the bottom housing so that you can see the screw holes Insert the second shortest screws the ones with fine threads in through the bottom chassis into the 2 5 drive holes circled securing it into the chassis Turn to section 12 4 Top Cover Assembly to finish assembling your Newer Technology miniStack MAX ...

Page 11: ...ion Insert the 9 5mm optical drive into the top optical drive bay Please note that you will not be installing the drive flush into the metal drive carrier but rather the 9 5mm drive will be extending up above the bottom plate a little bit NOTE If you are not installing an optical drive there is an included plastic cover to attach to the inside top cover to close the optical drive slot ...

Page 12: ...ptical drive lifting the drive up off of the metal carrier approximately 3 2mm to insert the screws into the screw holes in the side of the optical drive circled here Turn the bottom chassis 180º to see the opposite side You will have to look below the optical drive as shown to see the 2 screw holes on this side ...

Page 13: ...es are U shaped and the drive will need to be aligned to the top of the bracket This is to accommodate the larger 12 7mm drive mechanisms that the Newer Technology miniStack MAX is also compatible with Newer Technology miniStack MAX Chapter 2 Assembly Turn the Newer Technology miniStack MAX so that you are looking at the rear ports as shown ...

Page 14: ...to section 12 4 Top Cover Assembly to finish assembling your Newer Technology miniStack MAX Turn the bottom chassis of the Newer Technology miniStack MAX so that the unit is facing you as shown 2 4 12 7mm Optical Drive Installation NOTE If you are not installing an optical drive there is an included plastic cover to attach to the inside top cover to close the optical drive slot ...

Page 15: ...rive into the top optical drive bay Newer Technology miniStack MAX Chapter 2 Assembly Using the smallest screws included insert 2 screws into the optical drive through the screw holes in the side of the optical drive circled here ...

Page 16: ...ack MAX Chapter 2 Assembly Insert 2 of the smallest screws into the optical drive through the drive carrier bracket Note that the holes that this side of the bracket uses are U shaped and the drive will need to be aligned to the bottom of the bracket This is to accommodate the smaller 9 5mm drive mechanisms that the Newer Technology miniStack MAX is also compatible with ...

Page 17: ...ts as shown Newer Technology miniStack MAX Chapter 2 Assembly Insert the combination SATA and Power connector into the back of the optical drive It is keyed to only go in one direction Turn to section 12 4 Top Cover Assembly to finish assembling your Newer Technology miniStack MAX ...

Page 18: ... MAX Chapter 2 Assembly 2 5 Top Cover Attachment Using the longest screws provided attach the top cover to the bottom chassis by securing the 4 corner Phillips screws circled Your Newer Technology miniStack MAX is now assembled ...

Page 19: ...ich is found in your Applications Utilities folder Select the device with no volumes attached to it in this picture that would be the 1 TB miniStack MAX device Click on the drive icon next to the text If your miniStack was previously formatted there will be a volume already attached to the device in the red circle above You will destroy all data on that drive by reformatting If you have installed ...

Page 20: ...ou then need to choose how many partitions you wish your Newer Technology miniStack MAX to have For ease of use we re selecting one partition here but of course you could select more if you wish to have multiple volumes created Simply use the pulldown menu under Partition Layout to create more partitions Newer Technology miniStack MAX Chapter 3 Formatting ...

Page 21: ...ume if you selected multiple partitions Click on the Options button and the following dialog box will appear Choose the partition scheme appropriate for your computer most will choose GUID Partition Table Click OK Click Partition to complete the formatting process and partition the drive This will take a few moments to complete ...

Page 22: ...ng if you wish to use the new device as a Time Machine volume This is up to you to decide if you don t want to make that decision right now you can click Decide Later and use the Time Machine preference pane to select your Newer Technology miniStack MAX at a later time Formatting is complete you re all set You can quit Disk Utility ...

Page 23: ...y older versions of Windows without special software If you wish to use your storage solution on a computer running Windows you will need to repartition and reformat using the following instructions Go to the DOS command prompt by selecting Run from the Start Menu Type cmd into the text box and click the OK button Type diskpart and hit enter Type list disk and hit enter Type select disk x replacin...

Page 24: ...he Wizard does not appear expand the Storage menu by clicking on the plus sign Then right click next to the disk number of the drive that you have just connected and click Initialize to bring up the Wizard In the next window there should be only one drive listed That will be the drive that you connected via eSATA FireWire or USB Make sure the box next to the drive name is checked and click Next Th...

Page 25: ...er right reads as Unallocated Right click in this space and choose New Partition The New Parti tion Wizard will launch Click Next to continue Specify your partition type as Primary and click Next The wizard will display the MAXimum partition size for your drive It is strongly recommend ed that you do not change the default value Click Next ...

Page 26: ...ystems run ning Windows 2000 or later it is advisable to specify the file system as NTFS Leave the Allocation unit size as Default and feel free to give the drive what ever name you prefer Be sure to check the box Perform a quick format If you do not it will likely take several hours for your drive to format Click Next At the end of the Wizard you will see a summary of the information that you spe...

Page 27: ...e formatting wizard you will see that your new drive represented as Disk E in this case will display a message of Formatting This should only take a couple of min utes if you chose the quick format option After a moment or two the drive s status will change from Formatting to Healthy ...

Page 28: ...nless In fact you ll hardly know MacDrive is working Once installed MacDrive will automati cally give you access to any Mac disk you pop into your computer MacDrive even puts an apple icon on the Mac disk just to keep things clear You can access files on the Mac disk just like you would with a Windows format ted disk Open files from the disk or from within a program Mac files automati cally get th...

Page 29: ... 2 Tips To properly unmount any connected hard drives from your computer you need to follow a few simple steps For Macintosh systems There are a few methods to umount disks with Macintosh systems Either drag the icon for the hard disk you wish to unmount to the trash can or click the eject icon next to the hard disk name under the DEVICES tab in the sidebar in any finder window or right click and ...

Page 30: ...re exist but are not covered here Additionally FAT32 only works with hard drives that have a capacity of 2 2TB or less Q Can I charge my iPad using the built in hub in the miniStack MAX A Yes The miniStack MAX has a dedicated charging port for any USB device Q Will the hard drive spin down when my computer goes to sleep or into stand by mode A Yes it will spin down to save energy It will take abou...

Page 31: ...nvoice number The operating system you are using Which specific model of computer you are using All of this will help speed your support contact along 8AM 8PM CT Monday Friday 9AM 4PM CT Saturday By Telephone 800 275 4576 North America only International customers please call 815 338 8685 Live Chat is available during normal business hours as well Visit http www newertech com support for more info...

Page 32: ...ver Connect the equipment to an outlet on a circuit different from that to which the receiver is connected Health And Safety Precautions Use proper anti static precautions while performing the installation of your hard drives into this drive enclosure Failure to do so can cause damage to your drive mechanisms and or the hard drive enclosure Read this User s Guide carefully and follow the correct p...

Reviews: