National Electronics & Watch Co,. Ltd.
BC04
TIME setting in SET mode:
TIME sub modes:
Press S5 to enter the time sub mode. In these sub modes, you can set the
TIME 1
,
TIME 2
,
Time zone
, etc. Press S1/S3 to scroll through these sub modes.
TIME 1 setting:
You have two options in setting the watch,
AUTO
or
MANUAL
. In manual setting, you can
manually set the time. If you select the AUTO option, the watch will be automatically set base
on the data and time data from GPS satellites.
•
Select
TIME 1
by pressing S5
•
Select
AUTO
or
MANUAL setting
by pressing S1 or S3 and then press S5 to enter.
AUTO
setting:
¾
Select
TIME ZONE
by pressing S1/S3 and then press S5/S7 to enter. There are 106
cities to select in this time zone setting.
¾
Select
DST ON
or
OFF
by pressing S1/S3 and then press S5/S7 to enter.
¾
Select 12H or 24H format setting by pressing S1/S3. Press S5/S7 to enter.
¾
The watch will display the
CONFIRM
screen.
MANUAL
setting:
¾
Set the
HOUR
by pressing S1/S3 and then press S5/S7 to enter.
¾
Set the
Minute
by pressing S1/S3 and then press S5/S7 to enter.
¾
Set the
SECOND
by pressing S1/S3 and then press S5/S7 to enter.
¾
Set the
YEAR
by pressing S1/S3 and then press S5/S7 to enter.
¾
Set the
MONTH
by pressing S1/S3 and then press S5/S7 to enter.
¾
Set the
DATE
by pressing S1/S3 and then press S5/S7 to enter.
¾
Set the
12/24H
by pressing S1/S3 and then press S5/S7 to enter.
¾
The watch will display the
CONFIRM
screen.
TIME 2 setting:
You have two options in setting the watch,
AUTO
or
MANUAL
. In manual setting, you can
manually set the time. If you select the AUTO option, the watch will be automatically set base
on the data and time data from GPS satellites.
The procedure in setting time 2 is the same with time 1 setting.
12H/24H format setting:
You can select
12H
or
24H
format. Press S5 to enter setting mode. Press S1 or S3 to select
12H or 24H format. Press S5 or S7 to confirm and exit.
AUTOLAP setting:
You can use auto lap to automatically take the lap at specific traveled distance. This setting is
helpful for comparing your performance over different part of the RUN.
To set the Auto lap:
1. Press S5 to set the Auto lap.
2. Press S1/S3 to select the various settings. Following are the auto lap preset range: OFF,
0.5 Km, 1 Km, 2 Km, 3 Km, 4 km and 5 Km. Default value is 1.0 KM.
3. Press S5/S7 to save the selection and exit.
UNITS setting:
1. Press S5 to enter UNITS setting
2. Press S1/S3 to change the Units
3. Press S5/S7 to accept selected unit and exit.
Units: KM/M/KG or MI/FT/LBS
Setting the User’s information:
1. Press S5 to enter USER setting. GENDER parameter will be displayed.
2. Press S5 again to set the parameter. The parameters to set are Gender
Æ
AGE
Æ
WEIGHT
Æ
HEIGHT.
3. Press S1/S3 to change values.
4. Press S7 to exit
Weigh range : 20 to 255 Kg ( 44 to 561 Lbs)
Height range: 89-241 cm(2’11”- 8’00” ft’ inch”)
Age Range : 7 to 99
Gender : Male or Female
HRM setting:
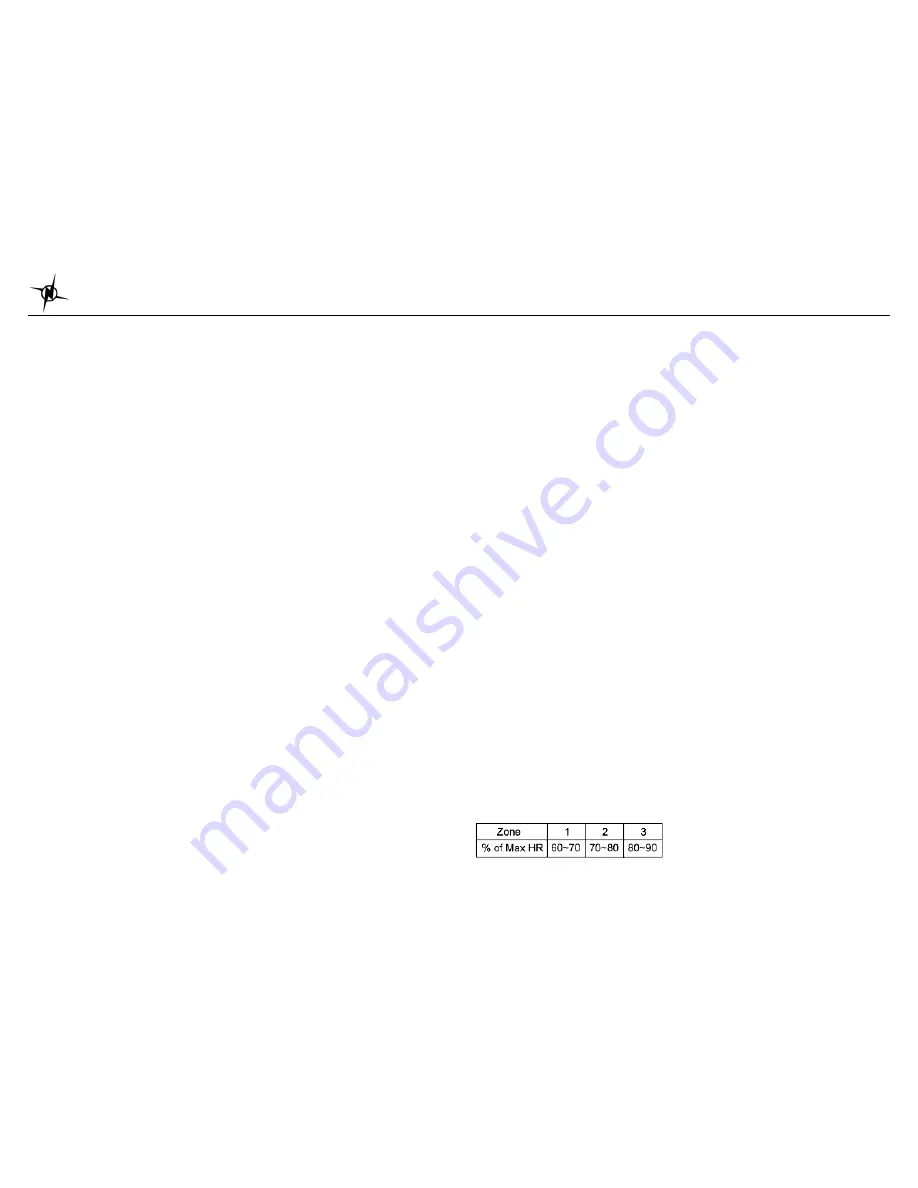
You can set the HR zones and Zone alarm here.
1. Press S5 to enter HR Zone setting
2. Press S1/S3 to change values Zone 1 to 3
3. Press S5 to set the Low limit of the selected zone.
4. Press S1/S3 to change the Low Limit value. There is a default value but you change it if
you want.
5. Press S5 to accept the setting and set the High limit of the selected zone.
6. Press S1/S3 to change the High Limit value. There is a default value but you change it if
you want.
7. Press S5 to accept the value and set the Zone Alarm.
8. Press S1/S3 to turn ON or OFF the Alarm.
9. Press S5/S7 to accept and exit.
Heart rate range: 30 to 240 BPM
Low Limit setting range = 30 BPM to High limit value
High Limit setting range = Low Limit Value to 240 BPM
Max HR = 220- Age
HR Zone Table:


