background image

21

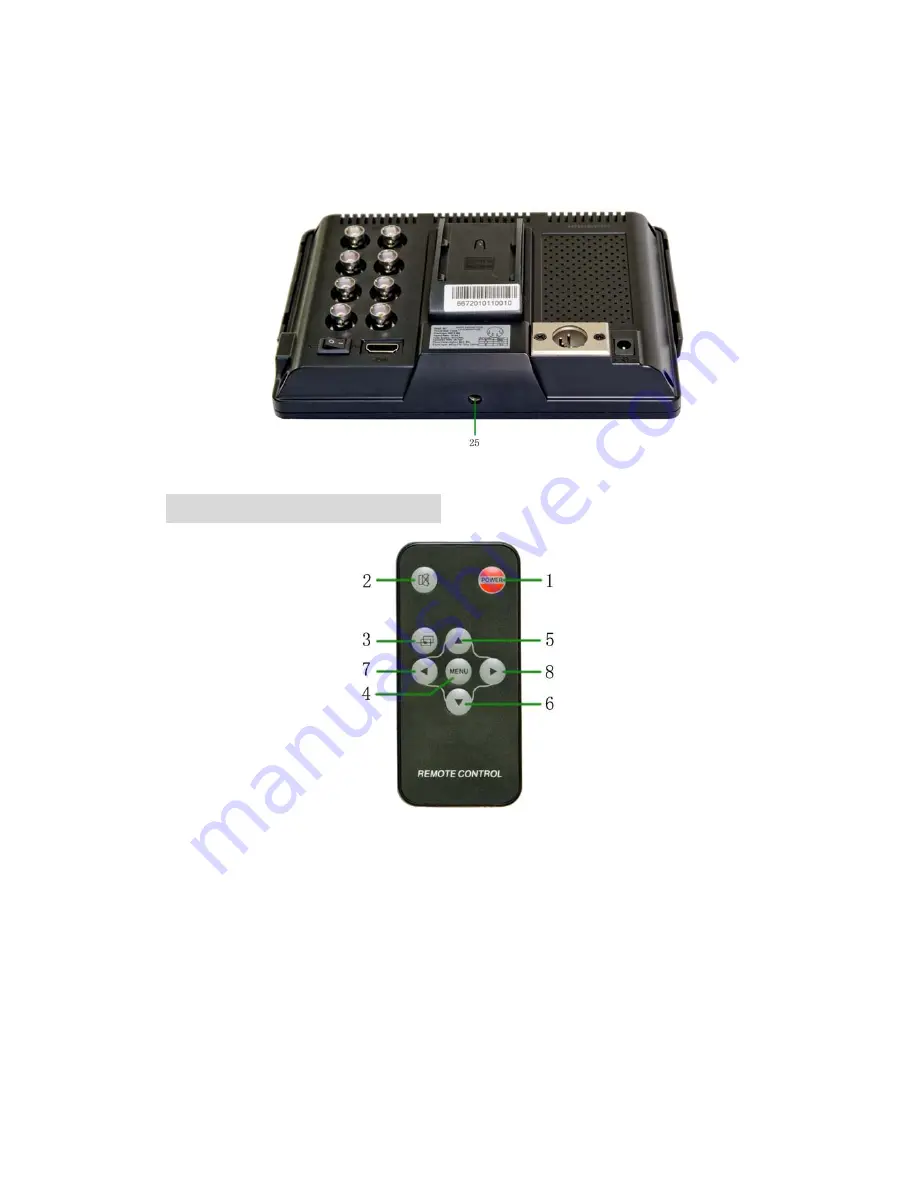
HDMI (High Definition Multimedia Interface) signal input 

              22

4-pin XLR DC power input 

              23

DC power input 

24

Battery slot 


25

Mounting socket (bottom) 

2.

 REMOTE CONTROLLER


1

Power 

2

Mute button 

3

Display switch among HDMI

YPbPr

Video 1, Video 2, and SDI 

(optional, must with necessary equipment) circularly 

4

MENU: enter menu function setting 

5

: Up move; or change brightness among 6 levels   

6

: Down move 

7

: Left move; or volume down; or increase the function values in 

menu settings 

8

: Right move; or volume up; or decrease the function values in 

menu settings 

Summary of Contents for CL7677

Page 1: ...COLOR TFT LCD MONITOR User Manual ...

Page 2: ...manual carefully beforehand CAUTIONS 1 Please use the adapter attached in the accessories 2 Please do NOT expose this product to direct sunlight heat or humid conditions 3 Please keep away from strong light while using this product in order to obtain the clearest and the most colorful pictures 4 Please avoid heavy impact or drop onto the ground 5 Please do NOT use chemical solutions to clean this ...

Page 3: ...Table of Contents 1 PRODUCT DESCRIPTION 2 REMOTE CONTROL 3 POWER SOURCE 4 BATTERY INSTRUCTION 5 SETTING MENU 6 ACCESSORIES 7 PARAMETER 8 TROUBLESHOOTING 9 REMARK ...

Page 4: ...hile using menu setting functions 5 MENU To activate OSD on screen display menu long press to zoom in out pictures automatically when receiving HDMI High Definition Multimedia Interface signals 6 Selection key to select items on OSD menu 7 Selection key to select items on OSD menu Press to adjust brightness among 6 levels 8 A V circularly switch among HDMI YPbPr Video 1 Video 2 and SDI optional 9 ...

Page 5: ... side 12 SDI Serial Digital Interface signal input 13 SDI signal output 14 Y signal input 15 Video 1 signal input 16 Pb signal input 17 Video 2 signal inpu 18 Pr signal input 19 Audio signal input 20 Battery power on off switch ...

Page 6: ...Power 2 Mute button 3 Display switch among HDMI YPbPr Video 1 Video 2 and SDI optional must with necessary equipment circularly 4 MENU enter menu function setting 5 Up move or change brightness among 6 levels 6 Down move 7 Left move or volume down or increase the function values in menu settings 8 Right move or volume up or decrease the function values in menu settings ...

Page 7: ...s capable to use the power from your camcorder via the 4 pin XLR interface See PRODUCT DESCRIPTION 22 4 BATTERY INSTRUCTION 1 Battery slot and battery The included two battery slots available for two types of batteries See the pictures below Picture two types of battery slots Picture two types of batteries corresponding to the upper two slots 2 Battery power control The battery switch controls whe...

Page 8: ...ON 5 or on the remote controller See REMOTE CONTROLLER 4 The menu of function setting will display on the screen Press buttons on the device or buttons on the remote controller to select items on the left of the display Then press buttons on the device or buttons on the remote controller to change the values The following pictures are the setting displays of different modes 1 OSD YPbPr HDMI SDI se...

Page 9: ...D AV setting menu Video 1 Video 2 The auto detected AV format displays at the bottom of the screen Picture AV setting screen 3 Miscellaneous setting menu under YPbPr HDMI SDI modes enter via item to a new page Picture Miscellaneous setting screen ...

Page 10: ...ions User 6500ºK 7500 ºK or 9300 ºK Red Green Blue Note Only can available under User mode to meet the color value you need Language Choose language between English and Chinese Miscellaneous Enter to next page See picture below for miscellaneous selections Exit OSD Select Exit to quit the on screen display menu Picture over turn horizontally Horizontally over turn picture to left or right Picture ...

Page 11: ...the included accessories are Remote controller 1 piece Bottom support bracket 1 piece 4 pin battery slot 1 piece 2 pin battery slot 1 piece Sun shade 1 piece User manual 1 piece 12V 1 2A DC adapter 1 piece Picture Optional accessories The optional accessories on the above picture are hot shoe bracket battery and HDMI cable ...

Page 12: ... saturation and brightness are properly setup 2 Power on but no pictures Check whether the cables of Video HDMI DVI Digital Visual Interface and or SDI optional are correctly connected Please use the standard power adapter coming with the product package Improper power input may cause the device 3 Wrong or abnormal colors Check whether the cables are correctly and properly connected Broken or loos...

Page 13: ...10 It is normal to see some bright lines appear on the screen when turn off the device ...

Reviews: