background image

- 26 -

www.NewLeader.com

(800) 363-1771

306375-AA-E

L5034G4 AGCO

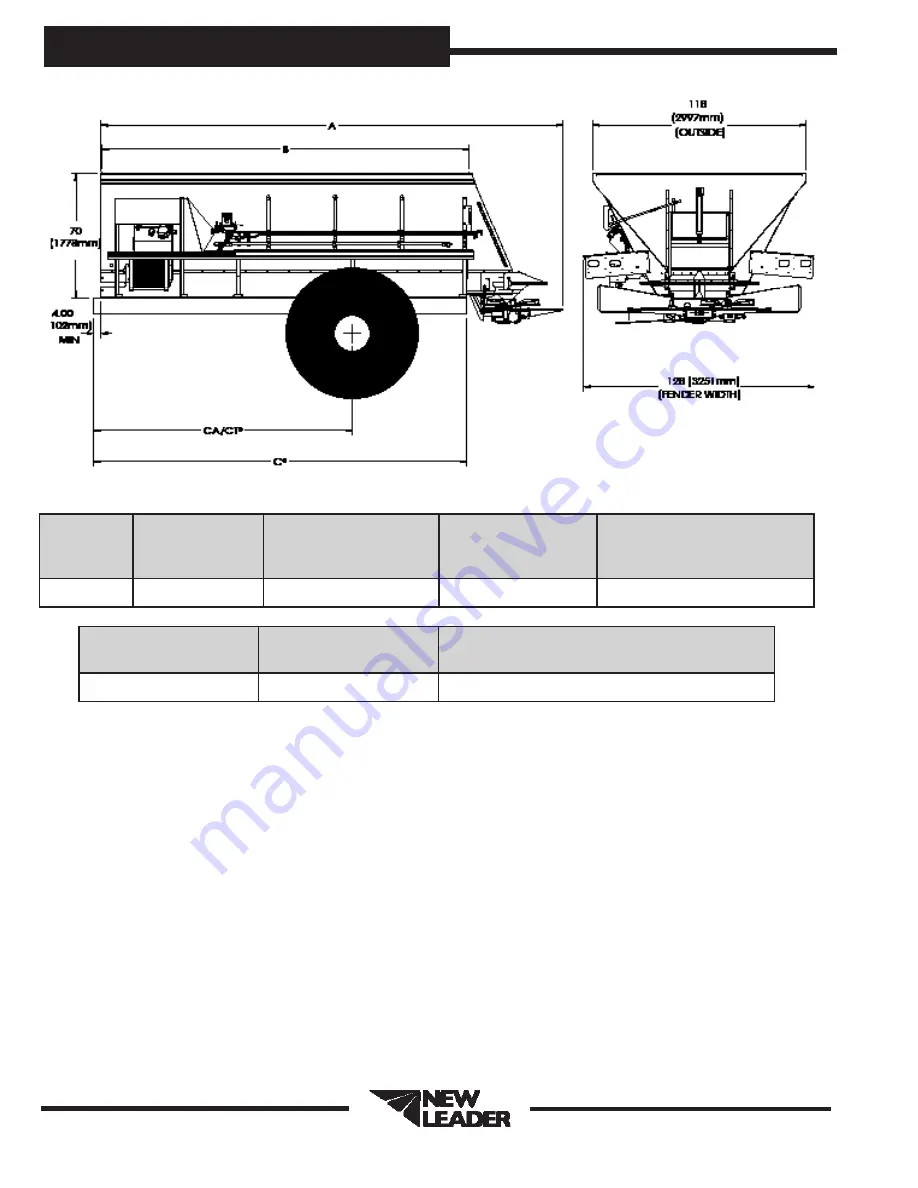
Dimensions & Capacities

Unit 

Length

Overall Lenth

A

Body Length

B

Frame Length

C

Cab to Axle or Cab to 

Tandem

CA/CT

14’

208” (5283mm)

156” (3962mm)

159” (4039mm)

114” (2896mm) CA

Unit Length

Struck Capacity

Cu Ft (Cu M) 

Approximate Weight

Pounds (kilograms)

14’ (4�27 m)

392 (11�1) 

5600 (2540)

Summary of Contents for L5034G4 AGCO

Page 1: ...______________________ MANUAL NUMBER 306375 AA E EFFECTIVE 05 2019 1330 76TH AVE SW CEDAR RAPIDS IA 52404 7052 PHONE 800 363 1771 FAX 319 286 3350 www newleader com Copyright 2019 Highway Equipment Co...

Page 2: ...neral Description 25 Dimensions Capacities 26 Initial Start up 27 Field Testing 28 General Operating Procedures 29 Lubrication Maintenance 30 Preventative Maintenance Pays 30 Hydraulic System 30 Hydra...

Page 3: ...aulic Schematic 37 Standard Torques 40 Spread Pattern 41 Catch Test 41 Spread Pattern 42 Spread Pattern Test Kit 42 Spinners 43 Spreader Preparation 43 Test Procedure 43 Test Results 47 Troubleshootin...

Page 4: ...nd use of these features Hyperlinks Hyperlinks provide direct access to a specific destination when clicked The entire Table of Contents of this manual is hyperlinked to provide quick access to all se...

Page 5: ...5 L5034G4 AGCO www NewLeader com 800 363 1771 306375 AA E This page is intentionally left blank Notes...

Page 6: ...Insert Current New Leader Warranty Warranty...

Page 7: ...uthorized dealer or our Product Sales and Support Department at 1 888 363 8006 It has been our experience that by following these installation instructions and by observing the operation of the spread...

Page 8: ...OUND THROUGHOUT THIS MANUAL IS USED TO CALL YOUR ATTENTION TO INSTRUCTIONS INVOLVING YOUR PERSONAL SAFETY AND THAT OF OTHERS FAILURE TO FOLLOW THESE INSTRUCTIONS CAN RESULT IN INJURY OR DEATH In this...

Page 9: ...spinner fins spinner frame mounting and spinner fin hardware daily Look for missing or loose fasteners wear and cracks Replace immediately if needed Use only new SAE grade 5 or grade 8 screws and sel...

Page 10: ...e inside a building unless adequate ventilation is provided to safely and properly remove exhaust fumes Figure 1 6 Always work in a properly ventilated area Engine exhaust fumes can cause sickness or...

Page 11: ...ng or servicing Keep hands feet hair and clothing away from moving parts Figure 1 9 Figure 1 10 Keep away from spinners while they are turning Rocks scrap metal and other material can be thrown from t...

Page 12: ...E SAFELY Always walk around and visually inspect the machine before using Check immediate vicinity of machine for people and obstructions Ensure adequate visibility Avoid distractions such as reading...

Page 13: ...lights turn indicators parking brake horn and rear view mirrors Repair or replace any component that is not in proper working order Never drive machine at a speed that causes it to bounce or cause lo...

Page 14: ...components while they are moving Never wear loose clothing or jewelry when working near machine tools or moving parts Remove rings and other jewelry to prevent electrical shorts and other personal inj...

Page 15: ...EQUIPMENT Figure 3 5 Use only lifting devices that meet or exceed OSHA standard 1910 184 or ASME B30 20 2013 Never lift equipment over people Never lift a loaded unit Never lift unit with any loose o...

Page 16: ...ystanders Do not heat by welding soldering or using a torch near pressurized fluid lines or other flammable materials Pressure lines can suddenly burst when heat goes beyond the immediate flame area F...

Page 17: ...us injury Tire service procedures must be performed by trained and qualified personnel Figure 3 12 CLEAN MACHINE OF HAZARDOUS CHEMICALS CAUTION During application of hazardous chemicals residue can bu...

Page 18: ...f spreader may cause machine to fall resulting in serious injury or death Never use lifting device to free machine from a chassis storage stands or frozen ground or to lift the chassis in any way Shoc...

Page 19: ...ere to these Remove the Liner A small bend at the corner or edge will cause the liner to separate from the decal Pull the liner away in a continuous motion at a 180 degree angle If the liner is scored...

Page 20: ...p unauthorized people away from machine Keep all guards in place when machine is in use If manual is missing contact dealer for replacement 2 DANGER MOVING PART HAZARD To prevent death or serious inju...

Page 21: ...pressure to the system Wear protective gloves and safety glasses or goggles when searching for leaks Use wood or cardboard instead of hands Do not use hydraulic lines for hand holds or steps Componen...

Page 22: ...before servicing or adjusting Keep bystanders at least 60 feet away 8 WARNING FALLING HAZARD To prevent death or serious injury Do not place objects on fenders Keep off fenders They are not intended...

Page 23: ...read Pattern manual for adjustment instructions A spread pattern test kit is available from your New Leader dealer Wind humidity rain and other adverse weather conditions can affect spread pattern res...

Page 24: ...keep the chain links loose and free running can result in severe damage to the conveyor chain drag shaft gearcase and body structure and is cause for voiding the warranty 3 NOTICE HYDRAULIC RESERVOIR...

Page 25: ...n PTO The 34 wide 864mm conveyor runs the full length of the hopper bottom to deliver material to the spinners through a hydraulically adjustable metering gate at the rear of the hopper body A feedgat...

Page 26: ...nsions Capacities Unit Length Overall Lenth A Body Length B Frame Length C Cab to Axle or Cab to Tandem CA CT 14 208 5283mm 156 3962mm 159 4039mm 114 2896mm CA Unit Length Struck Capacity Cu Ft Cu M A...

Page 27: ...until operating smoothly 9 Run conveyor at 0RPM and spinner at 0RPM Make sure both conveyor and spinner do not move 10 Calibrate spreader as defined in the manual for the controller that is supplied...

Page 28: ...other suitable means Do not stand on fenders in body or on any part of spreader as there is danger of falling off the vehicle or into moving parts Use great care in performing this test Start engine T...

Page 29: ...ting 4 Adjust spinner to give spread pattern desired Calibrate and spread pattern test for any new material 5 Fill applicable bins with material to be spread 6 Engage hydraulics 7 Begin spreading CAUT...

Page 30: ...high pressure oil leaks can be dangerous If skin is pierced with hydraulic fluid at high pressure seek immediate medical attention as fluid injected into the skin could cause gangrene if left untreate...

Page 31: ...tested at twice the recommended working pressure of the hose Test pressure should be held for not more than one minute and not less than 30 seconds When test pressure is reached visually inspect hose...

Page 32: ...Proper chain tension is also a factor in chain and sprocket life This adjustment is made by turning the idler screws on each side of the unit at the front idler bearings See Figure 2 Loosen the idler...

Page 33: ...in the bearing It is very important the grease maintain its proper consistency during operation It must not be fluid and it must not channel Make sure all fittings are thoroughly cleaned before grease...

Page 34: ...atures listed below Single Pinion 1 Pint 50 L Dual Pinion 1 5 Pints 70 L Ambient Temperature Oil Type 40 F 4 44 C SAE 80 E P SAE 90 E P SAE 100 E P 100 F 37 77 C Ambient Temperature Oil Type Figure 4...

Page 35: ...k Daily Change Annually Filter 1 Check daily Change when indicated Red Conveyor Grease Zerks Dragshaft Bearings 2 Grease Gun Weekly Grease Zerks Idler Shaft Bearings 2 Grease Gun Weekly Take Up Screws...

Page 36: ...in 3 Chain Poultry Litter 16 54 256 865 X O O Waste Sludge 40 65 641 1041 X O O Paper Pulp approx 42 673 X O O Compost Cattle Ma nure 36 65 577 1041 X O O Gin Trash 35 50 561 801 NR O X Fly Ash 38 45...

Page 37: ...37 L5034G4 AGCO www NewLeader com 800 363 1771 306375 AA E Troubleshooting Hydraulic Schematic...

Page 38: ...pinner motors Free up If not possible replace as required 7 Jammed or frozen conveyor Free up conveyor 8 Defective radar Check speed on console Repair or replace radar as required 9 Control processor...

Page 39: ...percent PTO or use larger pump Special 15 Defective spinner control valve Replace valve metering spool spring If no improvement replace spinner control valve 16 Cab control is for conveyor only spinn...

Page 40: ...60 DEGREES APART USE GRADE 2 TORQUES FOR STAINLESS STEEL FASTENERS AND CARRIAGE BOLTS TORQUE FOOT POUNDS CAP SCREW SIZE GRADE 2 GRADE 5 GRADE 8 DRY LUBE DRY LUBE DRY LUBE 1 4 5 4 8 6 12 9 5 16 11 8 1...

Page 41: ...th between different VT s Terminologies ISOBUS An electronic communications network used on agricultural and forestry equipment that adheres to the ISO 11783 standards VT Virtual Terminal The electron...

Page 42: ...ary CAN High Current Power Signal Cab to Enclosure VT Battery To ECU Enclosure To ECU Enclosure Terminating Plug Radar Existing CAN BUS Customer supplied Customer supplied Customer supplied Switchbox...

Page 43: ...unt Connections Hydraulic Cooler Fan 30 AMP Ground 60 AMP Ground Conveyor Conveyor Conveyor Control Conveyor Control Speed Conveyor Speed Bin Low Sensor Bin Low Sensor Conveyor Conveyor Control Speed...

Page 44: ...lity Task Control Multi product up to 4 bins Function VT will load New Leader UI and assign functions to in cab switches TC BAS Ability to track totals TC GEO Ability to log as applied maps and load p...

Page 45: ...ew Leader Home Screen also called the Run Screen as shown in Figure 1 A B C D E F G H J K L M N P Q R S T Figure 1 Home Screen A Spreader Operations K Target Rate 1 B Density L Calibration C Speed Sou...

Page 46: ...calibration numbers Press the keypad button to access the on screen numeric entry screen Keypads may look different depending on VT being used Figure 3 Numeric Keypad Navigation Control Buttons Back...

Page 47: ...See Manufacturer s Operations Manual for detailed instructions on these processes Initial Configuration Factory Setup Only seen on first boot or if system is reset reconfigured Power up Display Monito...

Page 48: ...sure Transducer calibration Enter Capacity for Main Bin using keypad Enable or disable bin level sensor as required Press to edit pressure transducer settings If standard transducers are being used pr...

Page 49: ...49 Repeat step 3 for MultiBin Micro 1 as necessary Press to continue Repeat step 3 for MultiBin Micro 2 as necessary Press to continue Controller Operations...

Page 50: ...r self propelled units enter the distance from the center of the rear axle to the center of the spinner disc a NOTE For units and trailers with tandem axles use the center of the tandem for measuremen...

Page 51: ...ble disable bins Enable Disable Bins Each Installed Bin as set up in Step 4 will appear Press each Enable button to enable or disable each bin as appropriate for the current job Valve Calibration Adju...

Page 52: ...valve manufacturer Zero Flow Offset Represents maximum duty cycle sent to control valve without producing any hydraulic flow from Increase this number to hit target rate sooner IMPORTANT Setting Zero...

Page 53: ...nel switches between using Valve Response 1 and Valve Response 2 speed setting Leaving all other valve control settings at default value and making small adjustments to this setting is usually all tha...

Page 54: ...rvice technician or New Leader product support Press to reset reconfigure system Reconfigure allows the user to adjust any of the system settings made during first time start up Machine Configuration...

Page 55: ...Assignment Press to show connected devices Connected devices will appear in the device list If using a New Leader switch box press to automatically map the switches to the correct function Controller...

Page 56: ...and activate VT The Run screen will appear Press to continue Spinner Disc Calibration Press to calibrate spinner discs Use keypad to edit numeric setting as necessary Standard spinner discs set to 4 I...

Page 57: ...t press for the bin to be tested To perform in field calibration press for the bin to be tested WARNING Do not work near rotating spinners Severe injury can result from contact with moving parts Spinn...

Page 58: ...Weigh material dispensed and enter actual weight of material dispensed Press to continue It is recommended a minimum of three 3 tests be done PER PRODUCT to ensure accuracy Once each test is done pre...

Page 59: ...system perceived total of dispensed product To enter actual dispensed amount press Using keypad enter actual weight of product dispensed Press to continue New cubic feet per revolution CFR rate will b...

Page 60: ...splay manual on how to create a job using Task Control When finished activate VT 2 Verify Product Density Material Density will vary from product to product It is imperative that correct density is en...

Page 61: ...different spread widths or spinner speeds Always verify the material profile is configured correctly before applying product Edit current profile or create a new one if necessary See Material Profile...

Page 62: ...correct reading 6 Verify CFR number is correct Different products may require different calibration numbers Verify the CFR number is correct before applying product Press then Use keypad to change CF...

Page 63: ...63 To view unlocked features press Current unlocked features will display Press Unlock to display module serial number and registration number Press to return Controller Operations...

Page 64: ...Hydraulics System pressure Temperature and status of Fluid Level and Filter Restrictions will show system wide Conveyor Pressure will display for Bin 1 and cumulatively for Bins 2 4 as equipped Fluid...

Page 65: ...T The Run screen will appear Press to continue The Tools main screen will appear Press to continue WARNING Do not work near rotating spinners Severe injury can result from contact with moving parts WA...

Page 66: ...Bin 2 Maximum 60 RPM Bins 3 4 Maximum 85 RPM Press to continue 4 Perform bin flush To flush bins press Conveyors will run until is pressed When process completes press to continue WARNING Do not work...

Page 67: ...VT The Run screen will appear Press to continue The Tools main screen will appear Press to continue Bin Cover Control If equipped press A to open and close tarp If MultiBin insert is installed press B...

Page 68: ...auto lube settings 1 Power up Display Monitor and activate VT The Run screen will appear Press to continue The Tools main screen will appear Press to continue 2 Set duration Use keypads to set oil cha...

Page 69: ...meter Press to return to Chain Oiler screen Press to return to Tools Screen 4 Set service reminder Press Service Reminder to set chain oiler reminder Enable Reminder and use keypad to enter interval h...

Page 70: ...ons WSM Spreader Module CAN Power Voltage Low The CAN power voltage is below 8 0 volts Check CAN bus power supply WSM Spreader Module High Power Voltage Low The high power voltage is below 10 0 volts...

Page 71: ...dy condition The spinners will now restart At the end of the Static Conveyor Calibration routine and Conveyor flush routine Boundary Spinner Not Responding Boundary Spinner Not Responding Spinner Name...

Page 72: ...ners Not Responding Spinner Not Responding Spinner Name enabled CLF Mode Basic Independent must be selected At least one product bin must be commanded on Perceived spinner speed is greater than 30 rpm...

Page 73: ...c temperature is below 65 F 18 C Hydraulic fluid too cold to operate machine Hydraulic Fluid Temperature Exceeds Maximum Hydraulic Fluid Temperature Exceeds Maximum Operating Range Hydraulic temperatu...

Page 74: ...ion of this manual for details Refer to Dimensions Capacities in Operations section of this manual for capacities on all applicable bin configurations PressureTransducerSettings Min PSI 0 Max PSI 5000...

Page 75: ...e Threshold 4 0 4 0 4 0 4 0 Allowable Error 1 1 1 1 Sensor Settings Encoder pulses 180 or 360 verify by looking on encoder Spinner pulses 4 Alarms Alarm Settings Alarm Variable Bin Main PSI Insert PSI...

Page 76: ...76 Notes This Page Intentionally Left Blank...

Page 77: ...Measure the depth of material on the end of the conveyor to verify the constant number feedgate height information entered into the controller Adjust feedgate height or recalibrate feedgate as necessa...

Page 78: ...NOTE If desired a material calibration kit is available to aid in measuring product quality Contact your local dealer for details WARNING Use great caution while working around the spreader Contact wi...

Page 79: ...he spreader to be tested must be in good mechanical condition and properly adjusted Refer to operator s manual for details All damaged and worn parts must be replaced Spinner discs and fins must be fr...

Page 80: ...round Speed mph Rate lbs Feedgate in Spinner Frame Setting Spinner RPM Lime 90 11 1000 5000 6 5 600 2000 8000 12 5 600 Urea 46 18 110 2 5 4 800 225 2 5 3 5 800 450 2 5 2 5 800 Corn Blend 53 18 125 2 5...

Page 81: ...nd is present testing must be done with spreader traveling parallel within 15 degrees to the wind direction Do not allow loaded spreader to sit for more than one hour prior to testing At this stage of...

Page 82: ...8m 100 100 75 75 20 30 40 50 60 70 80 90 100 110 20 30 40 50 60 70 80 90 100 110 0 120 120 60 60 Figure 2 Four Wheeled Vehicles Three Wheeled Vehicles For three wheeled application vehicles straddling...

Page 83: ...the data sheet under the corresponding tray position and graph the spread pattern profile See Figure 4 313964 A Temperature F lbs acre Spinner Speed RPM Controller Vehicle Speed MPH Controller Swath...

Page 84: ...e the spinner rearward away from conveyor Light Outside Vehicle s Tire Tracks RATE ACRE 1 Check spinner fins for material buildup rust or paint 2 Increase spinner RPM 3 Move spinner fins to 2 3 2 3 po...

Page 85: ...average amount at the center of the pattern In the example shown in Figure 8 these points are located 45 to the left of center and 45 to the right of center The distance between these two points 90 re...

Page 86: ...he center of the trays down the AB line 5 Drive through the row of trays and switch back once again driving past the trays on the opposite side at an equal distance from the AB line as the first pass...

Reviews: