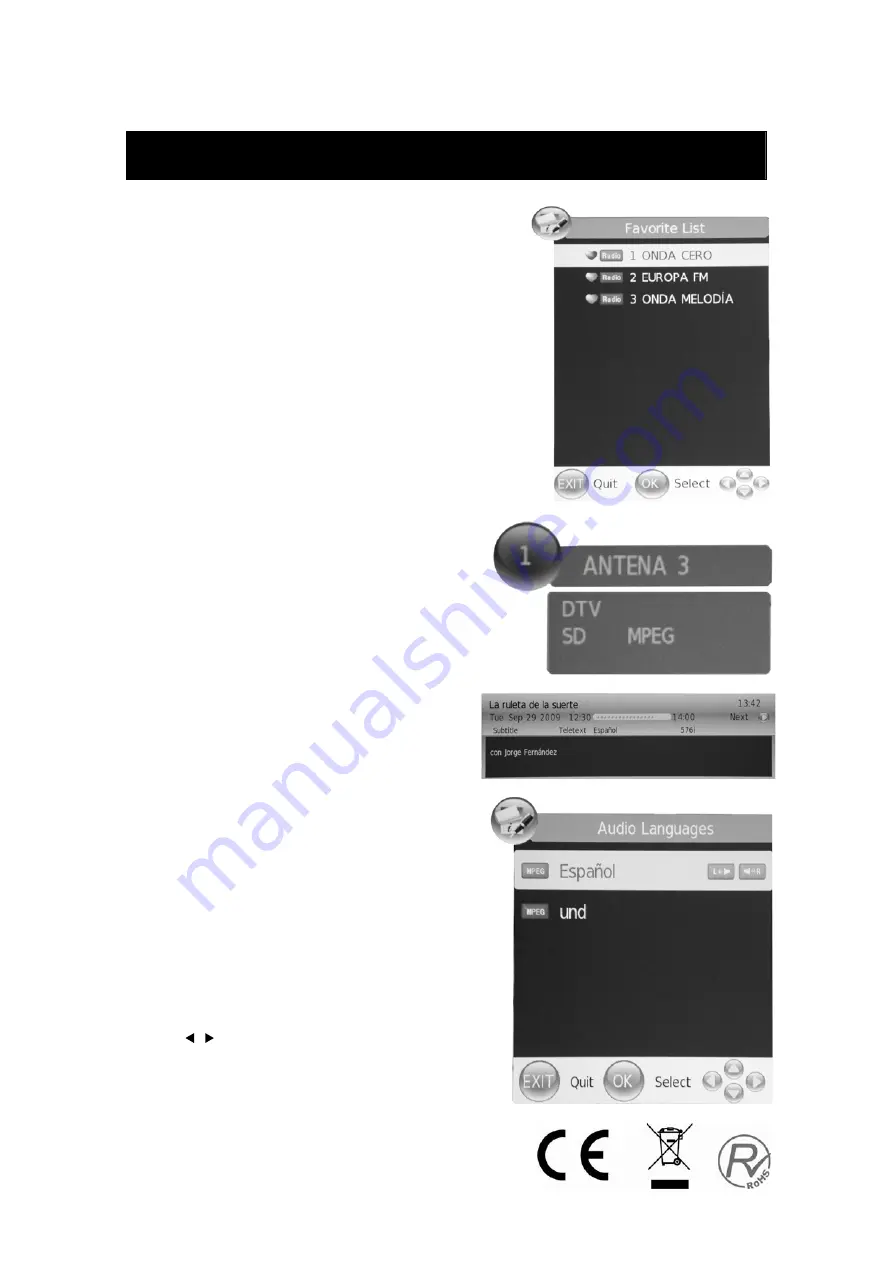
Nevir NVR-7062 TTGHD-19 Instruction Manual Download Page 43


2-15


DTV Features 

Favourite List 

When the source is selected as DTV, users can enter 

FAVOURITE LIST by pressing “FAV” button. The 
“Favourite LIST” window is illustrated as follows

:

Program Information 

When the source is selected as DTV, you can 

press “INFO” button to display the channel’s 
information. The PROGRAM INFORMATION 
window is illustrated as follows: 

Audio

When the source is selected as DTV, users can 

enter “Audio channel” by pressing “AUDIO” button. 
The  “channel  audio”  window  is  illustrated  as 
follows: 
Press  “ / ”  button  to  select  the  “Sound  Mode” 
such as “L&R”, “R&R”, “L&L”. 

Remarks:

 In order have this function of channel list,

you must previously select the channels.  
Choose Menu-channels-choose-edit channel-select the

channel and press memorize favourite list    

Summary of Contents for NVR-7062 TTGHD-19

Page 1: ...TV LCD con TDT Alta Definici n CI y USB Grabador NVR 7062 TTGHD 19 MANUAL DE INSTRUCCIONES INSTRUCTION MANUAL...

Page 2: ...n Descripci n de la unidad principal Mando a distancia Ajustes b sicos de OSD Caracter sticas de DTV Caracter sticas de USB Operaci n de PVR Modalidad Hotel Especificaciones Resoluci n de problemas C...

Page 3: ...o suficiente entre el receptor y la pared para que haya ventilaci n Evite situarlo en lugares con temperaturas excesivamente altas para evitar posibles da os del aparato o fallos prematuros Esta telev...

Page 4: ...usuario de la presencia de operaciones importantes e instrucciones de mantenimiento en la documentaci n que acompa a al equipo PRECAUCI N PARA EVITAR EL RIESGO DE DESCARGAS EL CTRICAS NO RETIRE LA CUB...

Page 5: ...uipo No derrame ning n tipo de l quido sobre el receptor de televisi n Precauci n Evite exponer la unidad a los rayos directos del sol u otras fuentes de calor No coloque directamente el televisor sob...

Page 6: ...producir heridas graves a la persona y da os al televisor Precauci n Es aconsejable desconectar el cable de alimentaci n CA del aparato de la salida CA cuando no vaya a utilizarse durante un per odo l...

Page 7: ...de v deo 7 Terminal de entrada de AUDIO 8 9 Terminal de salida de AURICULARES 10 TerminaldeentradaCI EstaunidadnoincluyetarjetaCAMniSMARTCARD Configuraci n de la entrada de alimentaci n CA ENCENDIDO V...

Page 8: ...al men principal EXIT SALIR Para salir de menu ENTER ACEPTAR Para aceptar la opci n seleccionada o realizar la operaci n seleccionada 0 9 Para seleccionar y cambiar un canal utilizando 0 9 Muestra po...

Page 9: ...or S lo para modelos con las funciones MEDIOS o DTV SUBPAGE SUBP GINA Lleva a cabo la funci n de SUBCODE SUBC DIGO en el texto dentro de la modalidad de visualizaci n de texto S lo para la regi n euro...

Page 10: ...continuaci n pulse los botones para seleccionar el men PICTURE IMAGEN Acceda al men PICTURE IMAGEN pulsando el bot n o el ENTER 2 Pulse los botones para seleccionar Picture Mode Modalidad de imagen y...

Page 11: ...MENU para entrar en el men de OSD A continuaci n pulse los botones para seleccionar el men SOUND SONIDO Acceda al men SOUND SONIDO pulsando el bot n o el ENTER 2 Pulse los botones para seleccionar So...

Page 12: ...nes para seleccionar la funci n On o Off 7 Pulse los botones para seleccionar Time Zone Zona de horaria y pulse los botones para seleccionar la zona de tiempo local y se ajusta la hora autom ticamente...

Page 13: ...seleccionar Lock Channel Bloquear canal y pulse los botones para seleccionar On o Off El ajustar On inicia el Bloqueo del Programa 3 Pulse los botones para seleccionar Change Password Cambiar contras...

Page 14: ...lataforma Tenga paciencia por favor 3 Pulse los botones para seleccionar DTV Manual Scan Escanear manual de DTV y pulse el bot n o el ENTER para empezar la b squeda manual de DTV Pulse el bot n MENU p...

Page 15: ...Pulse los botones para seleccionar el elemento que usted desea cambiar y pulse los botones para seleccionar otros elementos Pusel el bot n MENU para confirmar PC Cuando la fuente de se al es PC 1 Puls...

Page 16: ...para seleccionar DTV Manual Scan Escanear manual de DTV y pulse el bot n o el ENTER para empezar la b squeda manual de DTV Pulse el bot n MENU para volver al men anterior Pulse el bot n EXIT para sal...

Page 17: ...canal Esta es la imagen de la ventana de Informaci n del programa Audio Cuando la fuente seleccionada es DTV puede acceder a Canal audio pulsando el bot n AUDIO Esta es la imagen de la ventana de Can...

Page 18: ...haya seleccionado un programa puede pulsar el bot n INFO para visualizar los detalles del programa Pulse el bot n RED Rojo para seleccionar el D a Anterior y pulse los botones para cambiar el d a Puls...

Page 19: ...diente de la fila de Memoria y luego pulse el bot n ENTER para reproducirlo 4 Pulse los botones para reproducir la opci n de MOVIE Pel cula y pulse el bot n ENTER para confirmar Usted debe pulsar los...

Page 20: ...utilizar un suministro de alimentaci n independiente para el disco duro externo Mobile HD y no debe utilizar la entrada de USB y la toma de TARJETA a la vez Tiene la opci n de conectar el disco duro e...

Page 21: ...sando el bot n o el ENTER 2 Pulse los botones para seleccionar PVR y pulse el bot n o el ENTER para entrar y pulsar STOP para detener la grabaci n a Pulse los botones para seleccionar Record Start Ini...

Page 22: ...eccionar disco y pulse el bot n o el ENTER para elegir el disco Pulse los botones para seleccionar Check PVR File System Examinar el sistema de fila de PVR y pulse el bot n o el ENTER para examinar el...

Page 23: ...pago y aparecer M DULO CI INSERTADO espere unos segundo y aparecer Scrambled Programm Canal descodificado vuelva a esperar unos segundo hasta que se instale el canal de pago de forma autom tica Para e...

Page 24: ...y pulse los botones para seleccionar la fuente que usted desea d Pulse los botones para seleccionar Channel Number N mero del canal y pulse los botones para seleccionar el canal que usted desea e Pul...

Page 25: ...4 8 6 7 x 4 2 0 1 A G X 0 6 7 7 4 8 6 7 x 0 6 3 1 A G X W ENTRADA HDMI Modelo Resoluci n Frequencia horizontal KHz Frequencia vertical HZ VGA 640 x 480 31 47 59 94 480i 720 x480i 15 73 59 94 60 576i...

Page 26: ...Compruebe el cable entre la televisi n y la antena dispositivo AV externo Pruebe otro canal La emisora podr a tener problemas de retransmisi n Ajuste el brillo contraste en el men de V deo Compruebe...

Page 27: ...Servicio postventa Si ocurriera cualquier problema o anomal a cuando est utilizando este televisor LCD p ngase en contacto con la tienda donde lo adquiri o con el agente de servicio t cnico...

Page 28: ...TV LCD con TDT Alta Definici n CI y USB Grabador NVR 7062 TTGHD 19 MANUAL DE INSTRUCCIONES INSTRUCTION MANUAL...

Page 29: ...tents Introduction Warning Caution Main Unit Description Remote Control OSD basic adjustment DTV Features USB Features PVR Operation Hotel Mode Specifications Trouble Shooting Common Interface operati...

Page 30: ...le viewing Allow enough space between the receiver and the wall to permit ventilation Avoid excessively warm locations to prevent possible damage to the cabinet or premature component failure This TV...

Page 31: ...personnel This symbol is intended to alert the user to the presence of important operation and maintenance instructions in the literature accompanying the equipment CAUTION TO AVOID THE RISK OF ELECT...

Page 32: ...vision cabinet slots or openings Never spill any kind of liquid on the television receiver Caution Avoid exposing the main unit to direct sunlight and other sources of heat Do not stand the television...

Page 33: ...an individual and damage to the television may result if it should fall Caution When the product is not used for an extended period of time it is advisable to disconnect the AC power cord from the AC...

Page 34: ...al 7 AUDIO input terminal 8 ATV antenna close circuit TV network port or DTV antenna port 9 HEADPHONE output terminal 10 CI input terminal This unit does not include CAM nor SMARTCARD Power Input Conf...

Page 35: ...e OSD On screen display ENTER Enter the selected option or perform the selected operation 0 9 Select and switch to a channel using 0 9 Display the Channel List menu Switch back and front between the c...

Page 36: ...mation Used for European region only Skip to previous chapter Used for models with MEDIA DTV function only SUBPAGE Carry out the function of SUBCODE in the text while enter the text display mode Used...

Page 37: ...u by pressing button or ENTER button 2 Press button to select Picture Mode and press the button to select the picture mode 3 Press button to select Contrast and press the button to enter contrast adju...

Page 38: ...ressing button or ENTER button 2 Press button to select Sound Mode and press the button to select the sound mode 3 Press button to select Treble and press the button to adjust 4 Press button to select...

Page 39: ...button to select the OSD language which you desire 3 Press button to select Audio Language and press the button or ENTER button to set the Audio Language This function is only used for DTV source 4 P...

Page 40: ...5 Press button to select Parental Guidance and press the button to select Parental Guidance 6 Press button to select Hotel Mode and press the button or ENTER button to enter to Hotel Mode ATV CHANNEL...

Page 41: ...Then press the button to select the channel with which you want to move Press YELLOW button again to confirm d SKIP Press button to select the channel which you want to skip and press the BLUE button...

Page 42: ...Press MENU button to return the previous menu Press EXIT button to exit Note Searching for platform will take a long time please be patient 3 Press button to select DTV Manual Scan and press the butto...

Page 43: ...channel s information The PROGRAM INFORMATION window is illustrated as follows Audio When the source is selected as DTV users can enter Audio channel by pressing AUDIO button The channel audio window...

Page 44: ...rogram you can press INFO button to display the program s detail Press RED button to select the Prev Day and press the button to change the day Press GREEN button to select the Next Day and press the...

Page 45: ...ay the corresponding document and then press ENTER button to play 4 Press the button to play the MOVIE option and prsee ENTER button to confirm You should prsee the button to enter the file of Memory...

Page 46: ...e Mobile HD works well you should use other power supply for the Mobile HD And do not use the USB jack in the same time It supports Mobile HD by connecting with USB jack must more than 2 GB The partit...

Page 47: ...EL menu Enter the CHANNEL menu by pressing button or ENTER button 2 Press button to select PVR and press the button or ENTER button to enter a Press button to select Record Start and press the button...

Page 48: ...at disk Remark When playing the recording please note that the solution used in this unit would automatically play aspect 4 3 however the customer is free to change to 16 9 widescreen aspect manually...

Page 49: ...ess button to select Crypto Works and press the ENTER button to enter Crypto Works menu 2 Language a Press button to select Language and press the ENTER button to enter the Lnaguage menu Press the but...

Page 50: ...utton to enter the CI Module 4 Information message a Press button to select Information message and press the ENTER button to enter the Information message Note The pic is provided for reference only...

Page 51: ...Press button to select Set Source and press the button to select source which you desire d Press button to select Channel Number and press the button to select channel which you desire e Press button...

Page 52: ...4 8 6 7 x 4 2 0 1 A G X 0 6 7 7 4 8 6 7 x 0 6 3 1 A G X W HDMI INPUT Mode Resolution Horizontal Frequency KHz Vertical Frequency HZ VGA 640 x 480 31 47 59 94 480i 720 x480i 15 73 59 94 60 576i 720 x 5...

Page 53: ...able between TV and antenna external AV device Try another channel the station may have broadcast difficulties Adjust the brightness contrast in the Video menu Check that the unit is set to PAL Audio...

Page 54: ...N 55013 2001 A1 2003 A2 2006 EN 60065 2002 A1 2006 A2 2008 EN 55022 2006 A1 2007 EN 61000 3 2 2006 EN 61000 3 3 1995 A1 2001 A2 2005 EN 55020 2007 EN 55024 1998 A1 2001 A2 2003 Descripciones del apara...

Page 55: ...After sale Service In case any problem mostly like a fault occurs while your using LCD TV please contact the store where you purchased this unit or the service agency...

Reviews: