6
www.neutonowners.com
Chapter 3: Operating Your NEUTON Battery-Powered String Trimmer
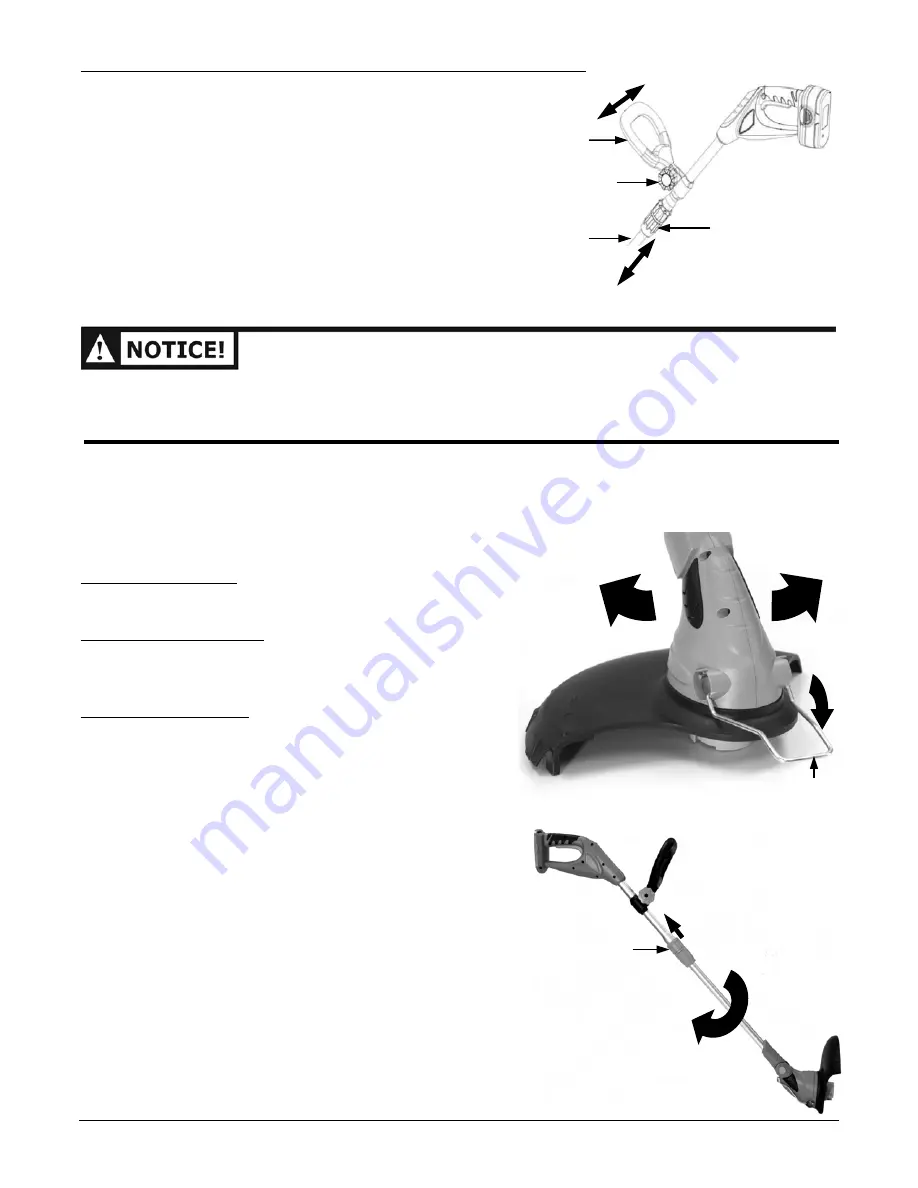
Auxiliary Handle Adjustment
For maximum comfort and control, adjust the Auxiliary Handle (
Figure 5
) to suit
your height. For shorter users, adjust the Handle to a lower position (away from
you) and for taller users, adjust the Handle to an upper position (towards you).
You should adjust the Handle so that your front arm is straight. To adjust the
Auxiliary Handle, simply loosen the Adjustment Knob (counterclockwise),
position the Auxiliary Handle as required and then tighten the Adjustment Knob
(
Figure 5
).
Height Adjustment
You can adjust the overall height of the Trimmer by loosening the Lock
Collar (
Figure 5
). Now you can adjust the Tubes shorter or longer. When you
achieve the desired height, rotate the Lock Collar back to the original
tightened position.
Starting the Trimmer
•
Starting, stopping, and restarting an electric Motor repeatedly within a few seconds can generate a great deal of heat and damage the
Motor. To protect the life of your NEUTON Battery-Powered String Trimmer, always wait at least five (5) seconds after stopping before
restarting the Trimmer.
•
Before you start the Motor, be certain that the Cutting Cord is not in contact with any object.
1. Perform the Daily Checks listed on the back cover of this manual.
2. Push the Lock-Off Button IN (
Figure 4
on page 5) with your thumb and squeeze the Trigger ON/OFF Switch (
Figure 4
on page 5)
with your fingers. Once the Motor starts you can remove your thumb from the Lock-Off Button. If the Trimmer does not start,
make sure the Battery Pack is charged and locked firmly into place in the Trimmer Housing.
3. To stop the Trimmer, simply release the Trigger ON/OFF Switch.
Using the Trimmer
Proper Trimming Stance
Balance your weight on both feet on solid ground keeping your forward arm
with elbow locked in a "straight arm" position.
Basic Trimming Procedure
(
Figure 6
)
Slowly swing the Trimmer from side-to-side.
Tip:
Swing down the Wire Edge Guide to protect fence posts, foundations,
plants, and shrubbery.
Edging with your Trimmer
(
Figure 7
)
To convert the Trimmer for maintenance edging, first turn OFF the tool.
1. While holding the Lower Trimmer Tube with one hand, pull up on the Edger
Adjuster (
Figure 7
) with the other and rotate the Trimmer Head clockwise
(when viewed from the ON/OFF Switch end) until it stops (half turn) and
release the Edger Adjuster. The Trimmer Head is now locked in the Edger
position.
2. To operate as an Edger, position Trimmer above sidewalk as shown (
Figure 7
).
3. To return to the trimming position, turn the tool OFF, pull up on the Edger
Adjuster, and rotate the Trimmer head counterclockwise until it stops and
then release the Edger Adjuster.
Figure 7
Figure 6
Auxiliary
Handle
Adjustment
Knob
Figure 5
Shorter
Taller
Lock Collar
Tube
Edger Adjuster
Wire Edge Guard


