background image

14

3

3.   

Disks

This chapter describes how to add and replace disks in your ReadyDATA desktop storage 
system.

For information about configuring disks on your storage system, see the 

ReadyDATA OS 

Software Manual

, which is available at 

www.netgear.com/readydata

.

This chapter includes the following topics:

Disk Trays

Supported Disks

Previously Formatted Disks

Add a Disk 

Replace a Disk 

Summary of Contents for ReadyDATA 516

Page 1: ...350 East Plumeria Drive San Jose CA 95134 USA May 2013 202 11286 01 ReadyDATA Desktop Storage Systems Hardware Manual Models ReadyDATA 516 ...

Page 2: ...g your product through the NETGEAR website For product updates additional documentation support visit http support netgear com Phone US Canada only 1 888 NETGEAR Phone Other Countries Check the list of phone numbers at http support netgear com general contact default aspx Trademarks NETGEAR the NETGEAR logo and Connect with Innovation are trademarks and or registered trademarks of NETGEAR Inc and ...

Page 3: ... 11 Forced Shutdown 12 Boot Menu 12 Chapter 3 Disks Disk Trays 15 Supported Disks 16 Previously Formatted Disks 16 Disks Containing Foreign Data 16 Disks Containing a ReadyDATA OS Volume 16 Add a Disk 17 Replace a Disk 25 Appendix A Defaults and Technical Specifications Factory Default Settings 32 ReadyDATA 516 Technical Specifications 33 Safety Warnings 34 Electrical Safety Precautions 34 General...

Page 4: ...R ReadyDATA storage system This manual describes the physical features of the ReadyDATA desktop storage systems This chapter contains the following sections Additional Documentation Setup Location Supported Operating Systems Supported Browsers Diskless Storage Systems ...

Page 5: ...on for your storage system that meets these criteria Cables can be connected easily Water or moisture cannot enter the case Airflow around the storage system and through the vents in the side of the case is not restricted The air is as free of dust as possible Temperature operating limits are not likely to be exceeded If you are using an uninterruptible power supply UPS for protection the power ca...

Page 6: ...orage Systems The first time that you start the ReadyDATA storage system you can do so with or without disks installed You can add a 3 5 inch hard disk drive a 2 5 inch hard disk drive or a 2 5 inch solid state drive to an empty drive bay For information about how to install a disk see Add a Disk on page 17 If you are adding a previously formatted disk to your storage system see the notices in Pre...

Page 7: ...DATA 516 This chapter provides an overview of the physical features of the ReadyDATA 516 and includes the following sections Front and Side Panels Drive Bays Rear Panel Status Information Power On and Shut Down Boot Menu ...

Page 8: ... 5 Figure 1 ReadyDATA 516 front and side panels 1 Status display screen 2 Infrared remote receiver 3 Drive bay door 4 Touchpad and backlight 5 OK button Note The touchpad and OK button are used to select boot menu options Once the storage system has booted the touchpad and OK button are disabled For more information about boot mode see Boot Menu on page 12 ...

Page 9: ...e Bays The following figure shows the drive bays of ReadyDATA 516 1 3 4 5 8 6 2 7 Figure 2 ReadyDATA 516 drive bays 1 Drive bay door 2 Disk tray release latch 3 Recessed disk tray handle lock 4 USB 2 0 port 5 Disk tray handle 6 Power button 7 Disk LED 8 Drive bays ...

Page 10: ...6 3 4 5 6 1 2 7 8 9 10 Figure 3 ReadyDATA 516 rear panel Note The E SATA ports are disabled Capacity expansion beyond six drive bays is not supported 1 Exhaust fan 2 Power cable socket 3 Power switch 4 Kensington lock 5 E SATA ports 6 LAN ports with LED status indicators 7 HDMI port 8 E SATA port 9 USB 3 0 ports 10 Reset button ...

Page 11: ...peed no activity Green off blinking amber 10 Mbps or 100 Mbps connection speed activity Green off amber off No connection Status display screen Displays messages about the status of your storage system The status display screen goes to sleep to prevent burn in If the storage system reports an abnormal operation or error the status display screen stays on Power On and Shut Down This section describ...

Page 12: ...sing the Power button Factory default Initiates a short disk test that takes approximately 2 minutes After the disk test a 10 minute time out period begins WARNING The factory default reboot process resets the storage system to factory settings erases all data and resets all defaults If you want to cancel the factory default process power off the storage system before the 10 minute time out ends T...

Page 13: ...r storage system For more information see Preferred Shutdown on page 11 2 Using a straightened paper clip press and hold the Reset button 3 Press the Power button on the front panel of the system The system powers on 4 Continue to press the Reset button until the status display screen shows a boot menu message The touchpad and OK button are enabled in boot mode 5 Use the arrows on the touchpad to ...

Page 14: ...top storage system For information about configuring disks on your storage system see the ReadyDATA OS Software Manual which is available at www netgear com readydata This chapter includes the following topics Disk Trays Supported Disks Previously Formatted Disks Add a Disk Replace a Disk ...
Page 15: ... 2 3 4 1 5 Figure 4 Disk tray 1 Disk tray 2 Disk tray release latch 3 Recessed disk tray handle lock 4 Disk tray handle 5 Disk screw holes 6 Mounting bracket 7 Mounting bracket lock IMPORTANT To maintain adequate airflow make sure that all disk trays remain in the drive bays even if no disk is installed in the tray ...

Page 16: ...a NETGEAR signature your ReadyDATA system can use disks that were previously formatted for an operating system other than ReadyDATA OS for example Windows or RAIDiator These disks are made available as unallocated disks If you attempt to use these disks for another volume you are not warned of possible data loss For more information about adding a disk see Add a Disk on page 17 Disks Containing a ...

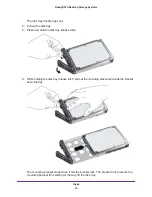
Page 17: ... system before adding a disk If you want to add a previously formatted disk to your storage system see the notices in Previously Formatted Disks on page 16 To add a 3 5 inch hard disk drive HDD 1 If necessary slide the recessed disk tray handle lock to the unlocked position 2 Press the disk tray release latch The disk tray handle pops out 3 Pull out the disk tray 4 Separate the mounting bracket fr...

Page 18: ...d slightly past the disk tray Mounting bracket Make sure that the ends of the mounting bracket are even with each other c Slide the mounting bracket down the disk tray keeping both sides of the bracket even with each other Mounting bracket lock The mounting bracket stops when it hits the bracket lock The bracket lock prevents the mounting bracket from sliding all the way off the disk tray ...

Page 19: ...ttach the new HDD to the mounting bracket Make sure that the HDD mounting holes are aligned with the bracket s mounting posts and that the HDD connectors face the interior of the disk tray 6 Push the mounting bracket and HDD back into the disk tray ...

Page 20: ... into the drive bay of the storage system Make sure that the disk tray release latch is on the left side of the system 8 Press down on the disk tray handle until it latches closed The disk tray is secured in the drive bay The disk becomes available for use You use ReadyDATA Dashboard to manually configure the new disk For more information about using ReadyDATA Dashboard to configure your disks see...

Page 21: ...nch solid state drive SSD 1 If necessary slide the recessed disk tray handle lock to the unlocked position 2 Press the disk tray release latch The disk tray handle pops out 3 Pull out the disk tray 4 Remove the mounting bracket from the disk tray a Press and hold the disk tray release latch ...

Page 22: ...d slightly past the disk tray Mounting bracket Make sure that the ends of the mounting bracket are even with each other c Slide the mounting bracket down the disk tray keeping both sides of the bracket even with each other Mounting bracket lock The mounting bracket stops when it hits the bracket lock The bracket lock prevents the mounting bracket from sliding all the way off the disk tray ...

Page 23: ...ased from the bracket lock e Slide the mounting bracket out of the disk tray The mounting bracket is not used to secure 2 5 inch HDDs or SSDs 5 Place the new 2 5 inch HDD or SSD in the disk tray 6 Secure the HDD or SSD to the disk tray using the screws that came with your storage system Make sure that the HDD or SSD connectors face the interior of the disk tray ...

Page 24: ...the drive bay 7 Insert the disk tray back into the drive bay of the storage system Make sure that the disk tray release latch is on the left side of the system 8 Press down on the disk tray handle until it latches closed The disk tray is secured in the drive bay The disk becomes available for use You use ReadyDATA Dashboard to manually configure the new disk For more information about using ReadyD...

Page 25: ... disk For information about RAID configurations setting up email alerts and using Dashboard see the ReadyDATA OS Software Manual which is available at www netgear com readydata ReadyDATA supports hot swap drive bays so you do not need to power down your storage system when replacing a disk If you are replacing a disk with a previously formatted disk see the notices in Previously Formatted Disks on...

Page 26: ... Press and hold the disk tray release latch 5 While holding the disk tray release latch pull out the mounting bracket and slide the bracket down the tray The mounting bracket stops when it hits the bracket lock The bracket lock prevents the mounting bracket from sliding all the way off the disk tray ...

Page 27: ...Disks 27 ReadyDATA Desktop Storage Systems 6 Remove the old HDD from the mounting bracket 7 Attach the new HDD to the mounting bracket ...

Page 28: ...ress down on the disk tray handle until it latches closed The disk tray is secured in the drive bay If the volume that contained the failed disk uses a protected RAID configuration the system automatically resynchronizes the volume using the new disk Resynchronization might take several hours depending on the disk size You can continue to use your storage system although access is slower until the...

Page 29: ...D or SSD a Remove the screws and the old 2 5 inch HDD or SSD b Place the new 2 5 inch HDD or SSD in the disk tray c Secure the HDD or SSD to the disk tray using the screws Make sure that the disk connectors face the interior of the disk tray Make sure that the HDD or SSD is installed on the correct side of the disk tray ...

Page 30: ...e of the system 5 Press down on the disk tray handle until it latches closed The disk tray is secured in the drive bay If the volume that contained the failed disk uses a protected RAID configuration the system automatically resynchronizes the volume using the new disk Resynchronization might take several hours depending on the disk size You can continue to use your storage system although access ...

Page 31: ...31 A A Defaults and Technical Specifications This appendix includes the following sections Factory Default Settings ReadyDATA 516 Technical Specifications Safety Warnings ...

Page 32: ...n IP address the ReadyDATA defaults to the IP address https 169 254 x x where the last two octets are randomly generated based on the system s MAC address Admin user name case sensitive admin Admin login password case sensitive password Management System configuration ReadyDATA Dashboard web based configuration and status monitoring Discovery utility RAIDar for Windows Mac and Linux LAN connection...

Page 33: ...ns h x w x d 259 x 192 x 287 5 mm 10 20 x 7 56 x 11 32 in Physical weight 7 97 kg 17 57 lb without disks Power consumption BTU at full power supply utilization 189 30 W In operation 87 69 W Power off Wake On LAN 956 12 mW Power off 370 09 mW Electrical Internal 200 W server rated AC power supply Input 100 240V AC 50 60 Hz Environmental requirements Operating temperature 0 to 40 C 32 to 104 F Opera...

Page 34: ...f an electrical accident occurs you can then quickly remove power from the system Do not work alone when working with high voltage components Always disconnect power from the system when removing or installing main system components such as the main board or memory modules When disconnecting power first power down the system with the operating system and then unplug the power cords of all the powe...

Page 35: ...s generated by two objects with different electrical charges coming into contact with each other An electrical discharge is created to neutralize this difference which can damage electronic components and printed circuit boards The following measures are generally sufficient to neutralize this difference before contact is made to protect your equipment from ESD Use a grounded wrist strap designed ...

Page 36: ... EU directives EMC Directive 2004 108 EC Low Voltage Directive 2006 95 EC If this product has telecommunications functionality it also complies with the requirements of the following EU Directive R TTE Directive 1999 5 EC Compliance with these directives implies conformity to harmonized European standards that are noted in the EU Declaration of Conformity FCC Requirements for Operation in the Unit...

Page 37: ... and can radiate radio frequency energy and if not installed and used in accordance with the instructions may cause harmful interference to radio communications However there is no guarantee that interference will not occur in a particular installation If this equipment does cause harmful interference to radio or television reception which can be determined by turning the equipment off and on the ...

Reviews: