Congratulations- You are now connected and ready to use the internet!
Before you Start
•
You will need your username and password from your ISP.
•
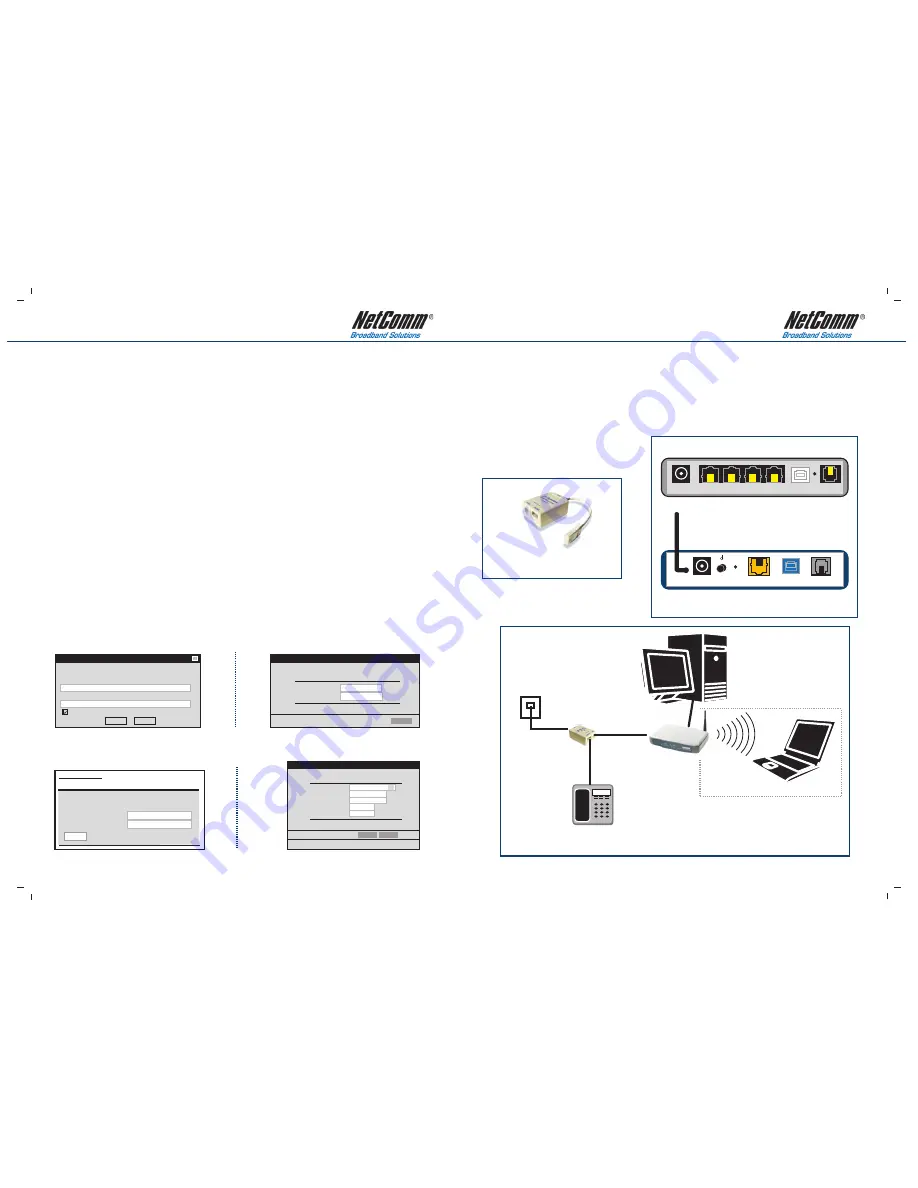
All devices on your phone line will need to have an ADSL Line Filter (See Figure 1) attached to them.
This includes Telephones, Fax Machines, Dial-up modems etc. Plug these devices into the PHONE
socket of the ADSL Line Filter (See Figure 1). Then plug the ADSL filter into the jackpoint.
Installing your Modem
Note: The following instructions relate to creating an Ethernet broadband connection i.e. installing
your modem using an Ethernet cable. Older computers may not support an Ethernet connection.
Refer to the setup guide on the Installation CD for alternative method (USB) and for setup of Apple
MAC computers.
Step 1:
Turn off your computer.
Step 2:
Plug one end of the Ethernet cable into Ethernet socketon the back of the (See Figure 2).
The other end of the cable is plugged into the Ethernet socket on the back of your computer.
Step 3:
Plug one end of Phone Cable 1 into the socket marked (Line) on the back of the modem
(See Figure 2). The other end of the cable is plugged in to the socket marked (Line) on the
ADSL Line Filter.
Step 4:
Plug the line filter into the wall jackpoint (See Figure 3).
Step 5:
Plug the power adaptor into the “Power” socket on the back of the modem (See Figure 2).
Plug the other end of the power adaptor into the wall socket.
Step 6:
Turn on the power on at the wall socket. If your modem has a power switch at the rear, please
turn it on now (See Figure 2).
Step 7:
Turn on your computer.
Step 8:
Open your internet browser (eg Internet Explorer) and enter the address
http://192.168.1.1
Enter admin for both User Name and Password to log in to modem configuration.
Step 9:
You should see the screen as shown:
Log In
admin
******
Modem Username:
Modem Password:
Log In
Please Log In to continue
Cancel
PPPoA VC-Mux
[email protected]
Protocol:
ISP Username:
Quick Settings
EasyConfig
********
0
100
ISP Password:
VPI:
VCI:
Connection Status:
Apply
Advanced Settings
^
Wireless Security (NB5PLUS4W and NB6W only)
By default wireless is activated on your modem and a minimum security level has been enabled to help
prevent unauthorized wireless access.
•
The default wireless security is enabled.
•
The default wireless SSID (network name) is “wireless”.
•
The default WEP key is: a1b2c3d4e5.
Connect to Internet
Your DSL router is
ready to connect
to ADSL.
Enter your ADSL user name and password, then click “Connect”
Internet Connection: pppoa_0_100
Total Online Time: 23 sec
ADSL User Name
Password
******
Connect
Cancel
admin
User Name:
Enter username and password for “NetComm NB6W Wireless ADSL2+ Router” at
http://192.168.1.1
Authentication Required
*****
Password:
Use Password Manager to remember this password
OK
?
x
Step 10:
Enter your ISP provided username and password as shown. Then click Connect or Apply.
Depending on your model you should now see the time connected next to “Online Time” or a green
light.”
If your Model is NB6W
If your Model isNB5PLUS4 or NB5PLUS4W
Figure 2: View of the back of the modem
Figure 3: FINAL SETUP DIGRAM
Figure 1: ADSL Line Filter
Computer
Ethernet
cable
Home Telephone or Fax
ADSL Line Filter
Phone
Cable
Jack Point
Phone Cable1
Modem/Router
Laptop
NB5PLUS4 and NB5PLUS4W
NB6W
NB5PLUS4W and NB6W only
Power
Ethernet
USB
Line
Power
Ethernet
USB
Line


