

DS4486 Disk Shelf Installation and Setup
Copyright © 2013 NetApp, Inc. All rights reserved.
210-06227+A0
3
Note:
A valid
disk shelf ID is
0-98.
Note:
To address failed cables, replace SAS copper for SAS
optical cables, or correct cabling on a storage system that is
up and serving data, see the
DS4243, DS2246, DS4486,
and DS4246 Disk Shelf Installation and Service Guide.
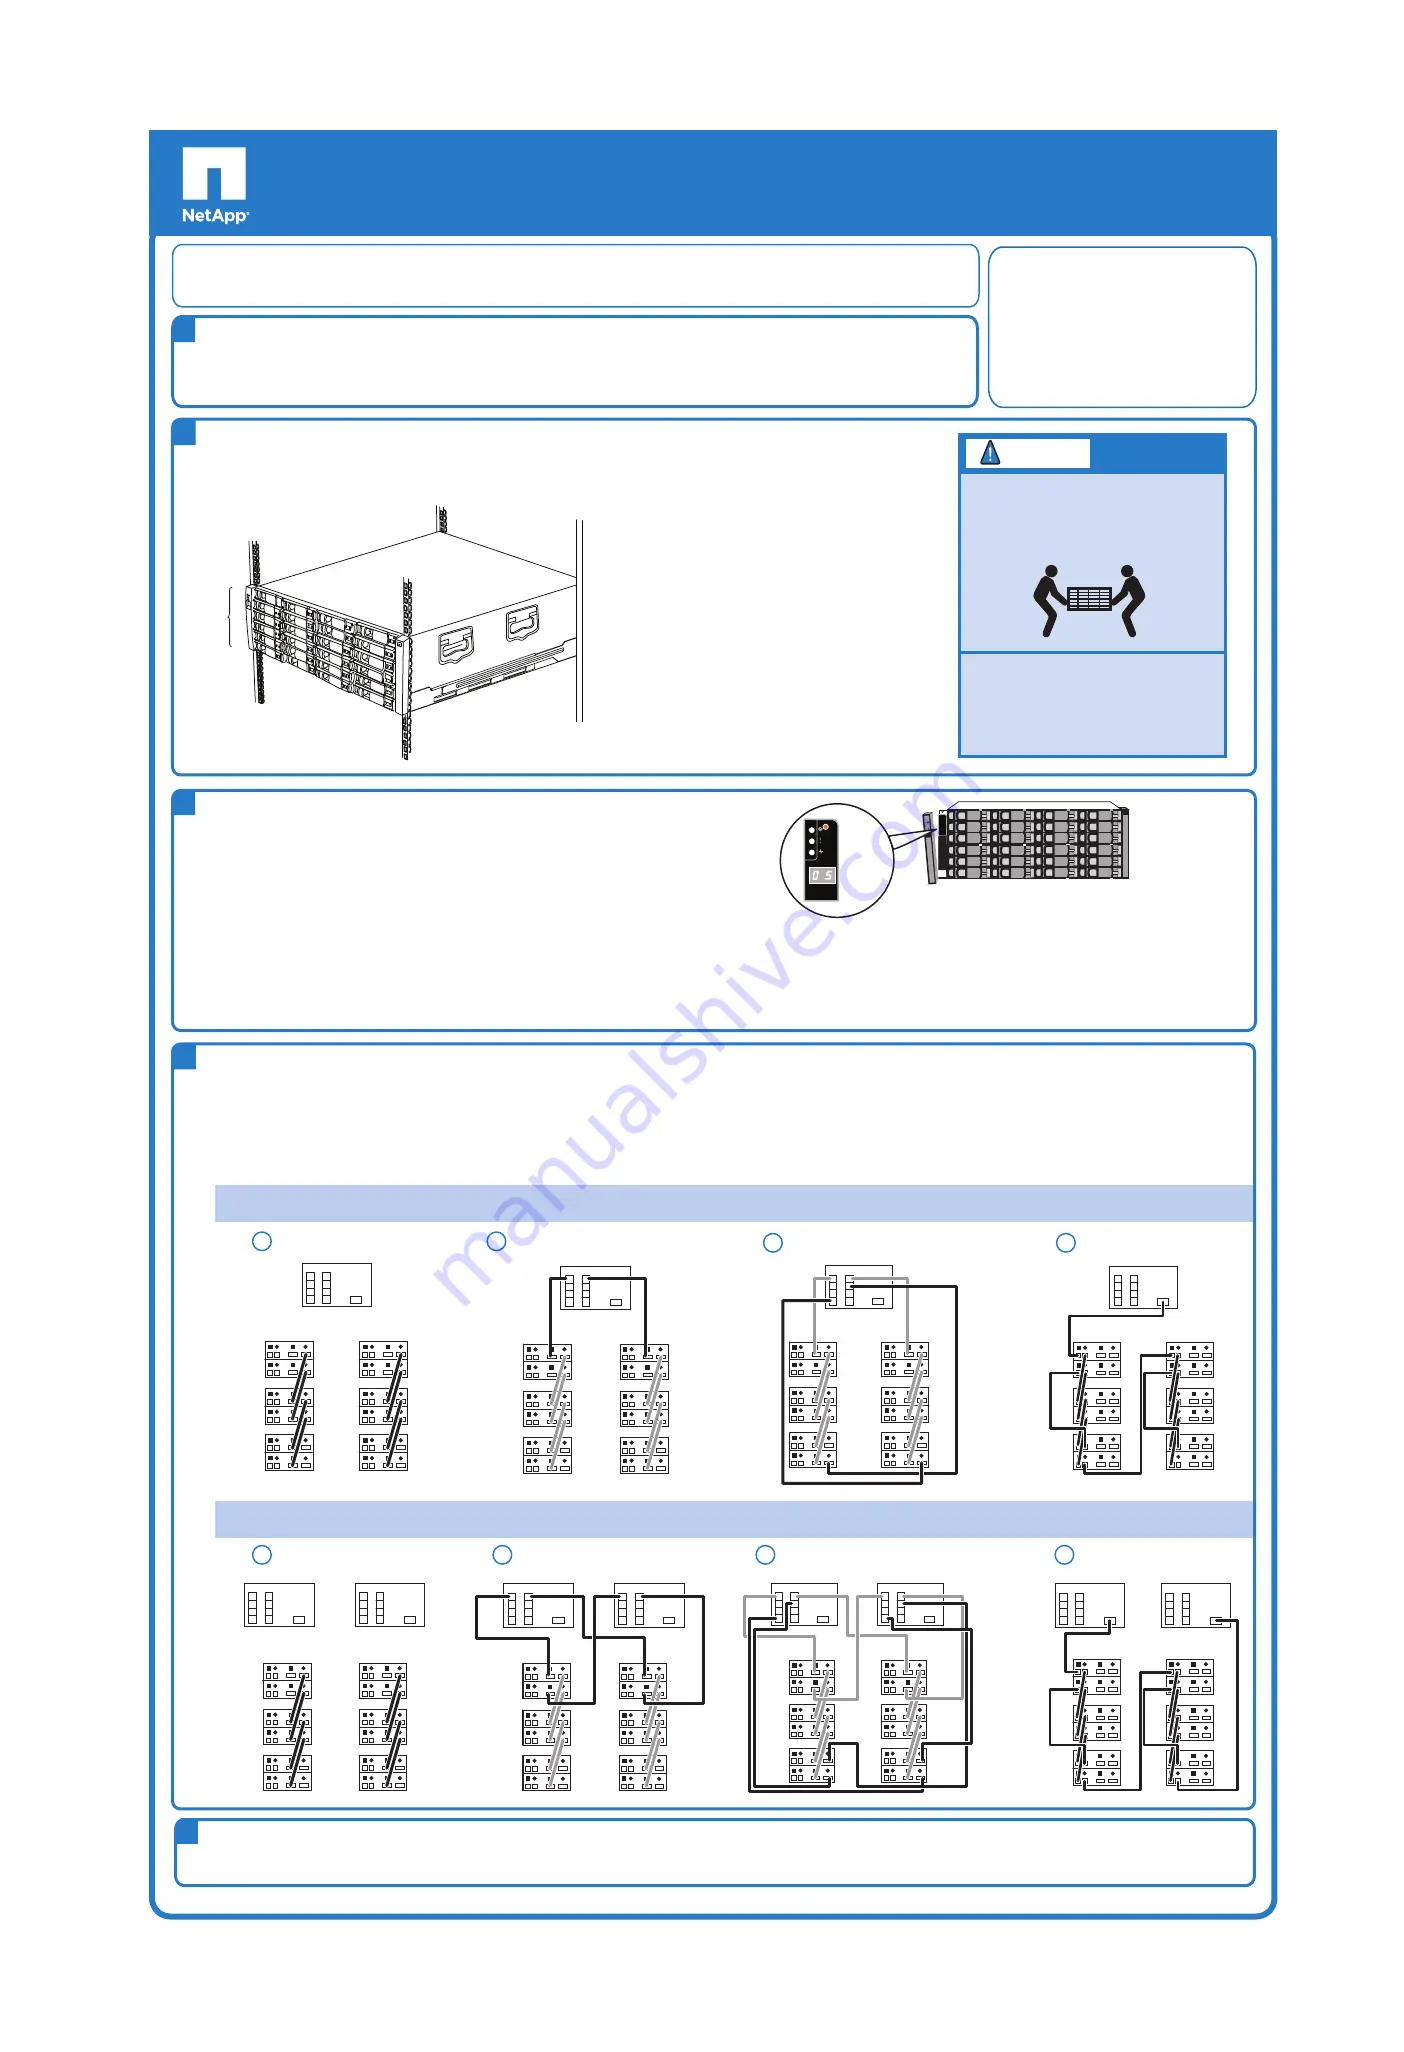
Cable the system
1.
Cable controllers.
See the documentation that came with your storage system for how to cable the controllers.
2.
Cable disk shelves.
Following are steps to cable two common configurations. For SAS and ACP rules, and more cabling configurations, see the
Universal SAS and ACP Cabling Guide
.
Controller 1
ACP
SAS
Stack 1
ACP
SAS
Stack 2
IOM A
IOM B
First
shelf
Last
shelf
Ethernet port
B
A
C
D
HBA 1
B
A
C
D
HBA 2
1
Daisy-chain SAS ports
2
Cable first shelf SAS connections
3
Cable last shelf SAS connections
4
Cable ACP connections
Controller 1
ACP
SAS
Stack 1
ACP
SAS
Stack 2
IOM A
IOM B
First
shelf
Last
shelf
Ethernet port
B
A
C
D
HBA 1
B
A
C
D
HBA 2
Controller 1
ACP
SAS
Stack 1
ACP
SAS
Stack 2
IOM A
IOM B
First
shelf
Last
shelf
Ethernet port
B
A
C
D
HBA 1
B
A
C
D
HBA 2
Controller 1
ACP
SAS
Stack 1
ACP
SAS
Stack 2
IOM A
IOM B
First
shelf
Last
shelf
Ethernet port
B
A
C
D
HBA 1
B
A
C
D
HBA 2
ACP
SAS
Stack 1
ACP
SAS
Stack 2
IOM A
IOM B
First
shelf
Last
shelf
ACP
SAS
Stack 1
ACP
SAS
Stack 2
IOM A
IOM B
First
shelf
Last
shelf
Controller 2
Ethernet port
B
A
C
D
HBA 1
B
A
C
D
HBA 2
Controller 1
Ethernet port
B
A
C
D
HBA 1
B
A
C
D
HBA 2
1
Daisy-chain SAS ports
2
Cable first shelf SAS connections
3
Cable last shelf SAS connections
4
Cable ACP connections
ACP
SAS
Stack 1
ACP
SAS
Stack 2
IOM A
IOM B
First
shel
f
Last
shelf
Controller 2
Ethernet port
B
A
C
D
HBA 1
B
A
C
D
HBA 2
Controller 1
Ethernet port
B
A
C
D
HBA 1
B
A
C
D
HBA 2
ACP
SAS
Stack 1
ACP
SAS
Stack 2
IOM A
IOM B
First
shelf
Last
shelf
Controller 2
Ethernet port
B
A
C
D
HBA 1
B
A
C
D
HBA 2
Controller 1
Ethernet port
B
A
C
D
HBA 1
B
A
C
D
HBA 2
Controller 2
Ethernet port
B
A
C
D
HBA 1
B
A
C
D
HBA 2
Controller 1
Ethernet port
B
A
C
D
HBA 1
B
A
C
D
HBA 2
High availability (HA pair) with two quad-port SAS HBAs supporting two stacks of disk shelves
Multipath HA connectivity
Single controller with two quad-port SAS HBAs supporting two stacks of disk shelves
Dual-path connectivity
4
If you are using HBAs, they must already be installed in the storage system.
Installing the disk shelf
2
1.
Connect power cords to the disk shelf and turn on the power to the disk shelf.
Note:
Connect power supplies in slots 1 and 3 to one power source and power supplies in
slots 2 and 4 to a different power source for resiliency.
2.
Visually verify that the ID for each disk shelf is unique. If not, set the disk shelf ID:
a.
Remove the left ear cover.
b.
Press and hold the button until the first digit blinks.
c.
Press the button until the correct number is displayed.
d.
Repeat steps
b
and
c
for the second digit.
e.
Press and hold the button until the second number stops blinking.
Result: Both numbers blink and the operator display panel fault LED illuminates in about
five seconds.
f.
Power-cycle the disk shelf to make the new disk shelf ID take effect.
!
Shelf ID
tab
Note:
A unique shelf ID is required for each SAS disk shelf
within the entire storage system. If your storage system has
SAS and FC disk shelves, shelf IDs do not need to be unique
between the SAS and FC disk shelves. (FC shelf IDs continue
to be unique within each FC loop. SAS shelf IDs continue to be
unique to all other SAS shelves in the storage system.)
1.
If you are installing the disk shelf in an equipment
rack or NetApp cabinet, you must install the rail kit
that came with your disk shelf.
Note:
If you are installing the disk shelf in a NetApp
cabinet, you should have received the X8783 rail kit.
1
1
All documentation can be found on the
NetApp Support Site at
support.netapp.com
.
Documentation
Ground yourself
Ground yourself to the storage system chassis. A grounding leash is shipped with new storage systems. You must provide
your own if you are only installing a disk shelf.
1
Note:
Disk shelves ship with IOMs, power supplies, and four disk carriers installed in the disk shelf. The four disk
carriers contain the Data ONTAP root volume. Best practice is to leave the drive carriers in the disk shelf when installing
the disk shelf.
Note:
Do not place hands on the disk drive boards
exposed on the underside of the disk carrier.
LIFTING HAZARD
CAUTION
To reduce the weight of a disk shelf to
approximately 53 lbs (24 kg), remove
all the IOMs and power supplies
before lifting.
A disk shelf containing the two IOMs,
four power supplies, and four disk
carriers weighs 82 lbs (37 kg).
3.
Carefully insert the remaining disk carriers into the
disk shelf using two hands.
Set disk shelf IDs
2.
Install and secure the disk shelf onto the support
brackets and rack, or in the system cabinet, as
applicable.
Note:
You do not need to ground DS4486 disk shelves; grounding is done through the power cords.
For more disk shelf and safety
information, see the
DS4243, DS2246,
DS4486, and DS4246 Disk Shelf
Installation and Service Guide
.
System requirements
For the most current information about supported Data ONTAP releases, platforms, SAS disk shelves, disk drives, and SAS cables,
see the Hardware Universe
on the NetApp Support Site at support.netapp.com.
Boot the system and proceed with setup
- See the
Installation and Setup Instructions
that came with your storage system for booting your storage system and for system setup.
- To take advantage of the ACP capability, you can enable it at setup or later. See the
Data ONTAP Software Setup Guide
for the setup worksheet and other setup information.
5
NetApp
4U


