background image

a.  Raise the cam handle on the new drive to vertical.

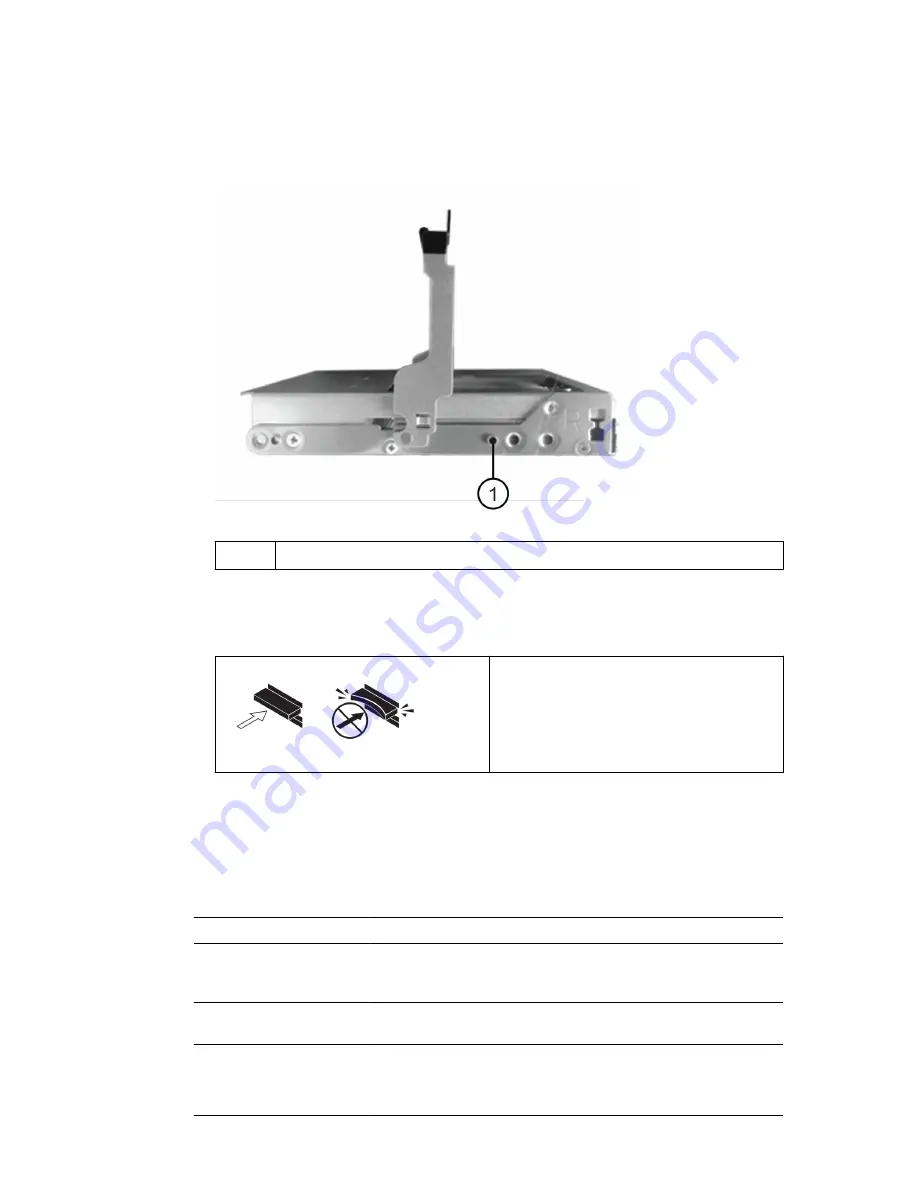
b.  Align the two raised buttons on each side of the drive carrier with the matching gap in the

drive channel on the drive drawer.

1

Raised button on the right side of the drive carrier

c.  Lower the drive straight down, and then rotate the cam handle down until the drive snaps into

place under the orange release latch.

d.  Carefully push the drive drawer back into the enclosure.


Attention: 

Possible loss of data access –

Never slam the drawer shut. Push the
drawer in slowly to avoid jarring the drawer
and causing damage to the storage array.

e.  Close the drive drawer by pushing both levers towards the center.

The green Activity LED for the replaced drive on the front of the drive drawer comes on when
the drive is inserted correctly.

8.  If you are replacing another disk drive, repeat Steps 

4

 on page 10 through 

7

 on page 11.

9.  Check the Activity LED and the Attention LED on the drive you replaced.

LED status

Description

The Activity LED is on or
blinking, and the Attention
LED is off

The new drive is working correctly.

The Activity LED is off

The drive might not be installed correctly. Remove the drive, wait 30
seconds, and then reinstall it.

The Attention LED is on

The new drive might be defective. Replace it with another new drive.

Note: 

When you first insert a drive, its Attention LED might be on.

However, the LED should go off within a minute.

12 | Service Guide for DS460C, DS224C and DS212C Disk Shelves

Summary of Contents for DS224C

Page 1: ...SAS Disk Shelves Service Guide For DS460C DS224C and DS212C August 2017 215 11810_B0 doccomments netapp com ...

Page 2: ......

Page 3: ...drawer 26 Installing a drive drawer 28 Attaching the cable chains 31 Hot swapping or replacing an IOM12 module 36 Hot removing disk shelves with IOM12 modules 40 Monitoring disk shelf LEDs 45 Operator display panel LEDs 45 IOM12 module LEDs 46 Power supply LEDs 46 Fan LEDs on DS460C disk shelves 47 Disk drive LEDs 48 Document update record 51 Copyright information 52 Trademark information 53 How t...

Page 4: ...sk drives If you are replacing a self encrypting disk SED you must follow the instructions for replacing an SED in the Disks and Aggregates Power Guide The instructions describe additional steps you must perform before and after replacing an SED ONTAP 9 Disks and Aggregates Power Guide About this task You should take steps to avoid electrostatic discharge ESD Keep the disk drive in the ESD bag unt...

Page 5: ... shelf_name led status on A disk shelf has three location blue LEDs one on the operator display panel and one on each IOM12 module Location LEDs remain illuminated for 30 minutes You can turn them off by entering the same command but using the off option If needed you can refer to the Monitoring disk shelf LEDs section for information about the meaning and location of disk shelf LEDs on the operat...

Page 6: ...re arranged vertically with the release button located at the top of the disk drive face The following illustrations show disk drives in a DS212C disk shelf 6 0TB 6 0TB 6 0TB 6 0TB 6 0TB 6 0TB 6 0TB 6 Slide out the disk drive slightly to allow the disk to safely spin down and then remove the disk drive from the disk shelf A disk can take up to one minute to safely spin down Note When handling a di...

Page 7: ...tainer type unassigned b Assign each disk storage disk assign disk disk_name owner owner_name You can use the wildcard character to assign more than one disk at once c Reenable disk ownership automatic assignment if needed storage disk option modify node node_name autoassign on You need to reenable disk ownership automatic assignment on both controllers in an HA pair 12 Return the failed part to N...

Page 8: ... the list of failed disk drives If you are replacing a self encrypting disk SED you must follow the instructions for replacing an SED in the Disks and Aggregates Power Guide The instructions describe additional steps you must perform before and after replacing an SED ONTAP 9 Disks and Aggregates Power Guide About this task You should take steps to avoid electrostatic discharge ESD Keep the disk dr...

Page 9: ...mware NetApp Downloads Disk Drive and Firmware Disk drive firmware is automatically updated nondisruptively on new disk drives with non current firmware versions Note Disk drive firmware checks occur every two minutes If needed you can turn on the disk shelf s location blue LEDs to aid in physically locating the affected disk shelf storage shelf location led modify node node_name shelf name shelf_...

Page 10: ...on modify node node_name autoassign off You need to disable disk ownership automatic assignment on both controllers in an HA pair 2 Properly ground yourself 3 Unpack the new disk drive and set it on a level surface near the disk shelf Save all packaging materials for use when returning the failed disk drive Note NetApp requires that all returned disk drives be in a ESD rated bag 4 Identify the fai...

Page 11: ... of each drive 6 Remove the failed drive from the open drawer a Gently pull back the orange release latch that is in front of the drive you want to remove 1 Orange release latch b Open the cam handle and lift out the drive slightly c Wait 30 seconds d Use the cam handle to lift the drive from the shelf e Place the drive on an antistatic cushioned surface away from magnetic fields 7 Insert the repl...

Page 12: ...both levers towards the center The green Activity LED for the replaced drive on the front of the drive drawer comes on when the drive is inserted correctly 8 If you are replacing another disk drive repeat Steps 4 on page 10 through 7 on page 11 9 Check the Activity LED and the Attention LED on the drive you replaced LED status Description The Activity LED is on or blinking and the Attention LED is...

Page 13: ...isk at once c Reenable disk ownership automatic assignment if needed storage disk option modify node node_name autoassign on You need to reenable disk ownership automatic assignment on both controllers in an HA pair 11 Return the failed part to NetApp as described in the RMA instructions shipped with the kit Contact technical support at NetApp Support 888 463 8277 North America 00 800 44 638277 Eu...

Page 14: ... SAS cables Current versions of firmware can be found on the NetApp Support Site NetApp Downloads Disk Shelf Firmware NetApp Downloads Disk Drive and Firmware If needed you can turn on the disk shelf s location blue LEDs to aid in physically locating the affected disk shelf storage shelf location led modify node node_name shelf name shelf_name led status on A disk shelf has three location blue LED...

Page 15: ...y helping to maintain air flow and cooling Note When handling a power supply always use two hands to support its weight 7 Make sure that the on off switch of the new power supply is in the Off position 8 Using two hands with the cam handle of the new power supply in the open position support and align the edges of the new power supply with the opening in the disk shelf and then firmly push the new...

Page 16: ... LED illuminate and then within 40 seconds the attention amber LED turns off 11 Return the failed part to NetApp as described in the RMA instructions shipped with the kit Contact technical support at NetApp Support 888 463 8277 North America 00 800 44 638277 Europe or 800 800 80 800 Asia Pacific if you need the RMA number or additional help with the replacement procedure 16 Service Guide for DS460...

Page 17: ...re that you remove and replace the fan module within 30 minutes to prevent the system from overheating Steps 1 Put on antistatic protection 2 Unpack the new fan module and place it on a level surface near the shelf Save all packing material for use when returning the failed fan 3 From the back of the disk shelf look at the Attention LEDs to locate the fan module you need to remove You must replace...

Page 18: ...e tab to release the fan module handle 1 Tab that you press to release the fan module handle 5 Use the fan module handle to pull the fan module out of the shelf 18 Service Guide for DS460C DS224C and DS212C Disk Shelves ...

Page 19: ...n module the Attention LED stays on solid amber while the firmware checks that the fan module was installed correctly The LED goes off after this process is complete 8 Return the failed part to NetApp as described in the RMA instructions shipped with the kit Contact technical support at NetApp Support 888 463 8277 North America 00 800 44 638277 Europe or 800 800 80 800 Asia Pacific if you need the...

Page 20: ...s And each of the five drawers can hold up to 12 drives Before you begin You need these items for this procedure Antistatic protection Attention Possible hardware damage To prevent electrostatic discharge damage to the drive shelf use proper antistatic protection when handling drive shelf components Replacement drive drawer Replacement left and right cable chains Flashlight Permanent marker 20 ...

Page 21: ...sk Each drive drawer has left and right cable chains The metal ends on the cable chains slide into corresponding vertical and horizontal brackets inside the enclosure as follows The left and right vertical brackets connect the cable chain to the enclosure s midplane The left and right horizontal brackets connect the cable chain to the individual drawer Note For a helpful overview of this procedure...

Page 22: ...five cable chains to disconnect The figure shows the right side of the drive shelf with the fan module removed With the fan module removed you can see the five cable chains and the vertical and horizontal connectors for each drawer The callouts for drive drawer 1 are provided 22 Service Guide for DS460C DS224C and DS212C Disk Shelves ...

Page 23: ...s attached to drive drawer 5 4 Use your finger to move the cable chain on the right side to the left 5 Follow these steps to disconnect any of the right cable chains from its corresponding vertical bracket a Using a flashlight locate the orange ring on the end of the cable chain that is connected to the vertical bracket in the enclosure Replacing a drive drawer in a DS460C disk shelf 23 ...

Page 24: ...pproximately 1 inch 2 5 cm but leave the cable chain connector within the vertical bracket 6 Follow these steps to disconnect the other end of the cable chain a Using a flashlight locate the orange ring on the end of the cable chain that is attached to the horizontal bracket in the enclosure The figure shows the horizontal connector on the right and the cable chain disconnected and partially pulle...

Page 25: ...your finger toward you to unplug the cable chain 7 Carefully pull the entire cable chain out of the drive shelf 8 From the back of the drive shelf remove the left fan module 9 Follow these steps to disconnect the left cable chain from its vertical bracket a Using a flashlight locate the orange ring on the end of the cable chain attached to the vertical bracket b Insert your finger into the orange ...

Page 26: ...ation of each drive as you remove the drive from the drawer Steps 1 Remove the bezel from the front of the drive shelf 2 Unlatch the drive drawer by pulling out on both levers 3 Using the extended levers carefully pull the drive drawer out until it stops Do not completely remove the drive drawer from the drive shelf 4 If logical unit numbers LUNs have already been created and assigned use a perman...

Page 27: ... magnetic devices Attention Possible loss of data access Magnetic fields can destroy all data on the drive and cause irreparable damage to the drive circuitry To avoid loss of data access and damage to the drives always keep drives away from magnetic devices 6 Follow these steps to remove the drive drawer Replacing a drive drawer in a DS460C disk shelf 27 ...

Page 28: ...tails sliding the drawer into the empty slot installing the drives and replacing the front bezel Before you begin You know where to install each drive You have obtained the following items Replacement drive drawer Flashlight Steps 1 From the front of the drive shelf shine a flashlight into the empty drawer slot and locate the lock out tumbler for that slot The lock out tumbler assembly is a safety...

Page 29: ...nt damage Stop pushing the drive drawer if you feel excessive resistance or binding Use the release levers at the front of the drawer to slide the drawer back out Then reinsert the drawer into the slot and ensure that it slides in and out freely 5 Follow these steps to reinstall the drives in the drive drawer a Unlatch the drive drawer by pulling out on both levers at the front of the drawer b Usi...

Page 30: ...es on the drawer The figure shows the right side view of a drive showing the location of the raised buttons 1 Raised button on the right side of the drive f Lower the drive straight down and then rotate the drive handle down until the drive snaps into place 30 Service Guide for DS460C DS224C and DS212C Disk Shelves ...

Page 31: ...ains The final step in installing a drive drawer is attaching the left and right cable chains to the drive shelf When attaching a cable chain reverse the order you used when disconnecting the cable chain You must insert the chain s horizontal connector into the horizontal bracket in the enclosure before inserting the chain s vertical connector into the vertical bracket in the enclosure Before you ...

Page 32: ...Callout Cable chain Connector Connects to 1 Left Vertical Midplane 2 Horizontal Drive drawer 32 Service Guide for DS460C DS224C and DS212C Disk Shelves ...

Page 33: ...in and the corresponding horizontal and vertical brackets inside the enclosure b Align both cable chain connectors with their corresponding brackets c Slide the cable chain s horizontal connector under the guide rail on the horizontal bracket and push it in as far as it can go The figure shows the guide rail on the left side for the second drive drawer in the enclosure Replacing a drive drawer in ...

Page 34: ...d both ends of the cable chain carefully pull on the cable chain to verify that both connectors are latched Attention Risk of equipment malfunction If the connectors are not latched the cable chain might come loose during drawer operation 2 Reinstall the left fan module 3 Follow these steps to reattach the right cable chain a Locate the horizontal and vertical connectors on the cable chain and the...

Page 35: ...the system runs d Slide the vertical connector on the right cable chain into the vertical bracket e After you reconnect both ends of the cable chain carefully pull on the cable chain to verify that both connectors are latched Attention Risk of equipment malfunction If the connectors are not latched the cable chain might come loose during drawer operation 4 Reinstall the right fan module 5 Reapply ...

Page 36: ...le on a disk shelf with a single path connection you will lose all access to the disk drives on the disk shelf as well as any disk shelves beneath You could also bring down your entire system Best practice is to have the current versions of disk shelf IOM firmware and disk drive firmware on your system before adding new disk shelves shelf FRU components or SAS cables Current versions of firmware c...

Page 37: ...HA configuration a Determine the target node the node the failed IOM12 module belongs to IOM A belongs to Controller 1 IOM B belongs to Controller 2 b Take over the target node storage failover takeover bynode partner HA node FAS2600 series single path configuration a Shut down the system from the system console halt b Verify that your system halted by checking the storage system console 5 Disconn...

Page 38: ...to the locked position and the IOM12 module is fully seated 11 Reconnect the cabling The SAS cable connectors are keyed when oriented correctly into an IOM port the connector clicks into place and the IOM port LNK LED illuminates green You insert a SAS cable connector into an IOM port with the pull tab oriented down on the underside of the connector 12 Perform one of the following actions based on...

Page 39: ...rt at NetApp Support 888 463 8277 North America 00 800 44 638277 Europe or 800 800 80 800 Asia Pacific if you need the RMA number or additional help with the replacement procedure Hot swapping or replacing an IOM12 module 39 ...

Page 40: ...moving therefore if the current cables are not long enough you need to have longer cables available About this task Best practice is to remove disk drive ownership after you remove the aggregates from the disk drives in the disk shelves you are removing Removing ownership information from a spare disk drive allows the disk drive to be properly integrated into another node as needed The procedure f...

Page 41: ...eps a Enter the following command from the clustershell of either controller storage disk show shelf shelf_number b Check the output to verify there are no aggregates on the disk drives in the disk shelves you are removing Disk drives with no aggregates have a dash in the Container Name column c Check the output to verify that ownership is removed from the disk drives on the disk shelves you are r...

Page 42: ...uminates green For disk shelves you insert a SAS cable connector with the pull tab oriented down on the underside of the connector If you are removing Then A disk shelf from either end logical first or last disk shelf of a stack a Remove any shelf to shelf cabling from IOM A ports on the disk shelf you are removing and put them aside b Unplug any controller to stack cabling connected to IOM A port...

Page 43: ...m the end of a stack demonstrates removing the logical last disk shelf in a stack that is cabled with multipath HA connectivity You can infer the recabling if you are removing the logical first disk shelf in a stack or if your stack has multipath connectivity 6 Verify that you bypassed the disk shelves you are removing and reestablished the path A IOM A stack connections correctly storage disk sho...

Page 44: ...disk drives connected through path A and path B b Repeat Step 1 to confirm that your system configuration is the same as before you removed one or more disk shelves from a stack c Go to the next step 9 If when you removed ownership from the disk drives as part of the preparation for this procedure you disabled disk ownership automatic assignment reenable it by entering the following command otherw...

Page 45: ...or occurred with the function of one of more FRUs the disk shelf disk drives IOM12 modules or power supplies Check event messages to determine corrective action to take Blinking amber The shelf ID is in a pending state Power cycle the disk shelf for the shelf ID to take affect Location Solid blue The system administrator activated this LED function to aid in physically locating the disk shelf requ...

Page 46: ...ent messages to determine corrective action to take LNK Port link Solid green One or more of the four SAS lanes established a link with either an adapter or another disk shelf Location Solid blue The system administrator activated this LED function to aid in physically locating the disk shelf with the failed IOM12 module Note The location LED on the operator display panel and both IOM12 modules il...

Page 47: ...nt dictating the location of the two LEDs The following illustration is for a power supply used in a DS460C disk shelf The two LED icons act as the labels and LEDs meaning the icons themselves illuminate there are no adjacent LEDs The following illustration is for a power supply used in a DS224C or DS212C disk shelf Fan LEDs on DS460C disk shelves The LEDs on the DS460C fans indicate whether the f...

Page 48: ...ing green The disk drive has power and I O operations are in progress 2 Attention Solid amber An error occurred with the function of the disk drive Check event messages to determine corrective action to take Depending on your disk shelf model disk drives are arranged vertically or horizontally in the disk shelf dictating the location of the two LEDs The following illustration is for a disk drive u...

Page 49: ...cribes the drive activity LEDs on the drive drawer and their operational states Location LED Status indicator Description 1 Attention Drawer attention for each drawer Solid amber A component within the drive drawer requires operator attention Off No drive or other component in the drawer requires attention and no drive in the drawer has an active locate operation Blinking amber A locate drive oper...

Page 50: ...The power is turned on and the drive is operating normally Blinking green The drive has power and I O operations are in progress Off The power is turned off When the drive drawer is open an attention LED can be seen in front of each drive 1 Attention LED light on 50 Service Guide for DS460C DS224C and DS212C Disk Shelves ...

Page 51: ...updates August 2017 Removed the SAS disk shelf safety information section All safety information can be found in the Safety Information and Regulatory Notices document on the NetApp Support Site NetApp Support Feature release date Feature updates January 2017 Initial release of the Service Guide for DS460C DS224C and DS212C 51 ...

Page 52: ...ICES LOSS OF USE DATA OR PROFITS OR BUSINESS INTERRUPTION HOWEVER CAUSED AND ON ANY THEORY OF LIABILITY WHETHER IN CONTRACT STRICT LIABILITY OR TORT INCLUDING NEGLIGENCE OR OTHERWISE ARISING IN ANY WAY OUT OF THE USE OF THIS SOFTWARE EVEN IF ADVISED OF THE POSSIBILITY OF SUCH DAMAGE NetApp reserves the right to change any products described herein at any time and without notice NetApp assumes no r...

Page 53: ...hare SANtricity SecureShare Simplicity Simulate ONTAP Snap Creator SnapCenter SnapCopy SnapDrive SnapIntegrator SnapLock SnapManager SnapMirror SnapMover SnapProtect SnapRestore Snapshot SnapValidator SnapVault SolidFire SolidFire Helix StorageGRID SyncMirror Tech OnTap Unbound Cloud and WAFL and other names are trademarks or registered trademarks of NetApp Inc in the United States and or other co...

Page 54: ...ng this document send us your comments by email doccomments netapp com To help us direct your comments to the correct division include in the subject line the product name version and operating system If you want to be notified automatically when production level documentation is released or important changes are made to existing production level documents follow Twitter account NetAppDoc You can ...

Page 55: ...elf 17 fans location and meaning of LEDs 47 feedback how to send comments about documentation 54 H hot removing disk shelves with IOM12 modules 40 hot swapping disk drives in DS224C or DS212C disk shelves 4 disk drives in DS460C disk shelves 8 IOM12 modules 36 power supplies 14 I information how to send feedback about improving documentation 54 installing a DS460C drive drawer 28 IOM12 modules hot...

Page 56: ...removing 40 suggestions how to send feedback about documentation 54 T Twitter how to receive automatic notification of documentation changes 54 U updates document record of 51 56 Service Guide for DS460C DS224C and DS212C Disk Shelves ...

Reviews: