

HOMEBASE
®
A S S E M B LY I N S T R U C T I O N S
PA R T S
A S S E M B LY
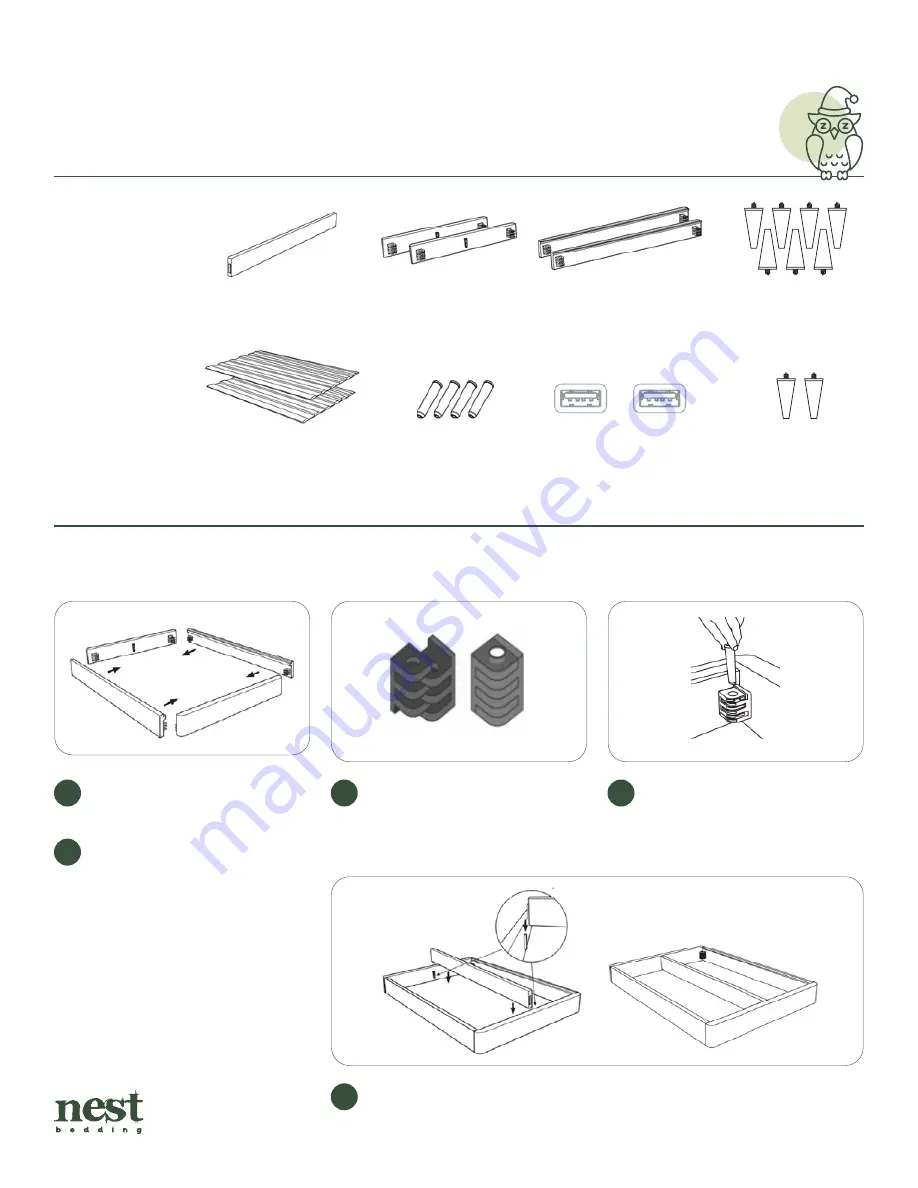
P A R T S
1 Center Support Beam
2 Shorter End Rails
2 Longer Side Rails
4 Black Corner Bracket Pegs 2 Fabric Encased Slates 9 5inch Wood Legs (optional)
2 USB Charging Ports Kits
P A R T S
1 Center Support Beam
2 Shorter End Rails
2 Longer Side Rails
4 Black Corner Bracket Pegs 2 Fabric Encased Slates 9 5inch Wood Legs (optional)
2 USB Charging Ports Kits
P A R T S
1 Center Support Beam
2 Shorter End Rails
2 Longer Side Rails
4 Black Corner Bracket Pegs 2 Fabric Encased Slates 9 5inch Wood Legs (optional)
2 USB Charging Ports Kits
P A R T S
1 Center Support Beam
2 Shorter End Rails
2 Longer Side Rails
4 Black Corner Bracket Pegs 2 Fabric Encased Slates 9 5inch Wood Legs (optional)
2 USB Charging Ports Kits
P A R T S
1 Center Support Beam
2 Shorter End Rails
2 Longer Side Rails
4 Black Corner Bracket Pegs 2 Fabric Encased Slates 9 5inch Wood Legs (optional)
2 USB Charging Ports Kits
P A R T S
1 Center Support Beam
2 Shorter End Rails
2 Longer Side Rails
4 Black Corner Bracket Pegs 2 Fabric Encased Slates 9 5inch Wood Legs (optional)
2 USB Charging Ports Kits
P A R T S
1 Center Support Beam
2 Shorter End Rails
2 Longer Side Rails
4 Black Corner Bracket Pegs 2 Fabric Encased Slates 9 5inch Wood Legs (optional)
2 USB Charging Ports Kits
1 Center Support
Beam
Remove all pegs from the
interlocking corner brackets.
Arrange the rails so the arrows
point up. Organize them so that
the two longer side rails are
parallel and the two shorter end
rails are parallel.
Now align the joints in the four
corners and push them together.
Corner brackets should interlock.
Slide the black center support beam, arrow pointing up, in place. Make sure
you have pushed the beam all the way down so it is level with the head and
foot of the frame.
Insert a peg into each of the four
joints and push them down firmly,
so everything is properly aligned.
2 Fabric Encased
Slats
4 Black Corner
Bracket Pegs
2 USB Charging
Ports Kits
2 Shorter End Rails
2 Longer Side Rails
7 5-inch Wood Legs
(regular)
2 5-inch Wood Legs
(smaller)
A s s e m b l y
Step 1.
Remove all pegs from the interlocking corner
brackets.
Step 2. Arrange the rails so the arrows point up. Organize
them so that the two longer side rails are parallel
and the two shorter end rails are parallel.
1
3
5
4
2
A s s e m b l y
Step 3.
Now align the joints in the four corners and push
them together. Corner brackets should interlock.
Step 4.
Insert a peg into each of the four joints and push
them down firmly, so everything is properly
aligned.
A s s e m b l y
Step 3.
Now align the joints in the four corners and push
them together. Corner brackets should interlock.
Step 4.
Insert a peg into each of the four joints and push
them down firmly, so everything is properly
aligned.
A s s e m b l y
Step 5.
Slide the black center support beam, arrow
pointing up, in place. Make sure you have pushed
the beam all the way down so it is level with the
head and foot of the frame.