background image

Administrator’s Guide and Operating Instructions

34

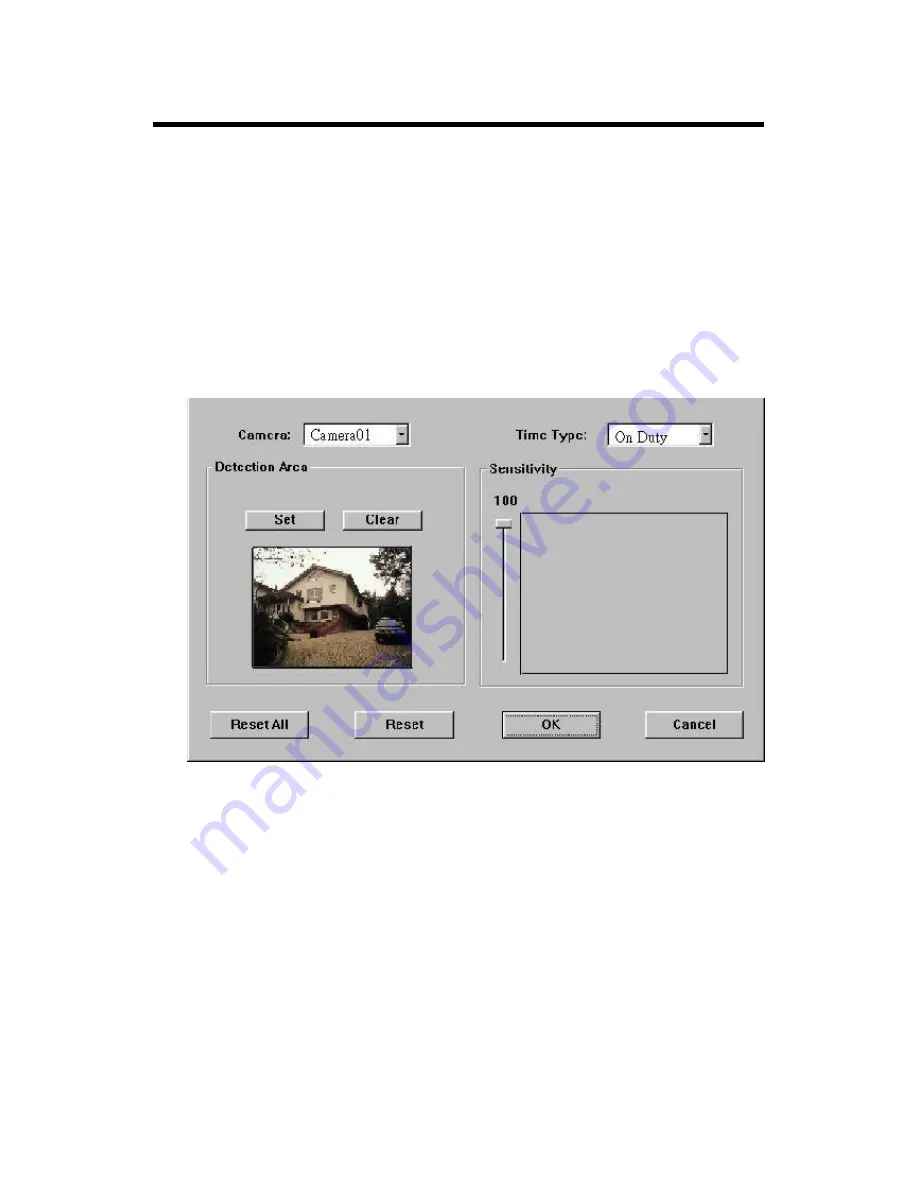
6.13 Motion Setup

The Motion Setup allows the administrator to configure how motion 
detection works for each Camera at each Time Type.    For each 
Camera and each Time Type, you may configure the Detection Area 
(16x12 grids) and Sensitivity as shown on the screen and described 
below.

Operations:

After the Motion menu item is selected, the Motion Setup dialog box 
will be shown on the screen.

Please select the Camera and the Time Type first.    All the other 
settings correspond to the selected Camera and the selected Time 
Type shown in their respective fields.    For the Detection Area, 
please click on the Set (Clear) button, then click in the video window 
and drag the mouse to set (clear) the detection area.    To set the 
Sensitivity, please click on the slider and drag the mouse.   The value 
is shown above – larger value means more sensitive.    On the right 
side is the trend curve showing the continuous snapshots of the 
detected motion.

The following is a brief description for each item shown above.

Summary of Contents for EDR1600

Page 1: ...INSTRUCTION MANUAL EDR1600 16 CHANNEL DIGITAL VIDEO RECORDER Before installing and using this unit please read this manual carefully Be sure to keep the manual handy for later reference ...

Page 2: ...diate radio frequency energy and if not installed and used in accordance with the instruction manual may cause interference to radio communications Operation of this equipment in a residential area is likely to cause harmful interference in which case the users will be required to correct the interference at their own expense Changes or modifications not expressly approved by the party responsible...

Page 3: ...e the appliance to water or moisture nor try to operate it in wet areas Do take immediate action if the appliance becomes wet Turn the power off and refer servicing to qualified service personnel Moisture may damage the appliance and also cause electric shock Do not use strong or abrasive detergents when cleaning the appliance body Use a dry cloth to clean the appliance when it is dirty When the d...

Page 4: ...ion Action Setup 6 6 Video Loss Action Setup 6 7 Hard Disks Full Action Setup 6 8 Camera Setup 6 9 Alarm In Setup 6 10 Alarm Out Setup 6 11 Display Sequence Setup 6 12 Display Page Setup 6 13 Motion Setup 6 14 Password Setup 6 15 System Configurations 7 Day Time Setup Administrator 8 Image Playback and Archive Administrator Supervisor 8 1 Select HDD Range Dialog Box 9 Remote Control 10 Note For 2x...

Page 5: ...recording or both Pre alarm post alarm recording for alarm motion and video loss with adjustable frame rate for different time modes and cameras Storage on Max 2 internal Hard Disks Connect up to 2 external Hard Disk Arrays Max 8 Hard Disks per set to enhance the storage capacity Hot swappable Hard Disks for highest surveillance availability Non editable video data with data loss at 1 second level...

Page 6: ...o processor controls the switching of the built in video matrix according to the system configurations The video encoder keeps analyzing the video signal from the cameras and encoding the incoming pictures in JPEG format or MPEG 1 format that is digitized and smaller in size at 30 fps for NTSC EIA or 25 fps for PAL CCIR During video playback the video decoder decodes the digitized format no matter...

Page 7: ... camera pictures or pictures from hard disks The display resolution is 640x480 for NTSC or 800x600 for PAL As many as 16 million colors can be displayed in the following screen formats full screen 4 windows 7 windows 9 windows 10 windows 13 windows and 16 windows All the main displays are window based look and feel for ease of user operations The call monitor displays full screen images of cameras...

Page 8: ...hot swappable With 40 GB of storage per hard disk the system storage is more than 700 GB and virtually unlimited no more redundant backup required 1 2 8 Non editable Recorded Images The retrieved images are saved as MPG files or MOV files which can be played by Media Player or QuickTime Therefore those files are editable by the video editing packages just like the recorded images in the other digi...

Page 9: ...d damaging the system set this switch before plugging in the power plug Use a screwdriver to set the switch to the correct position so that the number shown is the same as the local AC voltage 2 Power Socket Accepts 115V AC or 230V AC power source Power Selector at AC 115V 100 120V AC Power Selector at AC 230V 200 260V AC 3 Mouse Connector Connects to the PS2 mouse The mouse must be connected at s...

Page 10: ...C connector for Call TV monitor 15 Camera 16 Video Output BNC connector for looping camera video from the corresponding camera input 16 LAN Connector Outlet Ethernet 10 100 Mb base T 17 SCSI Connector Outlet Reserved 18 Cooling Fan Cooling fan of internal Switching Power Supply 19 Camera 1 Video Input BNC connector for Camera 1 20 Alarm In 1 8 Connects to alarm inputs 1 8 1 common ground 21 Camera...

Page 11: ...e sure to set HDD 1 as master and HDD 2 as slave The settings should be described on the hard disk itself or in the manual come with the hard disk 26 Floppy Drive 3 5 1 44MB 27 LEDs Reset Button and Power Switch LEDs for power and HDD indication Reset Button to reset the system and Power Switch to power on off the system 28 Dust Filter for Front Cooling Fan ...

Page 12: ... system installers 3 1 Before Installation Please make sure to set the Power Selector Switch before plugging in the power plug to avoid damaging the EDR1600 Use a screwdriver to set the switch to the correct position so that the number shown is the same as the local AC voltage Please refer to the following diagram for the system connections Modem Ethernet ...

Page 13: ... disk is inside the hard disk trays Set HDD 1 as master and HDD 2 as slave The settings should be described on the hard disk itself or in the manual come with the hard disk Power Plug the 115V AC or 230V AC power source into the power socket Be sure to set the Power Selector Switch before plugging in the power plug 3 3 Optional Connections Call Monitor Connect the Call Monitor Output Connector to ...

Page 14: ...t system startup EDA800 Connect the External Hard Disk Connector to EDA800 if the user has purchased EDA800 If EDR1600 is running please power on EDA800 first and then make the connection Main TV Monitor Connect the Main Monitor Output Connector to a TV monitor This monitor displays selected live or recorded cameras in any available format Ethernet Connect a standard RJ45 connector Ethernet cable ...

Page 15: ...ayed it means that the specific function is not accessible in the current mode or login right The followings are a brief description for each of the icons System time in military hour format Move the cursor on it and the system date will be shown in YYYY MM DD format Shutdown To shutdown the system Playback Controls To change the control icons to those for playback functions Alarm Reset To reset t...

Page 16: ...atic Page Mode the selected multi window display will always be shown on the screen Full Screen Display Static Page Mode 4 window Display Static Page Mode 7 window Display Static Page Mode 9 window Display Static Page Mode 10 window Display Static Page Mode 13 window Display Static Page Mode 16 window Display Static Page Mode Pause Circulate To toggle between Pause Mode and Circulate Mode for stat...

Page 17: ...RED Motion detected for Camera 5 Basic Operations Log Display If the user does not login the system he will be treated as a guest and can only view the live video display and device status To login as an Operator or Supervisor please click on the Login icon and enter the appropriate Operator s Login name and Password For Operator the factory default value for both of them is operator for Superviso...

Page 18: ...led Click on the Delete button to delete the highlighted event log and click on the Delete All button to delete all the event logs 5 1 Version Display Click on the logo icon on the upper right corner the software version of the system will be shown on the screen 5 2 Alarm Message Display The alarm message will be displayed on the screen if the alarm happened and the alarm message for the correspon...

Page 19: ...k on the Config icon The configuration menu will pop up as below Click on the menu item for the respective configuration For the details of each item please refer to the following paragraphs Click on the Exit menu item to exit the setup If the configurations related to Time Type are changed you may be asked to restart the system for those new settings to take effect Note If the system is in Sequen...

Page 20: ...ver you may configure up to 16 Time Types to suit your needs Use the meaningful names no matter they are from human viewpoint or the system s viewpoint Some other meaningful names may be Day Night Overtime Code 1 Normal Alert etc Operations After the Time Type menu item is selected the Time Type dialog box will be shown on the screen Please click on the item in the Time Type List then click on the...

Page 21: ...e menu item is selected the Day Type Setup dialog box will be shown on the screen Please click on the item in the Day Type List then click on the Day Type Tag and then enter the new tag name for the selected Day Type by using the mouse or the keyboard The Detail box corresponds to the selected Day Type shown in the Day Type Tag Please click on the Up Dn buttons to scroll the 16 time segments click...

Page 22: ... Calendar menu item is selected the Calendar Setup dialog box will be shown on the screen The active month is shown on the upper corner of the screen The selectable Day Types are shown on the left corner of the screen Please click on the Day Type button to select the active Day Type the button will be on the DOWN position Click on the Calendar Day button to change its Day Type to the active Day Ty...

Page 23: ...ion menu item is selected the Alarm Action Setup dialog box will be shown on the screen Please click on the item in the Action List then click on the Action Tag and then enter the new tag name for the selected Action by using the mouse or the keyboard All the other settings correspond to the selected Action shown in the Action Tag The following is a brief description for each item shown above Dura...

Page 24: ...ignals are available please refer to Alarm Out Setup Click on the Down arrow button to select one of the Alarm Outputs AO 1 8 Output Alarm Out output state when the Alarm Action is triggered For NC signal it s always open for NO signal close The Normal State above shows whether the selected Alarm Out is NC signal or NO signal Buzzer On To activate the internal buzzer or not when the Alarm Action i...

Page 25: ...g all the installed cameras as usual Log Log to event log list or not Please refer to Log Display for the details Show Message To display the alarm message or not when the Alarm Action is triggered Any Key To Stop When the Alarm Action is triggered the internal buzzer and Alarm Out relay may be activated If you want to stop those actions by pressing any key or moving clicking the mouse please chec...

Page 26: ...nu item is selected the Motion Action Setup dialog box will be shown on the screen Please click on the item in the Action List then click on the Action Tag and then enter the new tag name for the selected Action by using the mouse or the keyboard All the other settings correspond to the selected Action shown in the Action Tag Please refer to the Alarm Action Setup for the descriptions and operatio...

Page 27: ...erations After the VLoss Action menu item is selected the Video Loss Action Setup dialog box will be shown on the screen Please click on the item in the Action List then click on the Action Tag and then enter the new tag name for the selected Action by using the mouse or the keyboard All the other settings correspond to the selected Action shown in the Action Tag Please refer to the Alarm Action S...

Page 28: ...automatically overwrite the recorded data from HDD 1 when the hard disk drive capacity reaches the end While Auto Overwrite is not enabled the system will not overwrite the recorded data until the Administrator or Supervisor click on the Alarm Reset button The default setting is Auto Overwrite enabled Note Duration Response duration to define how long in seconds the Alarm Out relay and the Buzzer ...

Page 29: ...NC signal it s always open for NO signal close The Normal State above shows whether the selected Alarm Out is NC signal or NO signal Buzzer On To activate the internal buzzer or not when the full hard disk capacity is detected Log Log to event log list or not Please refer to Log Display for the details Note If the hard disk capacity reaches the end with the Auto Overwrite function not enabled whil...

Page 30: ... for the selected Camera by using the mouse or the keyboard The Recording Quality and the Compression Method apply to all cameras For the Behaviors For Each Camera please click on the item in the Time Type list to select the Time Type All the other settings correspond to the selected Camera shown in the Camera Tag and the highlighted Time Type in the Time Type list The following is a brief descrip...

Page 31: ...ays enabled Normal Record FPS The normal recording rate for the selected Camera at the selected Time Type Use the Up Down arrow buttons to adjust the value 0 30 The default value is 0 1 Frame Per Second or 6 Frame Per Minute Note Alarm Record FPS The alarm recording rate for the selected Camera at the selected Time Type Use the Up Down arrow buttons to adjust the value 0 30 The default value is 5 ...

Page 32: ...ected the Alarm In Setup dialog box will be shown on the screen Please click on the item in the Alarm Input List then click on the Alarm Input Tag and then enter the new tag name for the selected Alarm Input by using the mouse or the keyboard For the Alarm Action for each Alarm Input please click on the item in the Time Type list to select the Time Type All the other settings correspond to the sel...

Page 33: ...erminal on the rear panel of the system Use the Down arrow button to select the signal type Enable Alarm Action Check to Enable Alarm Action for the selected Alarm Input at the selected Time Type Alarm Action The corresponding Alarm Action if the Alarm Input changes its state from normal to alarm Up to 16 Alarm Actions are selectable ...

Page 34: ...o 4 Normally Closed NC signals AO 1 4 and 4 Normally Open NO signals AO 5 8 for the system Operations After the Alarm Out menu item is selected the Alarm Out Setup dialog box will be shown on the screen Please click on the item in the Alarm Out List then click on the Alarm Out Tag and then enter the new tag name for the selected Alarm Output by using the mouse or the keyboard ...

Page 35: ... on the screen The following is a brief description for each item shown above Number of Sequences Up to 8 sequences can be defined Use the Down arrow button to select the number The default number is 7 Sequence Number To select the Sequence you want to modify for the following 2 items Number of Pages Number of Pages for the Sequence shown in Sequence Number Different Display Types have different m...

Page 36: ...e or Static Page Mode first For Sequence Mode you may select the Sequence No then set the Page Dwell Time Cameras and Text Colors for each Page for Static Page Mode you may set the Cameras and Text Colors for each Display Type To Select Camera or Select Text Color for a specific video window please click on Select Camera button or Select Text Color button first then click on the video window the C...

Page 37: ...age No Use the Down arrow button to select the number The default value is 5 Display Type To select the Display Type in Static Page Mode display Use the Down arrow button to select the Display Type The available types are 1 window Full screen 4 window 7 window 9 window 10 window 13 window and 16 window Select Camera To select the cameras shown in the video windows Click on it and then click on the...

Page 38: ...be shown on the screen Please select the Camera and the Time Type first All the other settings correspond to the selected Camera and the selected Time Type shown in their respective fields For the Detection Area please click on the Set Clear button then click in the video window and drag the mouse to set clear the detection area To set the Sensitivity please click on the slider and drag the mouse ...

Page 39: ...ue and Its Slider Showing the sensitivity for the selected Camera and Time Type Dragging the mouse on the slider to change the value The default value is 50 Trend Curve Window Trend curve showing the continuous snapshots of the detected motion with the bar higher than the horizontal line in the middle as motion detected lower as no motion detected Reset All button To reset all the settings to thei...

Page 40: ...reen Please click on Administrator Supervisor or Operator in the list then click on the Login name Password or Confirm field and then enter the new names by using the mouse or the keyboard The following is a brief description for each item shown above List Box for Administrator Supervisor Operator To select Administrator Supervisor or Operator All the other fields correspond to the highlighted sel...

Page 41: ...ations dialog box will be shown on the screen The following is the brief description for each item shown above Communication LAN Card Configuration IP address Enter the desired IP address of the device in the columns To obtain the IP address please contact your Internet Server Provider Subnet Mask Enter the corresponding Subnet Mask Enable Gateway For local network setting leave the box blank to d...

Page 42: ...ylight Saving Time as described in below select the proper one while the Daylight Saving Time function is enabled North America Clocks are turned forward an hour begins at 2 a m on the first Sunday in April time reverts to standard time at 2 a m on the last Sunday in October European Union Clocks are turned forward an hour begins at 1 a m on the last Sunday in March time reverts to standard time a...

Page 43: ...slider bar is for adjusting the sharpness of the images shown on the main monitor screen To set the sharpness click on the slider and drag the mouse to left is for sharper images to right is for less sharp ones Note The V 2 0 and later version software can support Networking for either 30 FPS NTSC 25FPS PAL or 60FPS NTSC 50FPS PAL recording rate models The system requires 128 MB DRAM and LAN card ...

Page 44: ...nistrator If you are an Administrator please click one the Time displaying on the Main Screen to enter the Date Time Setup for the system The date is in YYYY MM DD format whilst the time in military hour format HH MM SS The built in real time clock will be updated accordingly ...

Page 45: ...cation The icons remained the same as in the Main Screen provide the same functions as described in Chapter 4 If any icon is grayed it means that the specific function is not accessible in the current mode If you want to playback the recorded video please click on the Select HDD Range icon first to select the range of the recorded video for playback The following is a brief description for each of...

Page 46: ...p Backward The previous single image corresponding to one of the selected playback cameras will be played on its corresponding video window Pause To pause playing the video Click on Play icon to resume playing Note 1 The Reverse Play function is only effective for the HDD data which is recorded after the system is upgraded to V2 1 or later version The image data recorded before V2 1 cannot be reve...

Page 47: ... cameras will be displayed in its respective video window For speed 3 4 5 6 each image out of 2 3 4 5 images will be displayed Click on the button to select the desired playback speed The default value is 1 Slider Bar Showing the current playing position in the selected range Click on it and drag the mouse to play the video from anywhere in the selected range when it s playing The date and time wi...

Page 48: ...he following is a brief description for each item shown above HDD No The recorded Hard Disk to playback Up to 18 Hard Disks can be mounted in the system Use the Down arrow button to select the Hard Disk number 1 18 Start End Block No 1 GB Block or 32 Sections Block for the system The maximum End Block No represents the Block number for the last recorded video or the maximum block number for the Ha...

Page 49: ...es above displays Block Section Slice in BB SS ss format date in YYYY MM DD format and military hour in HH MM SS format for the video corresponding to the Slider Bar position If Block Section Slice is shown as nn XX XX the messages are at the Block level nn nn XX Section level and nn nn nn Slice level Set Start button Drag the Slider Bar to the start position you want then click on the Set Start b...

Page 50: ...ow to select the desired start date and time click on the Submit button to start searching The other items are the same as the above description Search by Time 01 08 10 50 10 10 V 01 01 01 2001 8 13 Mon 18 46 50 N Y N N N Y Y N N N Y Y N N N N N Y N N N Y Y N N N Y Y N N N N N Y N N N Y Y N N N Y Y N N N N N Y N N N Y Y N ...

Page 51: ...k The procedure for configuring a remote PC depends on the desired type of connection The user can either dial directly into the server through modem or connect over a network You must obtain IP addresses for the remote PC and EDR1600 please refer to Chapter 6 15 System Configurations for the details Remote View Remote View After the Remote PC and EDR1600 are connected start your Web browser and e...

Page 52: ...for each window Click on the Submit button while the setting is completed Playback Date Time To set the searching date time for Image Playback Enter the desired date and time in the proper columns click on the Submit button to change the setting The Playback Date Time searching is based on EDR1600 system clock please enter the local date time for searching if there s time difference between local ...

Page 53: ...plorer 5 0 or above 1024 x 768 If the PC is protected by the Firewall please make sure Port 1600 is enabled before accessed Note 2 The Login Name and Password are the same as used in EDR1600 the Administrator can operate all the functions on remote end the Supervisor can view the live video and playback image and the Operator can only view the live video Note 3 The remote end will not be able to v...

Page 54: ...ality may have to be configured as 2 or less than 2 However that depends on the cameras connected to the system and some other factors Please do some tests for the trade off between recording quality and recording rate CMOS data recovery If after booting the EDR1600 the system halts and the LED for the floppy drive is always OFF the CMOS data of the system may be lost Please Insert the V1 20 or la...

Page 55: ...2 is not accessible please power off both HDD 1 and HDD 2 and then power on both of them immediately Hard disks in EDA800 If you are using EDA800 please choose IBM s hard disks for your recording purposes EDA800 and IBM s hard disks have the best compatibility No limitation for motion setup There are only 50 sets of motion configuration settings for V1 20 or earlier version Now there is no limitat...

Page 56: ...utputs Hard Disk Storage Up to 2 sets of Hard Disks hot swappable Hard Disk Extension Up to 16 sets of Hard Disks hot swappable Hard Disk Type IDE Type 3 5 half height Recording Rate Up to 60 fps for NTSC 50 fps for PAL independent of camera types Recording Mode Time lapse recording Event recording Playback Rate Up to 30 fps for NTSC 25 fps for PAL Playback Search Radar search Thumbnail search Tim...

Page 57: ...Administrator s Guide and Operating Instructions 53 Weight 20KG Operating Temperature 0o C 45o C ...

Page 58: ...3 2 5 2 22 52 8 16 48 25 6 49 2 1 7 4 10 18 13 1 12 37 22 13 1 2 1 7 9 10 21 17 59 63 5 2 1 0 83 8 20 36 26 2 23 75 20 27 0 6 0 5 14 18 21 43 11 59 126 10 4 0 3 0 25 29 12 41 86 23 58 252 20 9 0 2 0 17 44 7 2 130 11 59 379 6 13 0 12 0 1 73 19 43 217 11 55 632 2 22 0 1 88 14 4 260 23 54 758 12 27 FPS Fine 10 Normal 5 Rough 0 EDR1600 Time Lapse Mode Recording Time system storage 20GB Estimated with ...

Page 59: ...0 5 18 22 49 66 7 39 115 14 1 0 3 0 25 37 23 39 132 15 17 231 4 1 0 2 0 17 56 23 28 198 22 56 346 18 2 0 12 0 1 94 23 7 331 14 14 577 22 3 0 1 113 22 56 397 21 52 693 12 4 Note 1 EDR1600 can be mounted with 2 hot swappable internal HDDs Note 3 The listed system storage capture rates are just taken for example Note 2 With EDA800 EDR1600 can be mounted with up to 18 hot swappable HDDs EDR1600 Time L...

Page 60: ...ave The settings should be described on the hard disk itself or in the manual come with the hard disk The default settings for the hard disk should be master Q The playback images cannot be retrieved to the ZIP disk A The system support IOMEGA s ZIP drives The ZIP drive must be connected to the system at system startup Besides the ZIP disk must be PC formatted Q How to get better video quality A T...

Page 61: ... will not be able to see the live images for those cameras Q There are no pre recorded images for the camera A There must be at least one Action corresponding to that camera and the pre record time of those Actions must be non zero Besides the normal recording rate for that camera must be non zero Exception If the normal recording rates for all the installed cameras are all zero the pre record wil...

Page 62: ...rior notification in the interest of ongoing product development and improvement 2008 Ness Security Products Pty Ltd ABN 28 069 984 372 Head Office Ness Security Products Pty Ltd ABN 28 069 984 372 Ph 61 2 8825 9222 Fax 61 2 9674 2520 ness ness com au NSW Ph 02 8825 9222 Fax 02 9674 2520 sales ness com au VIC Ph 03 9875 6400 Fax 03 9875 6422 nessmelb ness com au QLD Ph 07 3399 4910 Fax 07 3217 971...

Reviews: