25
24
5. OUT. MODE
6. RETURN: Return to
MAIN MENU
or
SAVE & EXIT.
If the version of DVR is 1.0,
DISTANCE
menu is added.
DISTANCE
menu enables to choose
NORMAL
or
LONG
depending on length of cable.
6.13 EXIT
1. SAVE & EXIT: Save the current settings and exit the menu.
2. NOT SAVED: Do not save the current settings and exit the
menu.
3. RESET: Reset the camera settings to factory default.
7.0
CARE AND MAINTENANCE
Always keep camera clear from dirt and mud. Clean camera with a
soft moist cloth.
according to CDS operation.
You can select the duration time about
changing the Day / Night mode 0 ~ 60.
D
N : To adjust lux level for switching Day to Night.
N
D : To adjust lux level for switching Night to Day.
(2) EXT
Color or B / W is controlled by the signal coming from an external GPIO port.
(3) BW
The picture is always in black and white.
BURST
: ON / OFF.
IR AMART : ON / OFF.
Adjusts the level in 0 ~ 15. (Default 3)
(4) COLOR
The picture is always in color.
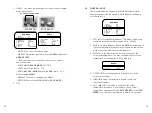
8. NR (Noise Reduction)
Noise Reduction (NR) is used in order to obtain a high
quality output image and enhance compression
efficiency.
Offers Edge Preserving 2D NR and Motion Adaptive
3D NR.
(1) 2D NR
Cuts off the noise in low light condition.
(2) 3D NR
Cuts off the noise in low light condition.
(3) RETURN
Returns to the MAIN MENU or SAVE&END.
9. SPECIAL
(1) CAM TITLE
If you enter a title, the title will appear on the
monitor.
1.
Please position the arrow to point to ‘SPECIAL’
on the moving UP or DOWN direction.
2.
Then, select ‘ON’ by using the LEFT and RIGHT
selection.
When you press the button to complete ‘ON’, then
‘CAM TITLE’ will be
displayed.
☞
NOTE
If ‘OFF’ is selected, the CAM TITLE does not appear on the monitor even if it has
been input.
3.
Up to 15 letters are available for the CAM TITLE.
①
Please move the cursor to the letter to choose by using the UP and DOWN
selections.
②
Set an ID from 0, 1, ~ 8, 9, A, B, ~ Y, Z by using the UP, DOWN, LEFT and
RIGHT selections.
③
Lock in the letters by using the button.
When the letter is locked in, the cursor moves to the next space.
④
Please repeat the above to input CAM TITLE.
4.
When a name has been chosen, please select a position for the name to
display.
①
Please move the cursor onto
‘POS’ and then press the button.
②
The name will appear at the top right corner.
③
Please find the position you wish to display the name by using the 4
directional selections, and then press the button to finish.
5.
Please select ‘END’ and then press the button to complete CAM TITLE input.
(2) D-EFFECT
-
FREEZE : You can view still or moving pictures.
-
MIRROR : ROATE / V-FLIP / MIRROR / OFF.
-
NEG. IMAGE : Negative ON / OFF.
-
RETURN : Returns to the SPECIAL MENU
or SAVE&END.
(3) MOTION
-
SELECT : You can select up to 4 MD areas.
-
DISPLAY : Determines whether to use the MD
area selected in AREA SELECT.
ON : Determines the coordinate of the
vertical / horizontal position.
Determines the coordinate of the
vertical / horizontal size.
-
SENSITIVITY : Determines the coordinate of
the sensitivity.
-
COLOR : GREEN, RED, WHITE, BLUE.
-
TRANS : Set the color transparency for displaying a detected area.
-
ALARM : Set the alarm output. (VIEW TYPE, OSD VIEW, etc.)
-
DEFAULT : Initialize all setting of the MOTION.
-
RETURN : Returns to the SPECIAL MENU or SAVE&END.
(4) PRIVACY
-
SELECT : You can select up to 4 PRIVACY
areas.
-
DISPLAY : Determines whether to use the MD
area selected in AREA SELECT.
-
COLOR : CYAN, GREEN, YELLOW, BLUE,
RED, BLACK, WHITE, USER.
-
TRANS : Set the color transparency for
displaying a detected area.
-
DEFAULT : Initialize all setting of the PRIVACY.
-
RETURN : Returns to the SPECIAL MENU or SAVE&END.
(5) LANGUAGE
ENG / ARB / HEB / JPN / KOR / TUR / NED
/ POR / RUS / POL / SPA / ITA / FRA / GER /
CHN2 / CHN1. (Supports up to 16 Languages)
(6) DEFECT
-
LIVE DPC : Live Dead Pixel Correction.
AGC LEVEL : Adjusts the AGC LEVEL
0 ~ 255.
LEVEL : Adjusts the LEVEL 0 ~ 100.
RETURN : Returns to the DEFECT MENU
or SAVE&END.
-
WHITE DPC : White Dead Pixel Correction.
POS / SIZE : Adjusts the position and size.
START
DPC VIEW : ON / OFF.
LEVEL : Adjusts the LEVEL 0 ~ 60.
AGC : Adjusts the LEVEL 0 ~ 14.
SENS-UP : Adjusts the LEVEL x2 ~ x30.
RETURN : Returns to the DEFECT MENU
or SAVE&END.
-
BLACK DPC : Black Dead Pixel Correction.
POS / SIZE : Adjusts the position and size.
START
DPC VIEW : ON / OFF.
LEVEL : Adjusts the LEVEL 0 ~ 255.
RETURN : Returns to the DEFECT MENU or
SAVE&END.
-
RETURN : Returns to the SPECIAL MENU or SAVE&END.
(7) RETURN
-
Returns to the MAIN MENU or SAVE&END.
10. ADJUST
(1) SHARPNESS
-
LEVEL : Adjusts the LEVEL 0 ~ 10.
-
START AGC : When the level is high, the
sharpness of picture at night is
improved while noise is increased.
-
END AGC : Set to 255 Level for optimized definition at night.
-
RETURN : Returns to the ADJUST MENU or SAVE&END.
(2) MONITOR
A. LCD
-
GAMMA : Adjusts the LEVEL 0.45 ~ 1.00, USER.
-
BLUE GAIN : Adjusts the LEVEL 0 ~ 100.
-
RED GAIN : Adjusts the LEVEL 0 ~ 100.
-
RETURN : Returns to the ADJUST MENU or
SAVE&END.
B. CRT
-
BLUE GAIN : Adjusts the LEVEL 0 ~ 100.
-
RED GAIN : Adjusts the LEVEL 0 ~ 100.
-
RETURN : Returns to the ADJUST MENU or SAVE&END.
(3) LSC
Lens Shading Correction (LSC) corrects the
phenomenon where the image gets darkened or
blurred on the periphery.
(4) VIDEO.OUT
NTSC / PAL
-
Video output can be set to NTSC or PAL
according to local TV standard.
(5) OUT. MODE
(6) RETURN
Returns to the MAIN MENU or SAVE&END.
If the version of DVR is 1.0,
‘
DISTANCE
’
menu is added.
‘
DISTANCE
’
menu enables to choose (select)
’
NORMAL
’
of
‘
LONG
’
depending
on length of cable.
11. EXIT
(1) SAVE&END
Save the current settings and exit the menu.
(2) NOT SAVE
Do not save the current settings and exit the
menu.
(3) RESET
Resets the camera settings to the factory defaults.
►
1. LENS
2. EXPOSURE
3. BACKLIGHT
4. WHITE BAL
5. DAY&NIGHT
6. NR
7. SPECIAL
8. ADJUST
9. EXIT
DC
OFF
ATW
AUTO
SAVE&END
MAIN MENU
►
1. LENS
2. EXPOSURE
3. BACKLIGHT
4. WHITE BAL
5. DAY&NIGHT
6. NR
7. SPECIAL
8. ADJUST
9. EXIT
DC
OFF
ATW
AUTO
SAVE&END
MAIN MENU
0 1 2 3 4 5 6 7 8 9
A B C D E F G H I J K
L M N O P Q R S T U V
W X Y Z
▶
( )
/ = & : ~ , .
CAM TITLE
CLR POS END
----------------------------------------
►
1. CAM TITLE
2. D-EFFECT
3. MOTION
4. PRIVACY
5. LANGUAGE
6. DEFECT
7. RETURN
ON
OFF
OFF
ENG
RET
SPECIAL
►
1. FREEZE
2. MIRROR
3. NEG . IMAGE
4. RETURN
OFF
OFF
OFF
RET
D-EFFECT
►
1. CAM TITLE
2. D-EFFECT
3. MOTION
4. PRIVACY
5. LANGUAGE
6. DEFECT
7. RETURN
OFF
OFF
OFF
ENG
RET
SPECIAL
AREA1
OFF
30
BLUE
1.00
TIME
RET
►
1. SELECT
2. DISPLAY
3. SENSITIVITY
4. COLOR
5. TRANS
6. ALARM
7. DEFAULT
8. RETURN
MOTION
|||||||||
|
||||||||||
►
1. CAM TITLE
2. D-EFFECT
3. MOTION
4. PRIVACY
5. LANGUAGE
6. DEFECT
7. RETURN
OFF
OFF
OFF
ENG
RET
SPECIAL
►
1. SELECT
2. DISPLAY
3. COLOR
4. TRANS
5. DEFAULT
6. RETURN
AREA1
OFF
0
3
RET
PRIVACY
►
1. CAM TITLE
2. D-EFFECT
3. MOTION
4. PRIVACY
5. LANGUAGE
6. DEFECT
7. RETURN
OFF
OFF
OFF
ENG
RET
SPECIAL
►
1. CAM TITLE
2. D-EFFECT
3. MOTION
4. PRIVACY
5. LANGUAGE
6. DEFECT
7. RETURN
OFF
OFF
OFF
ENG
RET
SPECIAL
►
1. POS / SIZE
2. START
3. DPC VIEW
4. LEVEL
5. AGC
6. SENS-UP
7. RETURN
OFF
10
10
x4
RET
WHITE DPC
||||||||||
|
|||||||||
||||||||||
|
|||||||||
►
1. POS / SIZE
2. START
3. DPC VIEW
4. LEVEL
5. RETURN
OFF
255
RET
BLACK DPC
|||||||||||||||||||
|
►
1. LENS
2. EXPOSURE
3. BACKLIGHT
4. WHITE BAL
5. DAY&NIGHT
6. NR
7. SPECIAL
8. ADJUST
9. EXIT
DC
OFF
ATW
AUTO
SAVE&END
MAIN MENU
►
1. SHARPNESS
2. MONITOR
3. LSC
4. VIDEO.OUT
5. OUT. MODE
6. RETURN
AUTO
LCD
OFF
NTSC
AHD
RET
ADJUST
►
6
128
255
RET
1. LEVEL
2. START AGC
3. END AGC
4. RETURN
SHARPNESS
|||||||||||
|
||||||||
||||||||||
|
|||||||||
|||||||||||||||||||
|
►
1. SHARPNESS
2. MONITOR
3. LSC
4. VIDEO.OUT
5. OUT. MODE
6. RETURN
AUTO
LCD
OFF
NTSC
AHD
RET
ADJUST
►
USER
70
70
RET
1. GAMMA
2. BLUE GAIN
3. RED GAIN
4. RETURN
LCD
|||||||||||||
|
||||||
|||||||||||||
|
||||||
►
1. SHARPNESS
2. MONITOR
3. LSC
4. VIDEO.OUT
5. OUT. MODE
6. RETURN
AUTO
LCD
OFF
NTSC
AHD
RET
ADJUST
►
1. SHARPNESS
2. MONITOR
3. LSC
4. VIDEO.OUT
5. OUT. MODE
6. RETURN
AUTO
LCD
OFF
NTSC
AHD
RET
ADJUST
►
1. SHARPNESS
2. MONITOR
3. LSC
4. VIDEO.OUT
5. OUT. MODE
6. RETURN
AUTO
LCD
OFF
NTSC
AHD
RET
ADJUST
►
1. LENS
2. EXPOSURE
3. BACKLIGHT
4. WHITE BAL
5. DAY&NIGHT
6. NR
7. SPECIAL
8. ADJUST
9. EXIT
DC
OFF
ATW
AUTO
SAVE&END
MAIN MENU
►
1. LIVE DPC
2. WHITE DPC
3. BLACK DPC
4. RETURN
ON
ON
OFF
RET
DEFECT
►
64
80
RET
1. AGC LEVEL
2. LEVEL
3. RETURN
LIVE DPC
||||||||||
|
|||||||||
||||||||||||
|
|||||||
►
1. CAM TITLE
2. D-EFFECT
3. MOTION
4. PRIVACY
5. LANGUAGE
6. DEFECT
7. RETURN
ON
OFF
OFF
ENG
RET
SPECIAL
►
ON
ON
RET
1. 2DNR
2. 3DNR
3. RETURN
NR
8.0 WARRANTY TERMS & CONDITIONS
Our goods come with guarantees that cannot be excluded under
the Australian Consumer Law. You are entitled to a replacement
or refund for a major failure and for compensation for any other
reasonably foreseeable loss or damage. You are also entitled
to have the goods repaired or replaced if the goods fail to be of
acceptable quality and the failure does not amount to a major
failure.
This warranty is provided in addition to your rights under the
Australian Consumer Law.
Neltronics warrants that this product is free from defects in material
and workmanship for a period of 36 months from the date of
purchase or for the period stated on the packaging. This warranty is
only valid where you have used the product in accordance with any
recommendations or instructions provided by Neltronics.
This warranty excludes defects resulting from alterations of the
product, accident, misuse, abuse or neglect.
In order to claim the warranty, you must return the product to the
retailer from which it was purchased or if that retailer is part of a
National network, a store within that chain, along with satisfactory
proof of purchase. The retailer will then return the goods to
Neltronics. Neltronics will repair, replace or refurbish the product at
its discretion. The retailer will contact you when the product is ready
for collection. All costs involved in claiming this warranty, including
the cost of the retailer sending the product to Neltronics, will be
borne by you.
For full warranty terms and conditions, visit:
https://www.neltronics.com.au/warranty-terms-and-conditions/
Neltronics Address:
4/50 Jersey St, Jolimont, Western Australia
Ph:
+61 08 9383 7833
Email:
Summary of Contents for NRC-80H
Page 1: ...NRC 80H USER MANUAL Heavy Duty Hybrid AHD Rear View Camera...
Page 17: ...31 30 9 0 NOTES...
Page 18: ...33 32...


