background image

11

5.

Microphone mounting and cable pulling under lining.

6.

Mounting of file locking wire button and cable pulling under lining.

 Having provisionally identified the installation place, use fastening components 
from the delivery set.

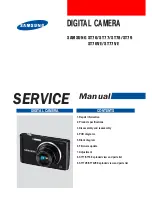
Installation of Front and Additional Cameras

To ensure an optimal view, the camera should be mounted bedsides the rear vi-
sion mirror on  the centreline and top of the windshield (front camera) and on the 
centreline and top of the rear window (additional camera).

 Position the lens so that the camera captures the image in proportion “30% sky/ 
70% road” to reach the best filming results. 
Identify beforehand a precise place for camera installation since the holder is 
provided with 3M tape that is intended for a single use. 

front camera

additional camera 

Summary of Contents for G-TECH X5x series

Page 1: ...Dashboard Camera NEOLINE series G TECH X5x User Manual...

Page 2: ......

Page 3: ...essary in future CERegulatoryNoticeTheproductherewithcomplieswiththerequirementsofthe LowVoltageDirective2014 35 EU theEMCDirective2014 30 EU batterydirective 2006 66 EC theR TTEDirective1999 5 ECandt...

Page 4: ...irect caused to the user or to a third party through improper use of the device or soft ware incorrect installation use of accessories not included in the delivery set Format microSD card not rarer th...

Page 5: ...athermal windshield or with heated windshield will require a correct installation of external GPS antenna Since such windshields contain a metal sputtering in their structure correct operation of GPS...

Page 6: ...on 10 C to 70 storage 30 C to 80 Number plate stamp Date time stamp Audio recording upon connection of external microphone Built in loudspeaker G sensor Motion sensor Parking mode Input voltage DC 12V...

Page 7: ...dels G Tech X52 X53 1 piece Memory card 1 piece Important Do not install GPS antenna behind metal surfaces of motorcar it will deteriorate satellite search performances and incorrect GPS operation Cor...

Page 8: ...ditional camera connection cable 3 Loudspeaker 4 MicroSD card slot 5 Dashboard camera operation indicator 6 Wi Fi status indicator 7 Button for connection with wireless file override locking button 8...

Page 9: ...onnector Light Indicators 1 2 3 4 5 6 Indicator Wi Fi status indicator Dashboard camera operation indicator Blue blinking Blue constantly lighted Red constantly lighted Blue blinking Blue frequent bli...

Page 10: ...nit instal lation in the motorcar under steering column besides driver s elbow rest under glove box Important If you have no experience in electric equipment installation it is recommended to address...

Page 11: ...optimal view the camera should be mounted bedsides the rear vi sion mirror on the centreline and top of the windshield front camera and on the centreline and top of the rear window additional camera...

Page 12: ...wire to ACC 12V or to other connector where voltage will disappear after ignition is keyed off Connect black minus wire with the motor car body Connect cable into supply cable connector of the main Lo...

Page 13: ...the memory card in or der to avoid damage of the device To install insert MicroSD into the slot until it is fixed goes click if necessary use a needle to seat the card To remove the card press on it...

Page 14: ...intended for storage of files recorded when the file override Locking button is pressed In the process of motion you can Lock the file against override using the special wire or wireless button of fil...

Page 15: ...ional camera 4 Recorded Files Menu function is intended for to display recorded files downloading files on smartphone viewing videofiles 5 Video Recording Menu video realtime viewing audio recording o...

Page 16: ...ce from the list Device name looks as follows G Tech X5x xxxxxx where 6 last symbols are the identifier of an individual device 4 Enter password factory password 12345678 and press connection button 5...

Page 17: ...me looks as follows G Tech X5x xxxxxx where 6 last symbols are the identifier of an individual device 4 Enter password factory password 12345678 and press connection button 5 Upon successful connectio...

Page 18: ...les storage folders 3 List of files in selected folder 4 List of files on the dashboard camera memory card the tab is intended to playback files saved on the dashboard camera memory card can select re...

Page 19: ...ck will start in full screen mode wipe screen sideways to delete the file Confirm file deletion in appearing window Transfer of Files into Social Networks and Other Services Press the selected file an...

Page 20: ...oad traffic accident You can set the sensor sensitiv ity at your own discretion taking into consideration the condition the lower the value the higher the sensitivity We recommend to retain factory se...

Page 21: ...folder 8 seconds before event and 10 seconds thereafter shall be saved File Locking Sound activates sound notification that the videofile is Locked asgainst override Power Off to prevent the motorcar...

Page 22: ...ry files prior to formatting the memory card Memory Card Areas select appropriate for you partition of spaces on the memory card a certain memory space will be reserved for each folder Important Forma...

Page 23: ...on hours 6 12 24 36 48 OFF Time Zone 11 to 12 hours Voice Notifications ON OFF Number Plate Stamp Enter the motorcar number plate Only numbers and Latin alphabet letters are allowed Formatting in popu...

Page 24: ...lay upon attempt to view playback photo video file Uncompleted recording into file through file system error on the microSD card Format the microSD card Washed out picture Check whether the lens is fr...

Page 25: ...uania Made in PRC Official website www neoline ru Technical support support neoline ru Operating temperature 10 C to 40 C See individual packaging for information about the importer and authorized ser...

Reviews: