background image

BluStream Operation in:

General Motors

(PGHGM4 & ISGM574)

Selecting Bluetooth Mode
Navigation Radios

Press the XM icon on the screen. Immediately turn the TUNE KNOB 

until BT is displayed. Press the >>>>> icon on the screen to select the 

displayed mode. 

Non-Navigation Radios

Press the BAND button until XM is displayed. Immediately turn the TUNE 

KNOB until BT is displayed. Press PRESET 2 to select the displayed 

mode.

Phone Controls
IMPORTANT NOTE: The radio MUST be in Satellite mode in order 

for the ISBT21 to function. If you switch out of Satellite Radio mode 

the ISBT21 will automatically disconnect from your phone and you 

must use the handset.
Navigation Radios

1. Answer/End Call - 

Press SEEK ▲ to answer/end a call.

2 Volume - 

Turn the TUNE KNOB while in a call to adjust the volume.


3. Call Waiting - 

Press SEEK ▲ while in a call to answer a 3rd party 

call. You can also use SEEK ▲ to switch between the calls. To end a 3rd 

party call you must press and HOLD SEEK ▲ for 2 seconds.

4. Privacy Mode - 

Press SEEK ▼ while in a call to transfer the audio 

from the vehicle speakers to the handset.

5. Reject Call - 

Press SEEK ▼ to reject an incoming call.

6. Voicedial - 

While in Bluetooth mode, press the CATEGORY icon on 

the screen & then press the VOICECALL button to activate voicedial.

7. Call History -

 Turn the TUNE KNOB while in Bluetooth mode to scroll 

through a list of your previous incoming calls.

8. Call Last # - 

Press SEEK ▲ while in Bluetooth mode to call the last 

incoming number to your phone.

9. Menu - 

While in Bluetooth mode press the CATEGORY icon on the 

screen & then press the >>>>> button to enter the menu. Once in the 

menu you can use the TUNE KNOB to scroll through the options. Press 

the >>>>> button while in the menu to select the displayed option.

Non-Navigation Radios

1. Answer/End Call - 

Press PRESET 3 to answer/end a call.

2 Volume - 

Turn the TUNE KNOB while in a call to adjust the volume.


INST030

Summary of Contents for GM4

Page 1: ...Expand Your Factory Radio GM4 Owner s Manual Neo Gateway add iPod Enjoy the Music...

Page 2: ...2 Precautions 2 3 Compatibility 3 4 Dipswitch Settings 3 5 Installation 4 6 iPod Operation 5 8 7 HD Radio Operation if equipped 9 8 Selecting AUX Input 10 9 Selecting Factory Satellite 10 if equipped...

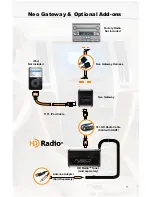
Page 3: ...ay Optional Add ons Neo Gateway Harness Factory Radio Not Included iPod Not Included Neo Gateway 3Ft HD Radio Cable Sold with HDRT 11Ft iPod Cable HD RadioTM Tuner sold seperately Antenna Adapter Sold...

Page 4: ...from Apple This is done on your computer To update the software on the iPod go to http www apple com ipod download Follow the directions on the website to complete the download There is no charge for...

Page 5: ...3 3 Compatibility 4 Dipswitch Settings All 4 dipswitches MUST be set in the OFF up position for proper operation Fig 1 Side view of interface with dip switches in correct position OFF ON...

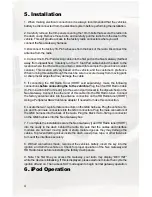
Page 6: ...to the second port closest to the dipswitches on the Neo Gateway Connect the other end of this cable into the HD Radio tuner Connect the factory antenna cable into the antenna connection on the HD Rad...

Page 7: ...to the right one notch to advance to the next track Previous Track Turn the rotary tune knob to the left one notch to move back to the previous track Fast Forward Press SEEK to fast forward the song t...

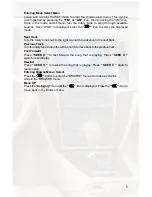
Page 8: ...splayed one at a time in alphabetical order AL will be displayed in front of the name of the album to indicate you are searching for an album Turn the rotary tune knob to cycle through the albums Once...

Page 9: ...e selected album Songs are listed in the order in which they appear in the album not alphabetically When the radio displays the name of the desired song Press to select and play the desired song The d...

Page 10: ...the name of the desired song Press to select and play the desired song The display will automatically change to display and scroll the song title Browse by Playlist Press the button to enter the brow...

Page 11: ...on the screen Press the softkey to select the desired band Store Presets To Store a station into the Preset memory tune to the station to enter the preset menu press the button Turn the tune knob in t...

Page 12: ...ly in AUX1 or AUX2 mode turn the rotary knob to enter the mode select menu Once AUX1 or AUX 2 is displayed on the screen press the button to select 9 Selecting Factory Installed Sat if equipped Enteri...

Page 13: ...e HD Radio tuner HDRT The HD tuner was not properly connected when the was first connected and initialized HDRT must be connected before the Gateway is powered on Disconnect the from the vehicles harn...

Page 14: ...orized dealer Warning This equipment may be reset by unintentional electrostatic discharge during operation Exposure to direct sunlight or extreme heat may cause damage or malfunction FCC Class B Radi...

Page 15: ...13 NOTES...

Page 16: ......

Page 17: ...d party call You can also use SEEK to switch between the calls To end a 3rd party call you must press and HOLD SEEK for 2 seconds 4 Privacy Mode Press SEEK while in a call to transfer the audio from t...

Page 18: ...ile in Bluetooth mode to scroll through a list of your previous incoming calls 8 Call Last Press PRESET 3 while in Bluetooth mode to call the last incoming number to your phone 9 Menu While in Bluetoo...

Reviews: