Configuration of the components
11
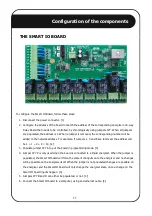
To configure the Smart IO Board, follow these steps:
1.
Disconnect the power connector. [1]
2.
Configure the address of the board to match the address of the corresponding energizer or 8-way
Relay Board that needs to be controlled, by chronologically using jumpers JP7. When all jumpers
are populated, the address is 1. When a jumper is removed, the corresponding number will be
added to the network address. For example, if jumpers 1, 4 and 8 are removed, the address will
be 1 + 1 + 4 + 8 = 14. [2]
3.
Populate jumper JP7 A to put the board in programming mode. [3]
4.
Jumper JP7 C is only used when the board is connected to a Druid energizer. When the jumper is
populated, the Smart IO board will force the state of its inputs onto the energizer and no changes
will be possible on the energizer itself. When the jumper is not populated changes are possible on
the energizer and the Smart IO board will only change the energizer state, once a change on the
Smart IO board inputs happen. [3]
5.
Jumpers JP7 B and D can either be populated, or not. [3]
6.
Connect the Smart IO board to a computer, using and ethernet cable. [4]
THE SMART IO BOARD
2
3
1
4


