background image

en

20

Information concerning 

disposal

*

 Disposal of packaging

The packaging protects your appliance 

from damage during transit. All utilised 

materials are environmentally safe and 

recyclable. Please help us by disposing 

of the packaging in an environmentally 

friendly manner.
Please ask your dealer or inquire at your 

local authority about current means of 

disposal.

*

 Disposal of your old 

appliance

Old appliances are not worthless 

rubbish! Valuable raw materials can be 

reclaimed by recycling old appliances.

Warning

Redundant appliances
1. Pull out the mains plug.
2. Cut off the power cord and discard 

with the mains plug.

3. Do not take out the trays 

and receptacles: children are 

therefore prevented from climbing in!

4. Do not allow children to play with 

the appliance once it has spent its 

useful life. Danger of suffocation!

Refrigerators contain refrigerant and 

gases in the insulation. Refrigerant 

and gases must be disposed of 

professionally. Ensure that tubing 

of the refrigerant circuit is not damaged 

prior to proper disposal. 
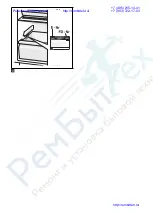
Scope of delivery

After unpacking all parts, check for 

any damage in transit.
If you have any complaints, please 

contact the dealer from whom you 

purchased the appliance or our 

customer service.
The delivery consists of the following 

parts:

Built-in appliance

Interior fittings (depending on model)

Bag containing installation materials

Operating instructions

Installation manual

Customer service booklet

Warranty enclosure

Information on the energy 

consumption and noises

Ambient temperature 

and ventilation

Ambient temperature

The appliance is designed for a specific 

climate class. Depending on the climate 

class, the appliance can be operated at 

the following temperatures.

This appliance is identified 

according to the European 

guideline 2002/96/EC on waste 

electrical and electronic 

equipment – WEEE. The directive 

specifies the framework for an 

EU-wide valid return and re-use 

of old appliances.

Ремонт


холодильников

http://rembitteh.ru/

+7 (495) 215-14-41 

+7 (903) 722-17-03

http://rembitteh.ru/

Summary of Contents for K81 Series

Page 1: ...on it Istruzioni per l uso nl Gebruiksaanwijzing K hl und Gefrierkombination Fridge freezer R frig rateur Cong lateur combin Combinazione frigorifero congelatore Koel diepvriescombinatie K81 http remb...

Page 2: ...on the appliance 22 Setting the temperature 23 Super cooling 23 Alarm function 23 Usable capacity 23 Refrigerator compartment 24 Interior fittings 25 Sticker OK 26 Switching off and disconnecting the...

Page 3: ...ral minutes switch off the appliance and pull out the mains plug inform customer service The more refrigerant an appliance contains the larger the room must be in which the appliance is situated Leaki...

Page 4: ...led and stored in an upright position Keep plastic parts and the door seal free of oil and grease Otherwise parts and door seal will become porous Never cover or block the ventilation openings for the...

Page 5: ...and gases must be disposed of professionally Ensure that tubing of the refrigerant circuit is not damaged prior to proper disposal Scope of delivery After unpacking all parts check for any damage in...

Page 6: ...in the compressor may have flowed into the refrigeration system Before switching on the appliance for the first time clean the interior of the appliance see chapter Cleaning the appliance Electrical...

Page 7: ...rols 6 Light 7 Glass shelf EasyLift 8 Fixed glass shelf 9 Extendable glass shelf 10 Delicatessen container 11 Vegetable container with humidity control 12 Vegetable container 13 Butter and cheese comp...

Page 8: ...r approx 6 hours Then the appliance automatically switches to the temperature set prior to super cooling mode Switch on super cooling mode e g before placing large quantities of food in the refrigerat...

Page 9: ...packaging could freeze to the rear panel Note the chill zones in the refrigerator compartment The air circulation in the refrigerator compartment creates different chill zones Coldest zone is between...

Page 10: ...the shelf downwards Notes Only ever press one lever If a load exceeds 5 kg the position of the shelf can no longer be changed Fixed glass shelf Fig To change the position of the fixed glass shelf pre...

Page 11: ...rost form on the rear panel of the refrigerator compartment As the rear panel defrosts automatically it is not necessary to remove the frost or the condensation droplets The condensation runs through...

Page 12: ...ay upwards and take out Taking out the door shelf EasyLift Fig Move door shelf all the way upwards and take out Taking out the fixed glass shelf Fig Press buttons on the underside and detach from the...

Page 13: ...n food in the refrigerator compartment and use the low temperature of the frozen food to cool refrigerated food Open the appliance as briefly as possible To prevent increased power consumption occasio...

Page 14: ...aning the appliance Fig The temperature in the refrigerator compartment is too cold Temperature has been set too low Increase the temperature The refrigerating unit is switching on more frequently and...

Page 15: ...tion The light does not function The LED light is defective See chapter Light LED section Appliance was open too long Light is switched off after approx 10 min When the appliance is closed and opened...

Page 16: ...Alarm Super 8 6 4 3 2 C 1 5 7 8 9 10 12 17 11 6 13 14 16 15 5 http rembitteh ru 7 495 215 14 41 7 903 722 17 03 http rembitteh ru...

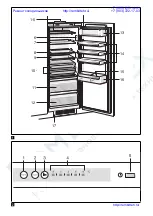
Page 17: ...0 3 1 2 http rembitteh ru 7 495 215 14 41 7 903 722 17 03 http rembitteh ru...

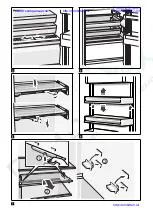
Page 18: ...http rembitteh ru 7 495 215 14 41 7 903 722 17 03 http rembitteh ru...

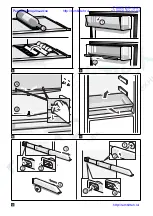
Page 19: ...http rembitteh ru 7 495 215 14 41 7 903 722 17 03 http rembitteh ru...

Page 20: ...9000778978 9411 de en fr it nl http rembitteh ru 7 495 215 14 41 7 903 722 17 03 http rembitteh ru...

Page 21: ...c p o o a http rembitteh ru 7 495 215 14 41 7 903 722 17 03 http rembitteh ru...

Page 22: ...15 1 2 3 12 13 18 21 24 25 28 29 30 27 26 22 20 23 14 15 16 17 4 5 10R 11 8 TORX 20 2 mm 10L 19a 19b 7 9a 9b 6a 6b 01 02 03 06 05 04 07 08 http rembitteh ru 7 495 215 14 41 7 903 722 17 03 http rembit...

Page 23: ...01 Type B 350mm 430mm 350mm 350mm Type A Type C 560mm min 550mm 100mm 4 1 5 max 155mm 1 1 X min 75mm 1 6a 6b X 3mm 19b http rembitteh ru 7 495 215 14 41 7 903 722 17 03 http rembitteh ru...

Page 24: ...02 1 2 3 4 5 6 7 http rembitteh ru 7 495 215 14 41 7 903 722 17 03 http rembitteh ru...

Page 25: ...7 8 10 9 02 4 3 2 1 8 03 90 http rembitteh ru 7 495 215 14 41 7 903 722 17 03 http rembitteh ru...

Page 26: ...04 11 10L 10R 2 2 1 9a 9b 3 http rembitteh ru 7 495 215 14 41 7 903 722 17 03 http rembitteh ru...

Page 27: ...05 12 06 13 1 15 14 15mm 20mm 3 06 http rembitteh ru 7 495 215 14 41 7 903 722 17 03 http rembitteh ru...

Page 28: ...06 06 13 13 14 17 16 18 3 3 1 15 19a http rembitteh ru 7 495 215 14 41 7 903 722 17 03 http rembitteh ru...

Page 29: ...07 20 14 ca 10mm 12 mm 2 mm ca 5 mm 1 15 1 http rembitteh ru 7 495 215 14 41 7 903 722 17 03 http rembitteh ru...

Page 30: ...a b c min 2 mm d 07a 23 23 07 ca 2 3 mm 21 1 2 1 http rembitteh ru 7 495 215 14 41 7 903 722 17 03 http rembitteh ru...

Page 31: ...07b 07c 1 1 2 22 22 2 23 21 21 1 1 2 2 21 ca 2 3 mm 1 2 1 http rembitteh ru 7 495 215 14 41 7 903 722 17 03 http rembitteh ru...

Page 32: ...26 27 28 29 30 08 25 24 http rembitteh ru 7 495 215 14 41 7 903 722 17 03 http rembitteh ru...

Reviews: