


Cleaning function
en
21
Preparation
:
Warning
Risk of fire!
■
Loose food residues, grease and meat juices may
catch fire during the cleaning function. Before
starting the cleaning function, remove coarse dirt
from the cooking compartment and from the
accessories.
Risk of fire!
■
The appliance will become very hot on the outside
during the cleaning function. Never hang
combustible objects, e.g. tea towels, on the door
handle. Do not place anything against the front of
the appliance. Keep children away from the
appliance.
:
Warning – Risk of serious damage to health!
The appliance will become very hot during the cleaning
function. The non-stick coating on baking trays and tins
is destroyed and noxious gases are released. Never
clean non-stick baking trays and baking tins using the
cleaning function. Only clean enamelled accessories
using the cleaning function.
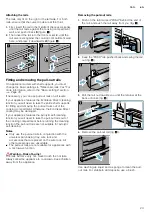
Caution!
Shelf supports and pull-out rails tend to discolour if they
are left in the cooking compartment when it is cleaned.
Before you start the cleaning function, remove the shelf
supports and pull-out rails from the cooking
compartment.
1.
Remove the accessories, shelf supports and pull-out
rails from the cooking compartment.
2.
Remove the worst of the food residues from the
cooking compartment and accessories.
3.
Clean the inside of the appliance door and along the
edges of the cooking compartment in the area
around the seal. Do not scrub or remove the seal.
Setting the self-cleaning
Before setting the cleaning function, ensure that you
have followed all instructions for preparation.
The duration of each cleaning setting is preset and
cannot be changed.
1.
Use the function selector to set the cleaning
functions
2
.
The
2
symbol and the cleaning functions appear in
the display. The first cleaning function is selected.
2.
Press the
)
or
(
button repeatedly until the
˜
symbol
is selected.
"PYRO" appears in the display.
3.
Use the temperature selector to set the cleaning
setting.
Note:
Once cleaning starts, the cleaning level can
no longer be changed.
The duration appears in the display for each setting.
The cleaning function starts after a few seconds. The
cooking time counts down on the display.
Ventilate the kitchen when the cleaning function is
running.
The appliance door locks shortly after the function starts
running. The
5
symbol appears in the display.
Finishing
As soon as self-cleaning has run through, a signal
sounds. The appliance door cannot be opened until the
5
symbol goes out.
Once the cleaning function has ended
1.
Allow the cooking compartment to cool down.
2.
Wipe off any ash that has been left behind in the
cooking compartment and around the appliance
door with a damp cloth.
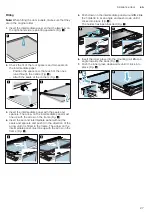
3.
Refit the shelf supports or pull-out rails.
Note:
Very bad soiling may cause white deposits to
remain on the enamel surfaces. This is residue from the
food and is harmless. It does not affect performance.
You can remove these residues using lemon juice if
required.
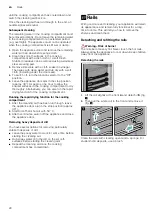
EasyClean
The EasyClean cleaning aid makes it easier to clean the
cooking compartment. Dirt is softened beforehand by
vaporizing soapy water. It can then be removed more
easily.
:
Warning – Risk of scalding!
Water in a hot cooking compartment may create hot
steam. Never pour water into the hot cooking
compartment.
Setting the EasyClean cleaning aid
Notes
■
The EasyClean
š
cleaning aid can only be started
once the cooking compartment is cold (room
temperature) and the appliance door is closed.
■
Do not open the appliance door while it is running.
Doing this will interrupt the EasyClean
š
cleaning
aid.
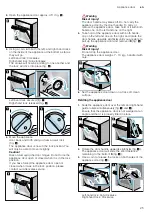
1.
Remove any accessories from the cooking
compartment.
2.
Mix 0.4 litres water (not distilled water) with a drop of
washing-up liquid and pour into the middle of the
cooking compartment floor.
3.
Use the function selector to set the cleaning
functions
2
.
The
2
symbol and the cleaning functions will
appear on the display.The first cleaning function is
highlighted.
4.
Press the
)
or
(
button repeatedly until the
š
symbol
is highlighted.
"EASY" will appear on the display.
5.
Turn the temperature selector.
"On" will appear on the display.
The cleaning aid will start after a few seconds.The
duration will count down on the display.
Note:
The interior lighting remains off while the cleaning
aid is running.
If
œ
flashes on the display when the function is switched
on, this indicates that the cooking compartment has not
completely cooled down. Switch off the appliance. Wait
Summary of Contents for B5ACM7H 0B Series
Page 1: ...en INSTRUCTION MANUAL BUILT IN OVEN B5ACM7H 0B...
Page 2: ......
Page 41: ...6...
Page 42: ...6...
Page 43: ...6...


