background image

19

Cleaning and care

In this section, you will find information on

Cleaning and care of your appliance

Cleaning agents and aids

Self-cleaning surfaces in the cooking compartment

Oven cleaning 

z

Risk of short circuit!

Do not use high-pressure cleaners or steam jet cleaners to 
clean your appliance.

Caution!

Surface damage due to incorrect cleaning: Do not use any

harsh or abrasive cleaning agents

cleaning agents that contain alcohol

abrasive cleaning aids such as steel wool or scourers.

Observe the specifications in the tables.

Note: 

Highly recommended cleaning and care products can be 

purchased through our after-sales service. Observe the 

manufacturer's instructions.

Cleaning the appliance exterior

Cleaning the cooking compartment

Caution!

Risk of damaging the surface. Do not clean the appliance while 

still warm, even if using oven cleaners specially intended for 

this purpose.

Notes

Enamel is baked on at very high temperatures during 

manufacture. This can cause some slight colour variation. 

This is normal and does not affect its function.

The edges of thin trays cannot be completely enamelled. As 

a result, these edges may be rough. Anti-corrosion protection 

is still guaranteed, however.

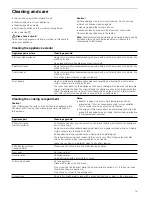
Appliance part/surface

Cleaning agent/aid

Stainless steel surfaces

Apply commercially available washing-up liquid with a soft, damp cloth or chamois; dry 

with a soft cloth. 
Use cleaners for matted stainless steel if very dirty.

Painted surfaces

Apply commercially available washing-up liquid with a soft, damp cloth or chamois; dry 

with a soft cloth.

Control panel

Apply commercially available washing-up liquid with a soft, damp cloth or chamois; dry 

with a soft cloth.
Do not use glass cleaners or glass scrapers.

Door panels

Use a commercially available glass cleaner or washing-up liquid with a soft, damp 

cloth or chamois; dry with a soft cloth. 
The inner door panel on the appliance door has a coating which reduces the tempera-

ture and reflects the heat. The view through the appliance door is not impaired by this. 

When the appliance door is open, this coating can have the effect of a light-coloured 

film. This is part of the design and is not due to any quality defect.

Appliance part

Cleaning agent/aid

Enamel surfaces 

(smooth surface)

To facilitate cleaning, you can switch on the interior lighting and detach the appliance 

door if necessary.
Apply commercially available washing-up liquid or a vinegar solution with a soft, damp 

cloth or chamois; dry with a soft cloth.
Soften baked-on food residues with a damp cloth and detergent.
We recommend using oven cleaner if the oven is very dirty. Observe the manufac-

turer's instructions when cleaning with an oven cleaner.
Leave the cooking compartment open to dry after cleaning.

Self-cleaning surfaces 

(rough surface)

Please see the notes in section: Self-cleaning surfaces

Door seal

Hot soapy water

Hook-in racks

Hot soapy water: 

Soak and clean with a dish cloth or brush.

Telescopic shelves

Hot soapy water: 

Clean with a dish cloth or a brush.
Do not remove the lubricant while the pull-out rails are pulled out – it is best to clean 

them when they are pushed in.
Do not soak or clean in the dishwasher.

Accessories

Soak in hot soapy water, clean with a brush and sponge or wash in the dishwasher.

Summary of Contents for B45M54.3GB

Page 1: ...en Instruction manual Built in oven B45M54 3GB...

Page 2: ......

Page 3: ...two or more levels 11 Baking table 11 Baking table for ready made products 12 Tips and tricks 13 Roasting and braising 14 Roasting 14 Braising 14 Tables for roasting and braising 14 Tips and tricks 1...

Page 4: ...in the instruction manual Risk of fire Combustible items stored in the cooking compartment may catch fire Never store combustible items in the cooking compartment Never open the appliance door if ther...

Page 5: ...olonged periods This will damage the enamel Fruit juice when baking particularly juicy fruit pies do not pack the baking tray too generously Fruit juice dripping from the baking tray leaves stains tha...

Page 6: ...DWXUH VHOHFWRU LQGLFDWRU OLJKW Operating mode Used for 3 CircoTherm For baking and roasting on one or more levels Top bottom heating For baking and roasting on one level Ideal for cakes with moist top...

Page 7: ...tions The shelf positions are counted from the bottom up The pull out rails lock in place when they are fully pulled out This makes it easy to place the accessories in position To unlock the pull out...

Page 8: ...the first time 1 Remove the accessories from the cooking compartment 2 Completely remove any residual packaging e g chips of polystyrene from the cooking compartment 3 Clean the accessories and cooki...

Page 9: ...tches off If a clock function is active the associated symbol remains lit 2 Press the KJclock function button briefly The clock display switches on Timer 1 Press the KJclock function button repeatedly...

Page 10: ...nd y symbols light up 5 Set the end of operation using the rotary selector e g o clock The appliance switches off and waits until the appropriate time to switch on in the example The appliance switche...

Page 11: ...s may brown at different rates on each level The items on the top level will brown more quickly and can be taken out earlier Two baking tins on two levels When baking with two round baking tins or two...

Page 12: ...am tarts 3 1 190 200 15 20 3 200 210 15 20 3 1 3 190 200 20 25 Swiss roll 3 1 180 190 10 15 2 190 200 10 15 Tart 3 1 160 170 50 60 0 1 180 190 45 55 3 1 3 160 170 50 60 Pies 3 1 170 180 65 75 0 1 170...

Page 13: ...40 Lasagne chilled 1200 g 3 1 170 180 40 45 2 190 200 40 45 Preheat oven The cake is too light in colour Check the shelf height Check whether you have used the bakeware that we have recommended Place...

Page 14: ...at shelf position 1 While the meat is braising the liquid in the roasting dish will evaporate Pour in more liquid if required Tables for roasting and braising The details given in the table are guide...

Page 15: ...0 25 Rack of lamb 3 1 180 25 25 2 200 25 25 Pork Roast joint 3 1 180 35 35 2 180 35 35 Loin joint 3 1 180 30 30 2 180 30 30 Belly 3 1 160 30 25 2 190 30 25 Gammon Joint 3 1 160 30 30 2 190 30 30 Chick...

Page 16: ...t after every use so that the dirt does not become burnt on At the end of the cooking time switch the grill off and leave the food to stand for approximately 10 minutes in the cooking compartment with...

Page 17: ...th the lower area facing downwards Suitable for grill items that should be cooked predom inantly rare to medium rare Meal Setting Level Temperature in C Time in minutes Beef Steaks 2 3 cm thick 4 270...

Page 18: ...osting time is shortened to 10 15 minutes Yoghurt You can also use the appliance to make home made yoghurt The heat of the cooking compartment light is used for this 1 Remove accessories and hook in r...

Page 19: ...mois dry with a soft cloth Control panel Apply commercially available washing up liquid with a soft damp cloth or chamois dry with a soft cloth Do not use glass cleaners or glass scrapers Door panels...

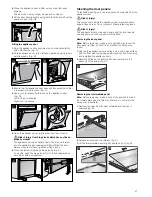
Page 20: ...ol or scourers Oven cleaning If the self cleaning surfaces see section Self cleaning surfaces in the oven no longer clean themselves adequately they can be regenerated using the z Oven cleaning operat...

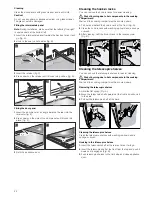
Page 21: ...sh the hinge lock Fig F fully downwards on both sides with a screwdriver Cleaning the door panels To facilitate cleaning you can remove the door panels from the appliance door Risk of injury The compo...

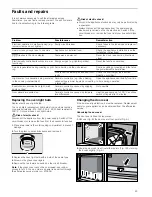
Page 22: ...the cooking compartment Wait until the cooking compartment has cooled down 1 Pull out and detach the hook in rack at the front Fig A 2 Clean the hook in rack with washing up liquid and a sponge or bru...

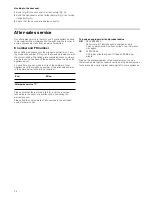
Page 23: ...iance can be obtained from the after sales service Unhooking the door seal The door seal is fixed in nine places 1 Unhook Fig B the door seal at four points Fig A 2 Hook the door seal in at five furth...

Page 24: ...open the appliance door To save time you can make a note of the number of your appliance and the telephone number of the after sales service in the space below should it be required Please note that...

Page 25: ...ookware Shortbread 3 140 150 20 30 Baking tray 3 1 140 150 20 30 Baking tray 3 1 3 140 150 25 35 2x baking tray 3 1 3 4 130 140 35 50 3x baking tray Small cakes 20 pieces 3 160 170 25 30 Baking tray 3...

Page 26: ......

Page 27: ......

Page 28: ...940313 9000813581 9000813581 Constructa Neff Vertriebs GmbH Carl Wery Stra e 34 D 81739 M nchen...

Reviews: